


To take advantage of this option, your device needs to be compatible with the Canon Camera Connect app. The app is available for Android and iOS (Apple) devices; visit Google Play Store for the Android version and the Apple App store for the iOS version. Be sure to check the app specs to make sure that it's compatible with the version of the operating system on your device.
A few critical points before you start:- You can't transfer movie files over the Wi-Fi connection. Nor can you enable the camera's Wi-Fi functions when the Mode dial is set to Movie mode.
- Wi-Fi features are inoperable while the camera is connected via cable to your computer or a TV set. This restriction puts a crimp in my ability to show you all the camera screens that you see during the connection process. I can record the screens only while the camera is connected to my computer's video-capture card, and as soon as I make that connection, the Wi-Fi is disabled.
I provide as many text cues as I can, but if you hit a snag, check the camera's instruction manual. Toward the back of the manual, Canon provides a quick guide to the Wi-Fi features. For more complete instructions, visit the Canon support site and download the complete camera instruction manual as well as the Wi-Fi manual. Both contain additional information about the wireless functions of your camera.
- The Canon Camera Connect app offers a built-in guide that walks you through the steps of setting up the camera and connecting it to your smart device. To use that guide, just tap Easy Connection Guide on the first screen that appears when you open the app. However, because the guide isn’t specific to your camera, understanding which choices to make as you work your way through the setup steps can be confusing.
How to set up the camera for Wi-Fi functions
Before you can use any of the wireless features, you need to take a few steps:1. Open Setup Menu 3 and choose Wi-Fi/NFC, as shown here.
 Wi-Fi functions are controlled via the two top options on Setup Menu 3.
2. Press Set.
3. On the screen that appears, highlight Enable.
After you do so, the camera displays a check box related to NFC Connectivity.
NFC stands for Near Field Communication. If your smartphone or other smart device is NFC capable, you may be able to establish a connection between it and the camera simply by placing the two devices next to each other. I say may because some devices offer NFC only for limited functions, such as using Apple Pay on an iPhone. Anyway, if your device doesn't offer NFC, press the DISP button to remove the check mark from the NFC box. Press again to enable the option.
4. Press the Set button.You see a screen asking you to enter a nickname for the camera.
5. Press the Set button again.Now you see a keyboard input screen like the one shown. The screen is divided into two sections: the text box, which shows the current nickname, and the keyboard, which you use to enter new characters. In the text box, the yellow line indicates the text cursor.
 The name you enter will be used to identify the camera's wireless network.
6. Enter a camera nickname.
This name will identify your camera on your smart device. By default, the camera name is EOST7, as shown. If that's okay with you, you don't have to change the name; just skip to Step 7.
If you do want to create a custom name, the keyboard works like so:
- Press the Q button to toggle between the text entry box and the keyboard. The blue outline indicates which part of the screen is active. In the figure, the keyboard is active.
- To delete the default nickname: First, press the Q button to activate the text box. Press the right cross key to move the cursor to the end of the text, as shown in the figure. Then press the Erase button; each press deletes one character.
- To enter new text: Again, press Q to toggle to the keyboard if needed. Then use the cross keys or Main dial to highlight a character. To enter the character, press Set. If you make a mistake, press Q to switch back to the text box, move the cursor as needed, and press the Erase button to remove the offending character. To enter an empty space, choose the very first character on the keyboard, highlighted in the figure. (The orange box surrounds the selected character — which, in this case, is an empty space.)
Your camera nickname can be up to 10 characters long.
7. Press the Menu button.You see a confirmation screen.
8. Select OK and press the Set button.Setup Menu 3 appears. The camera is now ready for Wi-Fi connections.
How to transfer images to your smart device
Follow these instructions to connect your camera to your device and transfer photos for the first time. After you make an initial connection, things work a little differently; more on that topic and on NFC connectivity after the steps.1. On the camera, open Setup Menu 3 and choose Wi-Fi Function, located just below the Wi-Fi/NFC option.
The next screen offers four icons.
2. Highlight the phone icon (second icon, top row) and press Set.Now you see the Connection Method screen, which offers two options: Easy Connection and Select a Network.
3. Choose Easy Connection, press Set to highlight OK, and press Set again.On the resulting screen, the camera displays the nickname that you assigned. You also see an encryption key, a string of nine characters that serve as the password to your camera's Wi-Fi network.
4. On your smartphone or tablet, enable Wi-Fi and then open the device’s wireless settings screen.Your camera's nickname should appear on the list of available Wi-Fi networks. If you didn’t assign a nickname, the camera name should start with EOST7 followed by some additional characters.
5. Select the camera name from the list of networks and, when prompted for a password, enter the encryption key shown on the camera monitor.After entering the password, tell the smart device to join the network.
6. On your phone or tablet, exit the settings screen and open the Canon Camera Connect app.If all the planets are in alignment, a screen should appear on your device that indicates that a new camera has been found and asks you to select the camera to finalize the connection.
7. Tap Canon EOS Rebel T7.8. On the camera, press the DISP button to specify which images you want to access.
You can select All Images, images from just the past few days, images assigned a particular rating, or a specific file-number range. If you choose anything but All Images, you can then set parameters for the file selection.
9. After selecting the type of images you want to access, press the Set button as needed to exit the camera screens.The monitor goes dark, and the app shows that the camera is connected. The left screen in gives you a look at the home screen for the iOS version of the app; you get the same options on an Android device, although the window dressing is a little different.
10. On your device, choose Images on Camera.Thumbnails of your images appear, as shown on the right here.
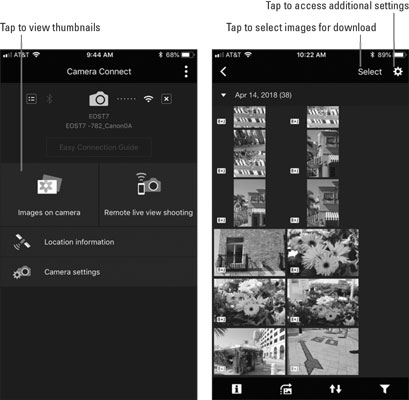 In the Canon Camera Connect app, tap Images on Camera (left) to view pictures stored on the camera memory card (right).
To toggle between the display you see in the figure and one that includes some shooting data for each image, tap the i symbol in the lower-left corner of the screen.
11. To transfer multiple images, tap Select.You see circles next to each thumbnail, as shown on the left. To select an image for transfer, tap its thumbnail to place a checkmark in the circle. Then tap the Download icon, labeled in the figure. You’re asked to specify whether you want to send the image at its original size or a reduced size, as shown on the right in the figure. Tap your choice and then tap OK to transfer a copy of the images to your device.
12. To transfer a single image, return to the main thumbnails screen, tap the photo’s thumbnail, and then tap the Download icon.Again, choose the download size and then tap OK.
 After selecting images for transfer, tap the Download icon (left) and then specify the size of the file that will be saved on your device (right).
That's the basic concept; here are a few more pieces of the puzzle that may help:
- After you get to the thumbnails screen, you can adjust a few aspects of the file transfer by tapping the Settings icon, labeled.
- Where the image files end up depends on how you have picture storage set up on your device. Look for the Canon Camera Connect app in your device's main settings panel to sort this out. You may need to give the app permission to access the photo-storage folder on the device.
- For NFC transfer, look for the camera's NFC thing-a-ma-jiggy on the left side of the camera, just forward of the door that covers the connection ports. I labeled the spot where the NFC connection lives in Figure 10-25. Bring the device's NFC antenna into contact with that mark until a message on the camera monitor says that the connection is established. Then move the two devices apart. At that point, the Camera Connect icon should launch automatically on the device.
- While a Wi-Fi connection is active, the lamp labeled on the right side of the following figure lights. You can't access any camera functions by using the camera's own controls while the devices are connected.
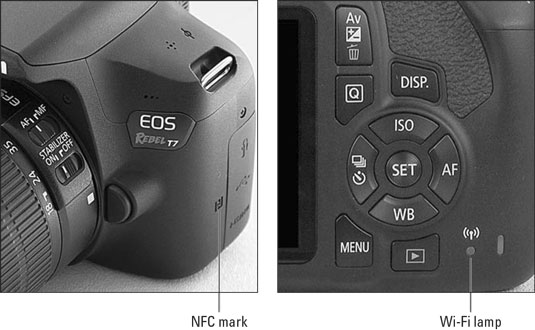 Here's where to find the NFC connection point (left) and the Wi-Fi connection lamp (right).
How to reconnect your devices
After you connect the camera to your smart device for the first time, you no longer have to go through all the steps. Take these steps instead:1. On your camera, open Setup Menu 3 and set the Wi-Fi/NFC option to Enable.
2. On the same menu, choose Wi-Fi Function and then choose the phone icon.
This time, you see a different screen than during initial screen setup. All your previous settings, such as the type of images you want to access, are stored in a “set” — Set 1, by default.
3. To use the same settings as your previous connection, highlight Connect and press Set.4. On the next screen, select OK and press Set.
5. On your smart device, open the device settings screen and select your camera from the list of available wireless networks.
6. On your smart device, open Canon Camera Connect.
The two devices should connect automatically, at which point the camera monitor turns off and you then control things through the app.
If you want to change settings that affect image transfers to your smart device, do so on the camera, from the menu that appears after you choose the phone icon in Step 2. You can opt to review and change settings or delete all settings and start over.To clear all Wi-Fi settings or change the camera’s assigned nickname, stop after choosing Wi-Fi Function in Step 2. When you see the icon screen, press the DISP button to bring up a screen where you can change the camera nickname or restore all Wi-Fi settings to the original, default settings.
One final note: You can set up connections to multiple devices. For example, you can set up one connection for your smartphone and another for a tablet. The two devices don’t even have to run on the same platform — one can be an iOS device and the other, an Android device. The downloadable Wi-Fi instruction manual contains details about creating multiple connections as well as other aspects of fine-tuning your Wi-Fi setup.


