


When you press the shutter button of your Canon EOS 70D halfway, the f-stop, shutter speed, and ISO speed appear in the viewfinder, as shown in Figure 1, and in the Shooting Settings display and LCD panel, as shown in Figure 2. In Live View mode, the exposure data appears at the bottom of the monitor and takes a form similar to what you see in the viewfinder.
The value at the far right of the viewfinder and lower right of the Shooting Settings display — 40, in Figures 1 and 2 — indicates the number of frames that can fit in the camera’s memory buffer when you use the Continuous Drive modes. For purposes of exposure, don’t worry about it.
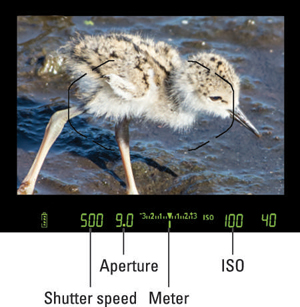

Also be aware that in the viewfinder, LCD panel, and on the monitor in Live View mode, shutter speeds are presented as whole numbers, even if the shutter speed is set to a fraction of a second. For example, for a shutter speed of 1/500 second, you see just the number 500. When the shutter speed slows to 1 second or more, you see quote marks after the number: 1" indicates a shutter speed of 1 second, 4" means 4 seconds, and so on.
In all exposure modes except B (Bulb), the displays also offer an exposure meter, labeled in Figures 1 and 2. The meter serves different purposes depending on your exposure mode:
-
In manual exposure (M) mode, the meter indicates whether your settings will properly expose the image. Figure 3 gives you three examples. When the exposure indicator (the bar under the meter) aligns with the center point of the meter, as shown in the middle example, the current settings will produce a proper exposure. If the indicator moves toward the minus side of the scale, as in the left example in the figure, the image will be underexposed. If the indicator moves to the right of center, as in the right example, the image will be overexposed. The farther the indicator moves toward the plus or minus sign, the greater the potential exposure problem.
 Figure 3: In manual exposure (M) mode, the meter indicates whether exposure settings are on target.
Keep in mind that the information reported by the meter is dependent on the metering mode, which determines what part of the frame the camera uses to calculate exposure. You can choose from four metering modes, covered in the next section.
-
In P, Tv, and Av modes, the meter displays the current Exposure Compensation setting. Remember, in those modes the camera sets either the shutter speed or aperture, or both, to produce a good exposure — again, depending on the current metering mode. Because you don’t need the meter to tell you whether exposure is okay, the meter instead indicates whether you enabled Exposure Compensation, a feature that forces a brighter or darker exposure than the camera thinks is appropriate. When the exposure indicator is at 0, no compensation is being applied. If the indicator is to the right of 0, you applied compensation to produce a brighter image; when the indicator is to the left, you asked for a darker photo.
In some lighting situations, the camera can’t select settings that produce an optimal exposure in the P, Tv, or Av mode, however. Because the meter indicates the Exposure Compensation amount in those modes, the camera alerts you to exposure issues as follows:
-
Av: The shutter speed blinks to let you know that the camera can’t select a shutter speed that will produce a good exposure at the aperture you selected. Choose a different f-stop or adjust the ISO.
-
Tv: The aperture value blinks to tell you that the camera can’t open or stop down the aperture enough to expose the image at your selected shutter speed. Your options are to change the shutter speed or ISO.
-
P: Both the aperture and shutter speed blink if the camera can’t select a combination that will properly expose the image. Your only option is to change the ISO setting.
-
In B (Bulb) mode, you see neither the meter nor the shutter speed in the displays. Remember, in this mode, the shutter stays open as long as you hold down the shutter button, so the camera has no idea what shutter speed you’re going to use or how it will affect the exposure. Instead, the shutter speed readout says Bulb, and the elapsed shooting time (in seconds) appears in the area that normally shows the number of shots remaining.
As for the C mode, which is your custom exposure mode, the way the camera behaves depends on which exposure mode you used as the basis for the custom mode.


