


How you activate Live View depends on whether you want to shoot still photos or movies:
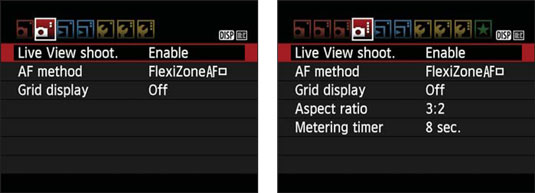
- Live View for still photography: First, ensure that Live View shooting is enabled in the menus. Where you find the option depends on the setting of the Mode dial. In Scene Intelligent Auto, Creative Auto, and Scene modes, it's found on Shooting Menu 2, as shown on the left in the figure. In the P, Tv, Av, and M modes, the Live View option is found on Shooting Menu 4, as shown on the right in the figure.
 If Live View mode doesn't activate, make sure that the Live View Shoot menu option is enabled.
Why set the menu option to Disable? Because it's easy to hit the Live View button accidentally and switch to Live View when you don't really want to go there.
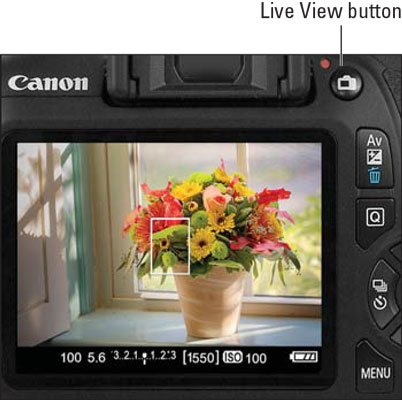
After enabling the feature on the menu, press the Live View button, labeled in the following figure. You hear a clicking sound as the internal mirror that normally sends the image from the lens to the viewfinder flips up. Then the scene in front of the lens appears on the monitor, and you can no longer see anything in the viewfinder. Data representing certain camera settings is displayed over the live image, as shown. You can press the DISP button to change the type of data that appears.
To exit Live View mode and return to using the viewfinder, press the Live View button again.
- Live View for recording movies: Rotate the Mode dial to the Movie mode icon. Live View engages automatically, and you then press the Live View button to start and stop recording. To exit Movie mode, rotate the Mode dial to any other exposure mode.
 In Live View mode, picture data is superimposed over the live preview.
In many ways, shooting photos in Live View mode is the same as for viewfinder photography, but some important aspects, such as autofocusing, work very differently.
Canon EOS Rebel T7/2000D Live View safety tips
Be aware of the following precautions when you use Live View and Movie modes:- Cover the viewfinder to prevent light from seeping into the camera and affecting exposure. The camera ships with a cover designed just for this purpose. In fact, it’s conveniently attached to the camera strap. To install it, first remove the rubber eyecup that surrounds the viewfinder by sliding it up and out of the groove that holds it in place. Then slide the cover down into the groove and over the viewfinder. (Orient the cover so that the Canon label faces the viewfinder.)
- Using Live View or Movie mode for an extended period can harm your pictures and the camera. Using the monitor full-time causes the camera’s innards to heat up more than usual, and that extra heat can create the right conditions for noise, a defect that looks like speckles of sand. More critically, the increased temperatures can damage the camera. A thermometer symbol appears near the right edge of the monitor to warn you when the camera is getting too hot. (Refer to the top-right screen for a look at this symbol.) Initially, the symbol is white. If you continue shooting and the temperature continues to increase, the symbol turns red and blinks, alerting you that the camera soon will shut off automatically. But it's not a good idea to keep shooting after the icon initially appears because image quality can degrade. Instead, turn the camera off and give it a chance to cool off.
- Aiming the lens at the sun or other bright lights also can damage the camera. Of course, you can cause problems doing this even during normal shooting, but the possibilities increase when you use Live View and Movie mode.
- Live View and Movie modes put additional strain on the camera battery. The extra juice is needed to power the monitor for extended periods of time. If you do a lot of Live View or movie shooting, you may want to invest in a second battery so that you have a spare on hand when the first one runs out of gas.
- The risk of camera shake during handheld shots is increased. When you use the viewfinder, you can help steady the camera by bracing it against your face. But when you compose shots using the monitor, you have to hold the camera away from your body to view the screen, making it harder to keep the camera absolutely still. Any camera movement during the exposure can blur the shot, so using a tripod is the best course of action for Live View photography and movie recording.
Customize the Canon EOS Rebel T7/2000D Live View display
In Live View mode, press the DISP button to change the amount and type of data that appears on the monitor. Again, the data readout depends on the current exposure mode and whether you’re shooting stills or movies. This figure shows the four styles you can use when shooting still photos in the P, Tv, Av, or M exposure modes. In Movie mode, some data changes to show movie-recording options instead of still-photography settings, and the histogram display shown at the lower left is not available.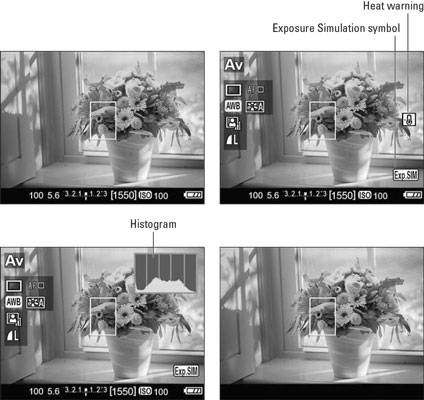 Press the DISP button to cycle through the Live View display styles.
A histogram is a tool you can use to gauge exposure. But note that when you use flash, the histogram is dimmed; it can’t display accurate information because the final exposure will include light from the flash and not just the ambient lighting. In addition, the histogram dims when you set the shutter speed to Bulb, a special setting available only in the M (Manual) exposure mode. Bulb mode keeps the shutter open for as long as you hold down the shutter button. The camera can't predict how long you're going to hold that button down, so it can't create a histogram that will reflect your final exposure.
Also note the little box labeled Exposure Simulation. This symbol, which appears in two display modes, indicates whether the monitor is simulating the actual exposure that you'll record. If the symbol blinks or is dimmed, the camera can’t provide an accurate exposure preview, which can occur if the ambient light is either very bright or very dim. Exposure Simulation is also disabled when you use flash in Live View mode.A thermometer appears if the camera gets so hot that it needs to shut down to avoid damaging itself. I labeled this symbol Heat warning.
You can make these additional tweaks to the Live View display:
- Display an alignment grid. To assist you with composition, the camera can display a grid on the screen, as shown on the left in the following figure. In fact, you can choose from two grid styles. Where you turn the grid on depends on your exposure mode. In P, Tv, Av, or M modes, the option appears on Shooting Menu 4, as shown on the right. In other still photography modes, Shooting Menu 2. In Movie mode, look for the option on Movie Menu 2.
- Adjust the exposure-data shutdown timing. By default, exposure information such as f-stop and shutter speed disappears from the display after 8 seconds if you don’t press any camera buttons. If you want the exposure data to remain visible for a longer period, you can adjust the shutdown time when you shoot in P, Tv, Av, or M exposure mode. Make the change via the Metering Timer option, which lives on Shooting Menu 4 for still photography. In Movie Mode, the same option resides on Movie Menu 2. The metering mechanism uses battery power, so the shorter the cutoff time, the better.
 You can display a grid as an alignment aid.


