


The built-in flash on your Canon EOS 70D offers an easy, convenient way to add light to a dark scene. Whether you can use flash depends on your exposure mode, as outlined in the next few sections.
Using flash in the fully automatic modes
Whether flash is available and how much control you have over it depends on the exposure mode. Here's how things shake out:
Flash Off and Landscape, Sports, and HDR Backlight Control Scene modes: Flash is disabled.
Scene Intelligent Auto, Creative Auto, and Portrait and Close-up Scene modes: Choose from three flash settings:
Auto flash: The camera decides when to fire the flash, basing its decision on the lighting conditions.
On: The flash fires regardless of the lighting conditions. You may hear this flash mode referred to as force flash because the camera is forced to trigger the flash even if its exposure-brain says there's plenty of ambient light. This flash mode is sometimes also called fill flash because it's designed to fill in shadows that can occur even in bright light. Whatever you call it, this option causes the flash to pop up as soon as you press the shutter button halfway. The flash will fire for subsequent shots until you change the flash mode to Auto or Off.
Off: The flash does not fire, no way, no how. Even if the built-in flash is raised because you used it on the previous shot, it still won't fire.
Night Portrait Scene mode: Auto flash is used for this mode; the camera decides whether flash is needed.
Handheld Night Scene mode: In this exposure mode, the camera takes four frames in rapid succession and merges them to get a sharper result than you might otherwise obtain when hand-holding the camera in dim lighting. By default, flash is turned off, and this is the best choice if you're shooting landscapes. If you're photographing people or a close-up subject at night, you can enable flash to help illuminate the subject. The flash will fire on the first shot only; warn people to keep smiling until all four frames are captured.
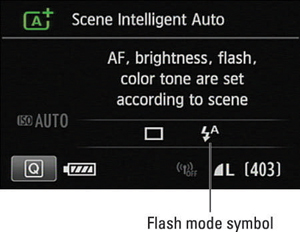
For exposure modes that allow flash, you can view the current flash setting in the Shooting Settings screen. The figure below shows you how the screen appears in Scene Intelligent Auto mode.
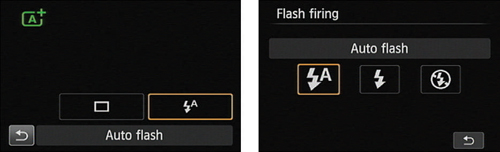
To change the flash setting, press Q to bring up the Quick Control screen. The left screen in the figure below shows you how the screen looks in Scene Intelligent Auto mode. Next, highlight the Flash mode setting, as shown in the figure, and then rotate the Main dial or Quick Control dial to cycle through the available settings. Or, if you prefer, tap the flash icon or press Set to display all your choices on one screen, as shown on the right in the figure. Make your selection and then tap the return arrow or press Set to go back to the Quick Control screen. Then press the Q button again or give the shutter button a quick half-press to exit the Quick Control screen.
Enabling flash in advanced exposure modes
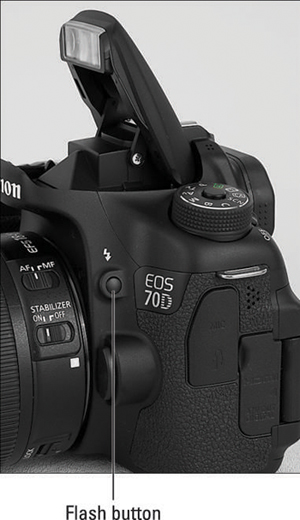
In the advanced exposure modes, you don't choose from the Auto, On, and Off flash modes as you do for some of the automatic shooting modes. Instead, if you want to use the built-in flash, you press the Flash button on the side of the camera. (See the figure below.) The flash pops up and fires on your next shot. Don't want flash? Just close the flash unit.
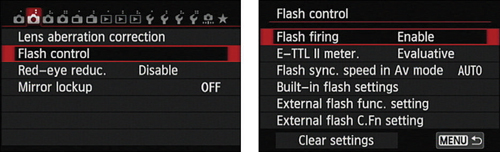
You do, however, have access to flash options that aren't available in the fully automatic exposure modes. Until you're ready to dig into those features, just make sure that flash firing is enabled. Bring up Shooting Menu 2, select Flash Control, and verify that Flash Firing is set to Enable, as illustrated in the following figure.
Using Red-Eye Reduction flash
For any exposure mode that permits flash, you can enable a Red-Eye Reduction feature. When you turn on this feature, the Red-Eye Reduction lamp on the front of the camera lights when you press the shutter button halfway. The light constricts the subject's pupils, which helps reduce the chances of red-eye. The flash fires when you press the shutter button the rest of the way. Turn the feature on and off via Shooting Menu 2, as shown in the figure below.

The viewfinder, LCD panel, and Shooting Settings display don't offer any indication that Red-Eye Reduction is enabled. However, the Camera Settings screen displays a little eyeball icon and the word Enable or Disable. To display the screen, press the Info button until it appears.
After you press the shutter button halfway in Red-Eye Reduction flash mode, a row of vertical bars appears in the center of the viewfinder data display. A few moments later, the bars turn off one by one. For best results, wait until all the bars are off to take the picture. (The delay gives the subject's pupils time to constrict in response to the Red-Eye Reduction lamp.) In addition, when you use the default autofocusing settings, the built-in flash may pulse briefly to help the camera find its focusing target; you can disable this feature via the AF-Assist Beam Firing option, found in the Autofocus Custom Functions category.


