


The Drive mode setting tells your Canon EOS 70D what to do when you press the shutter button: Record a single frame or a series of frames, or record one or more shots after a short delay.
Your camera offers the following Drive modes:
Single: This setting, which is the default for all exposure modes except the Portrait and Sports Scene modes, records a single image each time you press the shutter button. In other words, this is normal photography mode.
Continuous: Sometimes known as burst mode, this mode records a continuous series of images as long as you hold down the shutter button.
You can choose from two burst-mode settings:
High-speed continuous: At this setting, the camera can capture a maximum of about 7 frames per second (fps). This setting is the default for Sports Scene mode.
Low-speed continuous: This setting drops the maximum capture rate to about 3fps. It's the default for Portrait Scene mode.
Why would you want to capture fewer than the maximum number of shots? Well, frankly, unless you're shooting something that's moving at a really, really fast pace, not too much is going to change between frames when you shoot at 7 fps.
Keep in mind that the number of frames you can record per second depends in part on your shutter speed. To achieve 7 fps at the High-speed Continuous setting, you need a shutter speed of 1/500 second or faster. Also, some other functions, such as using flash, slow down the capture rate. The speed of your memory card plays a role in how fast the camera can capture images, too.
Silent Single Shooting: Although your camera isn't entirely silent in this mode, some sounds are less audible than in normal Single mode. There's a drawback, though: The delay that occurs between the time you press the shutter button and the picture is recorded — shutter lag, in photo lingo — is slightly longer than with the normal Single mode.
Silent Continuous Shooting: This mode, too, tries to dampen some camera sounds while permitting you to fire off about three frames a second. The warning about shutter lag time applies here, too.
In some autofocusing situations, the camera beeps when focusing is achieved even in the silent modes. To silence that sound, set the Beep option on Shooting Menu 1 to Disable.
10-Second Self-Timer/Remote Control: Want to put yourself in the picture? Select this mode, depress the shutter button, and run into the frame. You have about 10 seconds to get yourself in place and pose before the image is recorded. If you change your mind in the meantime, you can cancel the self-timer countdown by pressing the Drive button.
You can also use the self-timer function to avoid any possibility of camera shake. The mere motion of pressing the shutter button can cause slight camera movement, which can blur an image. Put the camera on a tripod and then activate the self-timer function. This enables "hands-free" — and therefore motion-free — picture taking.
As an alternative, purchase one of the Canon remote-control units. You can opt for a wireless unit or one that plugs into the remote-control terminal on the left side of the camera. Either way, set the Drive mode to this option or the following one when you want to trigger the shutter release with the remote control.
Your camera offers one other remote-trigger option, too: You can connect the camera wirelessly to a smartphone, tablet, or computer and trigger the shutter release through that device.
2-Second Self-Timer/Remote Control: This mode is available only in P, Tv, Av, M, and C exposure modes. It works just like the other Self-Timer/Remote Control mode but with just a 2-second capture delay.
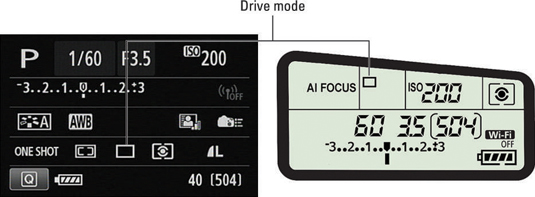
You can view the current Drive mode in the Shooting Settings screen and the LCD panel, in the areas labeled in the figure below.
To change the Drive mode, you have two options:
Drive button: Press the Drive button on the top of the camera to display the available modes on the monitor, as shown in the figure below. Tap the setting you want to use or highlight it by using the Main dial, the Quick Control dial, or the Multi-controller. To lock in your choice, tap the return arrow or press the Drive button or the Set button.
 You can access all these Drive options only in advanced exposure modes.
In the LCD panel, all data except the Drive mode disappears as soon as you press the Drive button. As you change the setting, the icon updates to show the currently selected option. Press the Drive button again or press Set after you choose your setting.
Quick Control screen: After activating the Quick Control screen, highlight the Drive mode icon, as shown in the following figure. The name of the current setting appears at the bottom of the screen. Rotate the Main dial to cycle through the available Drive mode options. Alternatively, tap the Drive mode icon or highlight it and press Set to access the same selection screen featured in the preceding figure.
 You also can change the Drive mode setting via the Quick Control screen.
Your selected Drive mode remains in force until you change it or switch to an exposure mode for which the selected Drive mode isn't available.


