


Your Canon Rebel t5i offers automatic White Balance Bracketing. With this feature, the camera records the same image three times, using a slightly different white balance adjustment for each one. You might try this feature to experiment with different color takes on a scene, for example.
Note a couple of things about this feature:
Because the camera records three images each time you press the shutter button, White Balance Bracketing reduces the maximum capture speed that’s possible when you use the Continuous shooting mode. Of course, recording three images instead of one also eats up more space on your memory card.
The White Balance Bracketing feature is designed around the same grid used for White Balance Correction. As a reminder, the grid is based on two color pairs: green/magenta and blue/amber.
When White Balance Bracketing is enabled, the camera always records the first of the three bracketed shots using a neutral white balance setting — or, at least, what it considers to be neutral, given its own measurement of the light. The second and third shots are then recorded using the specified shift along either the green/magenta or blue/amber axis of the color grid.
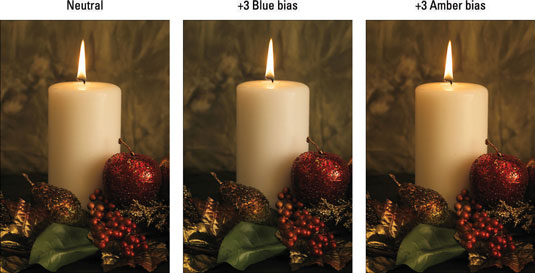
These images were shot using a single tungsten studio light and the candlelight. White Balance Bracketing was set to work along the blue/amber color axis. The camera recorded the first image at neutral, the second with a slightly blue color bias, and the third with an amber bias.
To enable White Balance Bracketing, follow these steps:
Set the Mode dial to P, Tv, Av, or M.
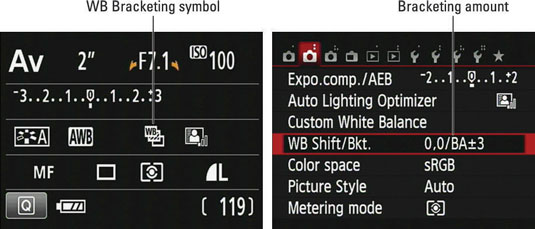
Display Shooting Menu 2 and choose WB/Shift Bkt.
It's the same screen that pops up for the White Balance Correction feature.

Rotate the Main dial to set the amount and direction of the bracketing shift.
Rotate the dial as follows to specify whether you want the bracketing to be applied across the horizontal axis (blue to amber) or the vertical axis (green to magenta).
Blue to amber bracketing: Rotate the dial right.
Green to magenta bracketing: Rotate the dial left.
As you rotate the dial, three markers appear on the grid, indicating the amount of shift that will be applied to your trio of bracketed images. You can apply a maximum shift of plus or minus three levels of adjustment.
You also can tap the markers on either side of the word Bracket, at the bottom of the screen. Tap the right arrow to move markers along the blue to amber axis; tap the left one to move the markers along the green/blue axis. After you reach the maximum marker positions (+/-3), the arrow dims and then you can tap the opposite arrow to lower the bracketing amount.
The BKT area of the screen also indicates the shift; for example, the display shows a bracketing amount of plus and minus three levels on the blue/amber axis. As you can see, even at the maximum shift (+/–3), the difference to the colors is subtle.
If you want to get truly fancy, you can combine White Balance Bracketing with White Balance Shift.
Tap the Set icon or press the Set button to apply your changes and return to the menu.
On Shooting Menu 2, the value after the slash shows you the bracketing setting. (The two values to the left of the slash indicate the White Balance Shift amount.) The Camera Settings display, which you bring up by pressing Info twice when the Shooting Settings screen is displayed, also reports the bracketing setting.
The bracketing setting remains in effect until you turn off the camera. You can also cancel bracketing, rotating the Main dial until you see only a single grid marker. You also can wipe out both your bracketing setting and any White Balance Shift amount by pressing the Erase button or tapping its icon. Either way, tap Set or press the Set button to officially turn off bracketing.
Although White Balance Bracketing is a fun feature, if you want to ensure color accuracy, creating a custom White Balance setting is a more reliable idea than bracketing white balance; after all, you can’t be certain that shifting the white balance a couple steps is going to produce accurate colors.
If you’re comfortable with shooting in the Raw format, that’s the best color safety net, however: You can assign a White Balance setting when you process the Raw images, whether you’re after a neutral color platform or want to lend a slight color tint to the scene.

