


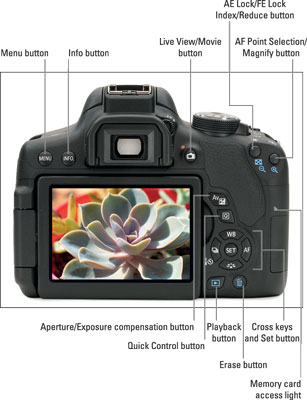
On the back of the Canon Rebel T6i/750D camera, you encounter the smorgasbord of controls shown in this figure. With the exception of Menu and Info, buttons with a white icon perform shooting mode functions; buttons with blue icons are used in playback. Some buttons sport dual colors, meaning that they come into play for both functions.
In addition, some buttons have multiple "official" names because they serve multiple purposes depending on whether you're taking pictures, reviewing images, recording a movie, or performing some other function. In this book, we refer to these buttons by the first label you see in the following list to simplify things. For example, we refer to the AF Point Selection/Magnify button as the AF Point Selection button. Again, though, the margin icons show you exactly which button you should press.
With that preamble out of the way, it's time to explore the camera back, starting at the top‐right corner and working westward (well, assuming that your lens is pointing north, anyway):
AF Point Selection/Magnify button: In certain shooting modes, you press this button to specify which autofocus points or zones you want the camera to use when establishing focus. In Playback mode, you use this button to magnify the image display (thus the plus sign in the button's magnifying glass icon). You can also use it to magnify the display when in Live View or Movie modes (as long as you are in one of the two FlexiZoneAF focus modes).

AE Lock/FE Lock/Index/Reduce button: During shooting, you press this button to lock autoexposure (AE) settings and to lock flash exposure (FE).

This button also serves two image‐viewing functions: It switches the display to Index mode, enabling you to see multiple image thumbnails at once, and it reduces the magnification of images when displayed one at a time.
Live View/Movie button: Press this button to shift to Live View mode, which enables you to compose your pictures using the monitor instead of the viewfinder. When shooting movies, you press the button to start and stop recording. (You must first set the On/Off/Movie switch to the Movie position.)

After you shift to Live View or Movie mode, certain buttons perform different functions than they do for viewfinder photography.
Aperture/Exposure Compensation button: When you shoot in the M (manual) exposure mode, press this button and rotate the Main dial to choose the aperture setting, also known as the f‐stop. In the other advanced exposure modes (P, Tv, and Av), you instead use the button and dial to apply Exposure Compensation, a feature that enables you to adjust the exposure.

Q (Quick Control) button: Press this button to display the Quick Control screen, which gives you one way to adjust picture settings.

Memory card access light: This light glows while the camera is recording data to the memory card. Don't power off the camera while the light is lit, or you may damage the card or camera.
Set button and cross keys: The figure points out the Set button and the four surrounding buttons, known as cross keys. These buttons team up to perform several functions, including choosing options from the camera menus. You use the cross keys to navigate through menus and then press the Set button to select a specific menu setting.
The instruction "Press the left cross key" means to press the one to the left of the Set button, "press the right cross key" means to press the one to the right of the Set button, and so on.
During viewfinder photography — that is, when you're using the viewfinder and not the monitor to frame your shots — the cross keys also have individual responsibilities, which are indicated by their labels:
Press the up cross key to change the White Balance setting. The White Balance control enables you to ensure that colors are rendered accurately.
Press the right cross key to adjust the AF mode. This option controls one aspect of the camera's autofocus behavior.
Press the left cross key to change the Drive mode. The Drive mode settings enable you to switch the camera from single‐frame shooting to continuous capture or any of the other drive modes.
Press the down cross key to change the Picture Style. Picture Styles can be used to adjust the color, contrast, and sharpness of your pictures.
Playback button: Press this button to switch the camera into picture‐review mode.

Erase button: Sporting a trash can icon, the universal symbol for delete, this button lets you erase pictures from your memory card during playback.

Info button: In Live View, Movie, and Playback modes, pressing this button changes the picture‐display style.
During shooting, you can press the Info button to switch from the Shooting Settings display to the Camera Settings display.
Menu button: Press this button to access the camera menus.


