


Scattered across the Canon EOS 70D's exterior are a number of buttons, dials, and switches that you use to change picture-taking settings, review and edit your photos, and perform various other operations. Here's a quick introduction to the topside and back-of-body controls.
Topside controls on the Canon EOS 70D
Your virtual tour begins on the top of the camera, shown in the following figure. The items of note here are:
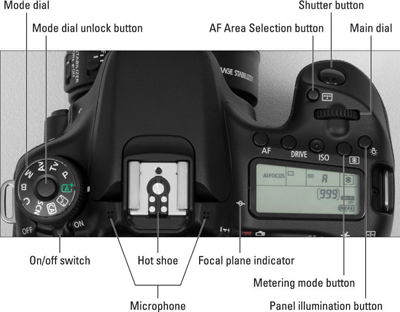
On/Off switch: By default, the camera automatically shuts itself off after one minute of inactivity to save battery power. To wake up the camera, press the shutter button halfway or press the Menu, Info, or Playback button. You can adjust the auto shutdown timing via the Auto Power Off option on Setup Menu 2.
Mode dial: Through this dial, you select an exposure mode, which determines whether the camera operates in fully automatic, semi-automatic, or manual exposure mode. To adjust the setting, press and hold the unlock button in the center of the dial as you rotate the dial.
Hot shoe: The hot shoe is a metal bracket on which you can affix an external flash (or other hot shoe accessory). It's called a hot shoe because it's wired to communicate back and forth from the camera using electrical signals. Don't go poking around the hot shoe: the flash-sync contacts (the little round metal posts) need to be clean and free of debris to work properly.
Microphone: These two clusters of holes lead to the stereo microphone that picks up sound when you record movies.
AF Area Selection button: This button enables you to change the AF Area Selection setting, an autofocus feature.
Drive button: This button switches between the various shutter-release (drive) modes, such as single frame, self-timer, or high-speed continuous.
ISO button: Press this button to access the ISO speed setting, which determines how sensitive the camera is to light.
Metering mode button: This button enables you to choose the camera's metering mode, which determines which part of the scene the camera uses to set exposure.
AF button: This button is related to the AF mode setting, which determines when the camera locks focus when you use autofocusing.
Main dial: You use this dial, labeled in the above figure, when selecting many camera settings.
Shutter release button: You probably already understand the function of this button, but what you may not realize is that when you use autofocus and autoexposure, you need to use a two-stage process when taking a picture: Press the shutter button halfway, pause to let the camera set focus and exposure, and then press the rest of the way to capture the image. You'd be surprised how many people mess up their pictures because they press that button with one quick jab, denying the camera the time it needs to set focus and exposure.
LCD panel illumination button: This button illuminates the top LCD panel with an amber backlight.
Focal plane mark: Should you need to know the exact distance between your subject and the camera, the focal plane indicator is key. This mark indicates the plane at which light coming through the lens is focused onto the image sensor.
Back-of-the-body controls on the Canon EOS 70D
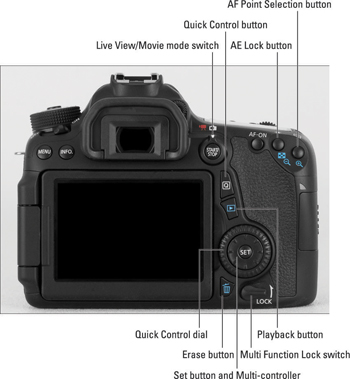
Traveling over the top of the camera to its back, you encounter the smorgasbord of controls shown in the figure below. The list is just to get you acquainted with the possibility of what you can accomplish with all these features.
Menu button: Press this button to access the camera menus.
Info button: By default, pressing this button during shooting displays the Camera Settings screen; pressing again displays the Electronic Level; and pressing a third time displays the Shooting Settings display. A fourth press of the button turns the monitor off.
Live View/Movie mode button and switch: Live View is the camera feature that enables you to compose photos using the monitor instead of the viewfinder. To shift to this mode, first move the switch to the camera icon above the Start/Stop button. Then press the button to engage Live View; press again to return to regular (viewfinder) shooting.
To enter Movie mode, move the switch to the red movie camera icon. The live scene appears on the monitor, and you can then press the Start/Stop button to start and stop recording.
AF-ON button: Just like pressing the shutter button halfway, pressing this button initiates autofocus.
AE Lock/FE Lock/Index/Reduce button: As you can guess from the official name of this button, it serves many purposes. The first two are related to still-image capture functions: You use the button to lock in the autoexposure (AE) settings and to lock flash exposure (FE). When using Live View and Movie modes, this button serves only as an exposure lock.
This button also serves two image-viewing functions: It switches the display to Index mode, enabling you to see multiple image thumbnails at once, and it reduces the magnification of images when displayed one at a time.
AF Point Selection/Magnify button: When you use certain advanced shooting modes, you can press this button to specify which of the autofocus points you want the camera to use when establishing focus. In Playback, Live View, and Movie modes, you use this button to magnify the image display (thus the plus sign in the button's magnifying glass icon).
Quick Control, or Q, button: You press this button to enter Quick Control mode, which offers one avenue for changing critical picture-taking settings..
Playback button: Press this button to switch the camera into picture-review mode.
Set button and Multi-controller: The figure above points out the Set button and surrounding controller, known as the Multi-controller. These buttons team up to perform several functions, including choosing options from the camera menus.
You work the Multi-controller by pressing one of the eight tiny arrows around its perimeter.
Quick Control dial: The Quick Control dial surrounds the Set button and the Multi-controller. Rotating the dial offers a handy way to quickly scroll through options and settings.
Erase button: Sporting a trash can icon (the universal symbol for delete), this button erases pictures from your memory card.
Multi Function Lock switch: You can rotate this switch up, in the direction of the arrow, to lock the Quick Control dial so that you don't accidentally move the dial and change a camera setting that you aren't intending to modify. If you want an even larger safety net, you can set things up so that the switch also locks the Main dial and the Multi-controller.


