


And don’t be quick to delete flawed photos — you may be able to fix them in a photo-editing program or mobile photo app. Your camera may even have some retouching tools built in. This article offers tips to help you avoid common picture problems and covers some tools that help you repair mistakes after the fact.
A few easy exposure fixes
Autoexposure is a beautiful thing, sparing you the task of choosing (and fully understanding) all of the exposure settings your camera offers. But sometimes, the autoexposure system delivers a picture that’s darker or brighter than you have in mind. When that happens, you may be able to get the result you want by using one of the following solutions:- Turn on exposure compensation. This common exposure-correction tool, usually represented by a plus/minus sign like the one in the margin here, tells the camera to increase or decrease exposure for your next shot. The default setting is EV 0.0, which applies no adjustment. (EV stands for exposure value.) Raise the value for a brighter exposure; lower the value to get a darker result. The image below shows an example of a scene that benefited from applying an exposure compensation value of EV +1.3.
 For a brighter image, raise the exposure compensation value.
 - Add flash. When the light is behind your subject, the camera may mistakenly underexpose the subject, as shown at the top in the image below Using flash typically solves the problem; the bottom image offers an example of the change you can expect. This solution assumes that you’re close to your subject, though; a built-in flash usually can’t reach farther than about 10 to 15 feet from the camera.
 When subjects are in front of the light, use flash to better illuminate them.
 - Investigate camera modes designed for high-contrast scenes. A high-contrast scene is one that contains both very dark and very bright areas. When you shoot in Auto mode, you often get a result like the one on the left below, where the brightest areas are almost white and yet the shadows are a little too dark. Many digital cameras now offer settings designed to produce a much better result, like the one shown on the right. These tools go by various names depending on the camera, and they work in a couple of different ways. For this image, a mode known generically as automatic HDR (high dynamic range) was used.
 Many digital cameras offer tools designed to deliver better results than Auto mode when you shoot high-contrast scenes.
Avoid blurry pictures
A blurry photo can result from a number of issues, each of which requires a different solution. Here are some quick tips to help you sidestep three common causes of out-of-focus photos:- Mount the camera on a tripod to avoid camera shake. An image that's blurry throughout the whole frame, like the one shown on the left in the image below, is due to camera shake (movement of the camera during the time the picture is being exposed). If you don't have a tripod handy, try raising the shutter speed. A shorter exposure time increases the odds of a shake-free handheld shot because you don't have to hold the camera still as long. Also enable image stabilization, if your camera or lens offers that feature, which is designed to compensate for a little camera shake.
 Allover image blur (left) is usually due to camera movement during the exposure; use a tripod to eliminate the problem (right).
 - When autofocusing, compose the shot so that your subject falls under the active focus point. By default, most cameras focus on the object closest to the lens or at the center of the frame. Many cameras enable you to specify a different focus point, however. On touchscreen cameras, you often can simply tap your subject on the screen to set focus on that area
- Use a fast shutter speed to capture moving subjects without blur. How fast a shutter speed you need depends on how fast your subject is moving. If you can't control shutter speed on your camera, see whether it offers a Sports scene mode, which is designed to use the fastest shutter speed possible.
- If your camera has a viewfinder, be sure to adjust it to your eyesight. Otherwise, scenes that are in focus may appear blurry, and vice versa.
Scan the frame before you shoot
At first glance, the left photo below looks like a winner. The exposure is fine, focus is sharp, and the subjects appear happy and relaxed. But on closer inspection, the astute portrait photographer notices two frame-spoiling issues: a tree appears to be growing out of the head of the male subject; and the black purse strap on the woman's shoulder draws the eye away from her face.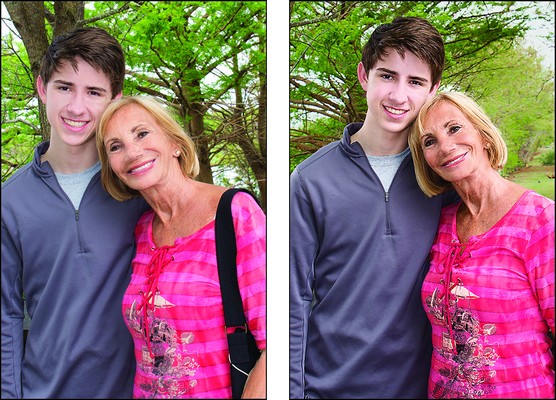 The tree directly behind the head of the male subject, along with the bag on the woman's shoulder, marred the left portrait; eliminating those distractions produced the better image on the right.
In this case, the fix was easy. Before the second shot was taken, the subject put down her bag, and then the photographer moved the pair a few feet to the right of the tree. Sometimes, though, you need to work a little harder to eliminate distracting elements. Look for a camera angle that doesn't include nearby objects, for example. Another option is to shoot with a telephoto lens, which includes less background than a wide-angle lens.
Blur a busy background
If you can't eliminate intrusive background objects, you can diminish their impact by using settings that throw the background out of focus — in photo terms, produce a shallow depth of field. The scene shown below offers an exampleThe photographer wanted to take a photo of the paella pan because the dish was so colorful and interesting. But with other dinner guests eager to dig in, there wasn’t enough time to completely arrange the background objects. So, the shallowest possible depth of field was used to blur everything except the pan and its contents. The bread bowl and other dishes add some interest to the background, but because they’re blurry, they don't compete with the star of the show.
 A shallow depth of field blurs background objects, making them less visually intrusive.
You can reduce depth of field in three ways: by setting the aperture to a low f-stop value; using a lens that has a long focal length; and getting closer to your subject.
Level the horizon
It’s often difficult to keep the camera level when handholding shots like the one below. In this case, the horizon line tilts noticeably downward to the right. Either the ocean is sliding off the edge of the earth or the photographer didn't hold the camera level when shooting the picture.
A fail-safe solution is to mount the camera on a tripod that has a built-in level. But here are two other options:
- Enable a viewfinder or monitor alignment grid, if available on your camera. For example, the image below offers a look at a viewfinder grid. Check your camera manual to find out whether you have this feature and, if so, how to enable it.
 Some cameras enable you to display a grid in the viewfinder to help you frame your shot.
 - Apply a straighten tool in your photo-editing program. Even most free programs offer this type of tool. On computers running the latest iteration of Windows 10, for example, the free Photos program shown below does the trick. You simply click the Straighten button, and the program automatically rotates the horizon so it's level. In other programs, you may instead need to drag the mouse across a line that should be horizontal (or vertical). The software rotates the image as needed based on that input.
Cameras that have built-in retouching tools sometimes offer a leveling tool as well. It often goes by the name Straighten tool.
 Windows Photos offers an easy-to-use straightening tool.
 The straightened image contains slightly less image area than the original, which is an unavoidable result of the correction.
Crop away excess background from your photos
To crop an image means to trim away some of the perimeter of the photo. Cropping enables you to eliminate excess background when circumstances didn’t enable you to get close enough to your subject to fill the frame when shooting the photo. You may also want to crop a photo to produce an image that fits a particular frame size or to create a composition that you didn’t capture in the original image.Some cameras have built-in tools that make a cropped copy of the original photo. If your camera doesn't, any photo editor should offer one. You can also find crop tools in most photo apps for phones and tablets. Look below to see a crop in progress, this time featuring the Gallery app available on some Android mobile devices.
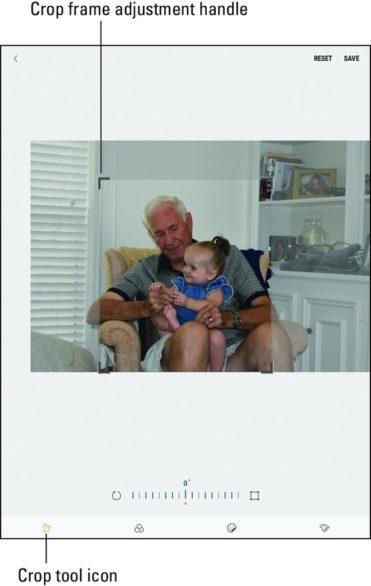 After selecting the crop tool, adjust the boundaries of the crop box to control how much background to eliminate.
Notice the crop tool symbol; this shape is the standard crop-tool icon. It's designed to look like the mechanical cropping tools used in film-printing darkrooms, in case you're wondering. In the digital world, all crop tools operate pretty much the same way: After you see an initial cropping frame, you drag the edges of the frame as needed to adjust it.
Sometimes, you see special corner handles to drag. When you execute the crop, areas outside the crop frame are clipped away, and you can then save your cropped photo. Give the cropped version a new name if you want to retain the original file.
If the photo also needs straightening or distortion or perspective correction, make those changes before you crop. You want all the original pixels available to make these types of corrections because they result in the loss of some image area.
Solve color miscues
If image colors appear off when you review pictures on your camera monitor, try adjusting the white-balance setting and retaking the shot. This setting is designed to compensate for the colors cast produced by different types of lighting.Normally, the default setting, AWB (automatic white balance) works well. But when more than one type of light is hitting the subject, the camera can get confused and render colors inaccurately. Most cameras enable you to dump out of AWB mode and select an option geared to a specific type of light. Choose the one that matches the most prominent light source. If your camera offers a live preview, the monitor will reflect the change so that you can find the setting that works best for the scene.
It’s a good idea to reset the camera to AWB after you finish shooting the scene that caused you to switch from that setting. Otherwise, you can easily forget that the camera is set up for a specific light source and end up with wildly incorrect colors on your next shoot. That very mistake was made in the first image below.
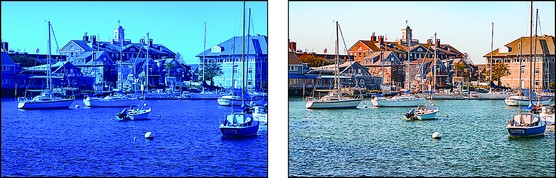 The strong blue cast in the left image happened because the photographer mistakenly used a white-balance setting designed for indoor lighting; switching to automatic white balance (AWB) fixed the problem.
Turn down the noise
Noise is a digital defect that has the appearance of small grains of sand, as shown below. Noise can occur for two reasons: A high ISO (light sensitivity) setting and/or a long exposure time (slow shutter speed). Here's a close-up look at image noise, which can be caused by a high ISO setting, long exposure time, or both.
To lessen the chances of noise, then, shoot with the lowest ISO setting and the fastest shutter speed that enable you to expose the picture given the lighting conditions and the aperture (f-stop setting) you want to use.
Deal with dust spots and lens flare
Starting to see dark spots — or just a single spot, like the one you see below — on your images? It could be that you have dirt or dust on your lens, in which case a careful cleaning will resolve the problem. If the spots remain, it’s fairly certain that debris on your image sensor is the problem. (The image sensor is the part of your camera that absorbs light and converts it into a digital image.)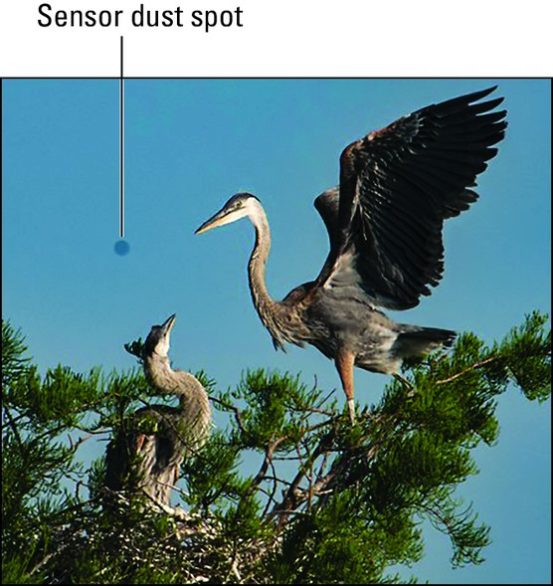 This spot was caused by dust or dirt on the image sensor.
Most cameras have an internal sensor-cleaning system, so check the instruction manual to find out how to perform a cleaning cycle. No luck? Take your camera to a repair shop to have the sensor cleaned manually. On removable-lens cameras, you can take off the lens and try to do the job yourself, but you can easily damage the sensor if you're not careful. This is often best left to the pros
Don’t confuse the type of spot seen above with the one you see in the image below, which is caused by an entirely different issue: Light hitting the lens at just the right angle caused lens flare. Some lenses come with a lens hood that’s designed to shield the lens from the stray beams of light that cause lens flare; you can see one on the right below. You also can just hold your hand above the lens in a position that eliminates the flare. You’ll be able to see the flare in the viewfinder or monitor after you compose your shot.
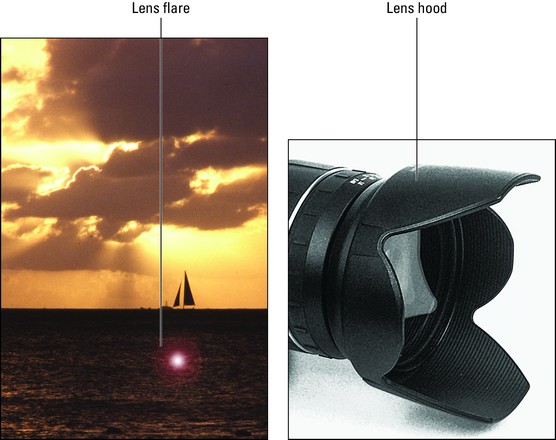 Bright spots like the one in this photo are caused by lens flare, not sensor dust.
Watch out for weird halos
The image you see below displays a defect that is more and more common these days: large halos of white along the borders between light and dark areas of the photo — in this case, the areas where the palm fronds meet the sky. The white halos around the palm branches are the result of applying an excessive amount of shadow recovery to the photo.
These halos sometimes occur when you use the shadow-recovery and HDR tools. So when you use these tools, don’t set the degree of adjustment so high that the solution becomes worse than the problem.


