


If you're like most musicians, getting great-sounding drum recordings seems like one of the world's great mysteries. You can hear big, fat drums on great albums, but when you try to record your drums, they always end up sounding more like cardboard boxes than drums. Fret not — here are some solutions for you.
The room
The room influences the drums' sound more than it influences other instruments'. If you're looking for a big drum sound, you need a fairly live room (one with lots of reflection).
You may be thinking, "But I just have a bedroom for a studio and it's carpeted." No worries, you can work with that. Remember, you have a home studio, so you potentially have your whole home to work with. Here are a couple of ideas to spark your imagination:
- Buy three or four 4-x-8-foot sheets of plywood and lean them up against the walls of your room. Also place one on the floor just in front of the kick drum. This adds some reflective surfaces to the room.
- Put the drums in your garage (or living room, or any other room with a reverberating sound) and run long mic cords to your mixer. If you have a studio-in-a-box system, you can just throw it under your arm and move everything into your garage or, better yet, take all this stuff to a really great-sounding room and record.
- Set up your drums in a nice-sounding room and place an additional mic just outside the door to catch an additional ambient sound. You can then mix this in with the other drum tracks to add a different quality of reverberation to the drums.
Kick (bass) drum
The mic of choice for most recording engineers when recording a kick drum is a dynamic mic. In fact, you can find some large diaphragm dynamic mics specifically designed to record kick drums.
No matter where you place the mic, you can reduce the amount of boominess that you get from the drum by placing a pillow or blanket inside the drum. Some people choose to let the pillow or blanket touch the inside head.
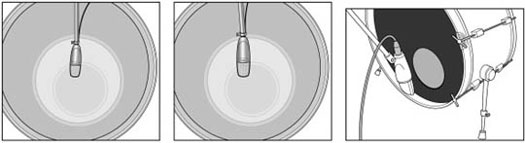
That said, you can place your mic in several ways (all conveniently illustrated in Figure 1):
- Near the inside head: If you take off the outside head or cut a hole in it, you can stick the mic inside the drum. Place the mic 2 to 3 inches away from the inside head and a couple of inches off center. This is the standard way to mic a kick drum if you have the outside head off or if a hole is cut in it. This placement gives you a sharp attack from the beater hitting the head.
- Halfway inside the drum: You can modify the preceding miking technique by moving the mic back so that it's about halfway inside the drum. In this case, place the mic right in the middle, pointing where the beater strikes the drum. This placement gives you less of the attack of the beater striking the head and more of the body of the drum's sound.
- Near the outside head: If you have both heads on the drum, you can place the mic a few inches from the outside head. If you want a more open, boomy sound (and you have the drum's pitch set fairly high), point the mic directly at the center of the head. If you want less boom, offset the mic a little and point it about two-thirds of the way toward the center.
The kick drum responds quite well to a compressor when tracking. For the most part, you can get by with settings that allow the initial attack to get through and that tame the boom a little. A sample setting looks like this:
Threshold: -6dB
Ratio: Between 4:1 and 6:1
Attack: Between 40 ms and 50 ms
Release: Between 200 ms and 300 ms
Gain: Adjust so that the output level matches the input level. You don't need much added gain.
Snare drum
The snare drum is probably the most important drum in popular music. The bass guitar can cover the kick drum's rhythm, and the rest of the drums aren't part of the main groove. A good, punchy snare drum can make a track, whereas a weak, thin one can eliminate the drive that most popular music needs.
Because the snare drum is located so close to the other drums, especially the hi-hats, a cardioid pattern mic is a must. The most common mic for a snare drum is the trusty Shure SM57. The mic is generally placed between the hi-hats and the small tom-tom about 1 or 2 inches from the snare drum head (see Figure 2). Point the diaphragm directly at the head. You may need to make some minor adjustments to eliminate any bleed from the hi-hats. This position gives you a nice punchy sound.

Adding compression to the snare drum is crucial if you want a tight, punchy sound. There are a lot of ways to go with the snare. The following settings are common and versatile:
Threshold: -4dB
Ratio: Between 4:1 and 6:1
Attack: Between 5 ms and 10 ms
Release: Between 125 ms and 175 ms
Gain: Adjust so that the output level matches the input level. You don't need much added gain.
Tom-toms
The tom-toms sound best when using a dynamic mic. For the mounted toms (the ones above the kick drum), you can use one or two mics. If you use one mic, place it between the two drums about 4 to 6 inches away from the heads (Figure 3 shows this placement option). If you use two mics, place one above each drum about 1 to 3 inches above the head.

Floor toms are miked the same way as the mounted tom-toms:
- Place a single mic a couple of inches away from the head near the rim.
- If you have more than one floor tom, you can place one mic between them or mic them individually.
If you want to apply compression to the tom-toms, you can start with the settings that for the snare drum in the preceding section.
Hi-hats
The hi-hats are generally part of the main groove and, as such, you want to spend time getting a good sound. You'll probably have problems with a few other mics on the drumset picking up the hi-hats, particularly the snare drum mic and overhead mics. Some people don't bother miking the hi-hats for this reason.
Hi-hats often sound too trashy through the snare drum mic. If you mic hi-hats, make sure that the snare drum mic is picking up as little of the hi-hats as possible by placing it properly and/or using a noise gate (a dynamic processor use to filter unwanted noise).
You can use either a dynamic mic or, better yet, a small diaphragm condenser mic for the hi-hats. The dynamic mic gives you a trashier sound and the small diaphragm condenser mic produces a bright sound. You can work with either by adjusting the EQ. Try adding just a little bit (4dB or so) of a shelf EQ set at 10 kHz to add just a little sheen to the hi-hats.
Place the mic about 3 to 4 inches above the hi-hats and point it down. The exact placement of the mic is less important than the placement of the other instrument mics because of the hi-hats' tone. Just make sure your mic isn't so close that you hit it.
Compression isn't usually necessary when tracking the hi-hats unless you have a drummer whose volume level is inconsistent. In this case, try using the same snare drum settings.
Cymbals
You want to know one secret to the huge drum sound of Led Zeppelin's drummer, John Bonham? Finesse. He understood that the drums sound louder and bigger in a mix if the cymbals are quieter in comparison. So he played his cymbals softly and hit the drums pretty hard. This allowed the engineer to raise up the levels of the drums without having the cymbals drown everything else out. Absolutely brilliant.
Because the drums bleeding into the overhead mics is inevitable and the overhead mics are responsible for providing much of the drums' presence in a mix, playing the cymbals softly allows you to get more of the drums in these mics. This helps the drums sound bigger.
Ask (no, demand) that your drummer play the cymbals quieter. Also use smaller cymbals with a fast attack and a short decay. Doing these things creates a better balance between the drums and cymbals and makes the drums stand out more in comparison.
Small diaphragm condenser mics capture the cymbals' high frequencies well. You can mic the cymbals by placing mics about 6 inches above each cymbal or by using overhead mics set 1 to 3 feet above the cymbals.
The whole kit
Most of the time, you want to have at least one (but preferably two) ambient mics on the drums if for no other reason than to pick up the cymbals. These (assuming you use two mics) are called overhead mics and, as the name implies, they are placed above the drumset. The most common types of mics to use for overheads are large and small diaphragm condenser mics because they pick up the high frequencies in the cymbals and give the drumset's sound a nice sheen (brightness). You also may want to try a pair of ribbon mics to pick up a nice, sweet sound on the overheads.
To mic the drumset with overhead mics, you can use either the X-Y coincident technique or spaced stereo pairs. Place them 1 to 2 feet above the cymbals, just forward of the drummer's head. Place X-Y mics in the center and set up spaced stereo pairs so that they follow the 3:1 rule (the mics should be set up 3 to 6 feet apart if they are 1 to 2 feet above the cymbals). This counters any phase problems. Point the mic down toward the drums and you're ready to record. Figure 4 shows both of these set-ups.


