

Often, you want a background image to cover the entire page on your HTML5 and CSS3 website. This can be harder than it seems because you don't know how large the page will be in the user's browser.
Worse, large images can take a huge amount of space and slow down the user's experience. The common solution is to use a tiled image that's designed to repeat in the background. Gimp has some very useful tools for building tiled images.
Recall that the background-repeat CSS property allows you to specify how a background repeats. The default setting repeats the background infinitely in both the X and Y axes. You can also set the background to repeat horizontally (repeat-x), vertically (repeat-y), or not at all (no-repeat).
The goal of a tiled background is to make a relatively small graphic fill the entire page and look like a larger image. The secret is to create the image so it's difficult to see where the image repeats. Here's one way to make a tiled background in Gimp. Of course, you can adapt this technique for your own purposes.
Create a new image.
The size of your image is important. Smaller images are much more efficient to download, but the pattern is much more obvious. Start with 256 by 256 pixels.
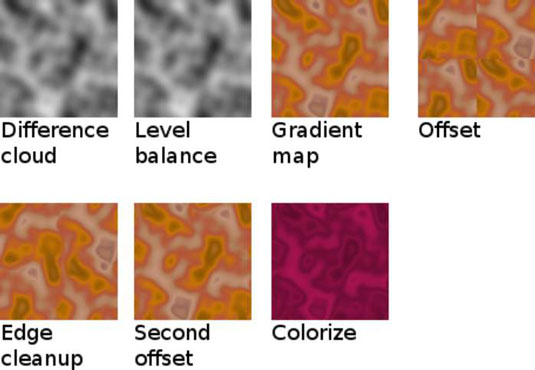
Build a random pattern.
You can use the Plasma filter technique or try a similar technique by choosing Filters→Render→Clouds→Difference Clouds. The Difference Clouds filter creates a grayscale image but with a number of interesting options. The Tileable option creates a pattern that's ready to tile. Play with these options until you get something interesting.
Adjust the contrast.
For the best effect, you want a relatively even distribution of values from light to dark. The easiest way to do this is through the automatic normalization tool (Colors→Auto→Normalize).
Pick a gradient.
You'll add colors to your pattern using a technique called gradient mapping. Use the Gradient dialog box (Windows→Dockable Dialogs→Gradients) to pick a gradient. Darker colors on your image map to colors on the left of the gradient, and lighter colors map to the left. You can adjust colors, so don't worry if the colors aren't exactly what you want.
Use the Gradient Map tool (Colors ➪ Map ➪ Gradient Map) to map the colors of the gradient to your cloud pattern.
Offset the image to check for tiling.
The easiest way to see whether the image tiles well is to offset the image. This puts the edges in the center so you can see how the image will look when multiple copies are next to each other. Open the Offset dialog by choosing Layer→Transform→Offset. The Offset dialog has a handy x/2, y/2 button. Click the button to see how your image looks.
Clean the image if necessary.
If you chose the Tileable option when you built the cloud image, the new image will look fine. If not, you may have some visible seams. Use the Smudge and Clone tools to clean up these seams if necessary. Apply the Offset tool a second time to check whether your seams look good.
Apply filters to get the effect you want.
You may want to colorize your image or blur it a bit to cover any artifacts of your cleanup. Remember that background images should be extremely dark or extremely light with very low contrast if you want readable text.
Test the image by saving the image in XCF format and a web-friendly format (like PNG), build a simple page using the image as a background, and load the page into your browser to ensure it tiles the way you expect.

