
Fortunately, Business Central does not define the account number master record as a fixed string inclusive of all segments, like some other Microsoft ERP products do (Dynamics GP, for example). Instead, Business Central defines the account number master record as just the natural account number. Segments can be defined separately and are referred to as dimensions.
You first specify the natural account (sometimes referred to as the main, or root, account) and then add dimensions later. You do this because many charts of accounts end up with astronomically high account counts (sometimes in the hundreds of thousands). With dimensions, Business Central is able to tag transactions in ways that not only define which business unit or geographical area a transaction affects but also include data such as what was sold, who sold it, and the category of customer(s) that bought it. This allows for a smaller chart of accounts and an extremely powerful business intelligence (BI) integration on the back end that will both qualify and quantify transactions.
Adding accounts to the chart of accounts in Dynamics 365 Business Central
To add a natural account (the only kind that exists in Business Central) to a chart of accounts, follow these steps:- With Business Central open, click the main Finance drop-down menu, at the top of the screen.
A menu appears immediately below, displaying all available options within the Finance category.
- Choose the Chart of Accounts option.
The list of accounts is displayed.
- Click the New button at the top of the list.
The new G/L Account card form opens in Edit mode.
- Enter the account number and name in the appropriate fields.
The red asterisk to the left of the text box indicates that the No. (Number) field is a required field.
- Select the account category.
When you select this category first, the Income or Balance option automatically defaults to the most likely category.
- Assign the account subcategory.
This step helps for reporting purposes, to further break down subsets of accounts and dimensions of those accounts.
- Define the default entry type (Debit/Credit) for the account.
This refers to whether the transactions posted to this account are typically credit, debit, or both (such as a clearing account) by default.
- Select the account type.
Select one of these types: Posting, Heading, Total, Begin-total, or End-total.
- If the account is set to a totaling account, define the totaling accounts.
The totaling accounts are a list of the account’s whole totals sum to the balance of the account. Separate account numbers by using the pipe (|) symbol. Click the Ellipse button on the page to bring up a selection of accounts. To select multiple accounts, hold down the keyboard’s Ctrl button while clicking each account.
Some sample text input for this field is
10200|10500|10800|10940|20400
After you enter the account numbers on this screen, the Balance field on the account setup automatically updates to reflect the selected accounts.
- Select the appropriate boxes in the General section to specify whether this is a reconciliation account, a direct posting, a blocked account, or another option.
A blocked account specifies that the related record may not be used in posting a transaction while it remains blocked.
- Fill out the rest of the account information on this screen.
If you hover the mouse over the label of a field, a pop-up Help box appears that describes the field.
- Finally, use the top bar above the card to select dimensions (if these have been defined) to tag transactions reflected within this account.
You can view the account balance, view the account balance by dimension, and modify the posting setup. (That last step is important if you’re working with accounts with different sales and purchasing accounts associated with them).
- Click the Edit button on the Home tab of the menu at the top of the screen to save your changes.
Clicking the Edit button moves the account from Edit mode back into View mode.
There’s no Save button on this screen, even for new accounts.
- Click the X to leave that account card (or press Esc on the keyboard).
To edit an account already in place on the chart of accounts, click the Ellipse button next to its name and choose Edit from the menu that appears.
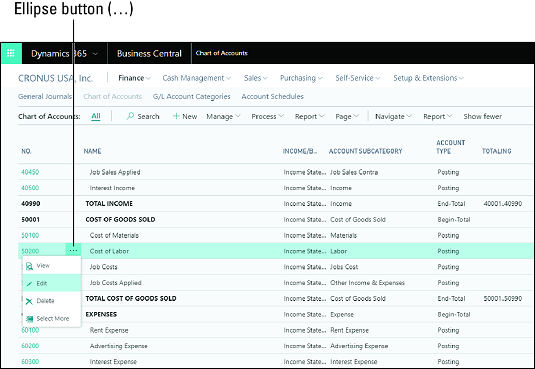 Chart of accounts Account Edit button.
When you’re viewing the chart of accounts, you’ll notice accounts displayed in bold, which typically indicates whether an account is a totaling account for the accounts rolled up within it (refer to the Totaling column). When editing an account, notice that a) the pipe symbol (|) allows you to input specific pipe-delimited accounts in a list and b) if you click the Ellipse button, you’re presented with a menu where you specify a series of accounts. For example, in the sample data, the total income account has 40001..40990 as the setting in the Totaling column (indicating that any account between 40001 and 40990 is included in the total). You may, however, instead specify a discontinuous range of accounts — the 10200, 10500, 1800, 10940, and 20400 accounts, for example — by using the text 10200|10500|10800|10940|20400.
Defining G/L account categories in Dynamics 365 Business Central
Business Central has a simple yet effective way of setting up account categories. These categories make it easy to map general ledger (G/L) accounts to specific categories. You can also create subcategories and assign those categories to existing accounts. Each group shows you the total balance of the accounts within those categories within the different financial reports available throughout Business Central. These categories are a handy way to quickly specify the totaling on your financial statements. You may change these on the fly, making account categories a robust way to categorize your financial data. For example, a department may change its basic functionality from one year to the next. Account categories allow you to create and maintain financial reports more easily.Account categories determine how accounts roll-up to calculate totals used on financial reports. For example, Current Assets is an account category with no specific G/L accounts explicitly defined on the account number level. However, Cash, Accounts Receivable, Prepaid Expenses, and Inventory are all account categories that roll-up within the Current Assets category. This means that the Current Assets category reports the total of all G/L accounts represented in those four categories.
Check out the main screen for G/L account categories. On this screen, you see a list of every account category. To get things started, go ahead and make a new item. The following steps show you how:- With Business Central open, choose Finance → G/L Account Categories from the menu bar at the top of the screen.
The list of G/L account categories appears.
- Choose Manage → Edit List from the menu that appears, immediately above the list of G/L account categories.
You’re now in List Edit mode, where you can add new G/L account categories or edit existing ones.
- Select a G/L account category from the displayed list, and then click the New button on the Home tab of the menu at the top of the screen to create a new category immediately below the selected category.
- Use the Move Up and Move Down buttons to place the new G/L account category where you want it to fall within the list.
- Under the G/L Accounts in Category column, specify the G/L accounts that pertain to the new G/L account category.
The Additional Report Definition column is used to determine where the G/L category would appear within a statement of cash flows (called the cash flow statement in Business Central), so be sure to specify that setting if you intend to use the cash flow statement.
Business Central has no concept of roll-ups or subcategories: Instead, it has account categories that are “indented” to become part of another category above them in the structure. Neither does Business Central display how “deep” within a hierarchy an account lies on all forms, which can be troublesome when you’re trying to ensure that you have properly assigned an account in the proper level of a roll-up. If you moved an account accidentally on the category screen and are having trouble restoring it in the correct part of the hierarchy, use both the Indent and Outdent buttons, as well as the Move Up and Move Down buttons, to reposition it.
Specifying bank accounts in Dynamics 365 Business Central
Business Central lets you link bank accounts by way of a secure interface — definitely one of the nicest features of this cloud-based application. One thing, however, that is not so easily discovered, is how to set up API connections between your bank and the Business Central system, to drastically help with the reconciliation of bank accounts. Here, you find out how to- Set up and link bank accounts
- Enable automatic bank imports using Envestnet Yodlee Bank Feeds (the connection Microsoft has authored, installed, and enabled by default)
- Match transactions within the interface to bank transactions
- Reconcile your bank accounts
Here, you discover how to perform automatic bank reconciliation and the import of transactions. You can do all this manually, but one of the many benefits of this application is that you can import transactions automatically and reconcile them within an easy-to-use interface. The system even attempts to automatically reconcile and gives you a match-confidence score based on a few unique matches, such as amount and date and other information related to that transaction.
Follow the next set of steps to set up all these features, and you’ll be on your way to saving time when the time comes to reconcile your bank accounts.To link a bank account to an account set up in Business Central, follow these steps:
- Choose Cash Management → Bank Accounts from Business Central's main menu at the top of the screen.
Doing so displays a list of available bank accounts.
You can create a new bank account by clicking the New button and filling out your bank account information.
In this example, you use an existing bank account.
- Click the Ellipse button — the one in the second column, immediately to the right of the name of the bank account — on the row for the bank account you want to edit.
A small drop-down menu appears.
- Select Edit from the drop-down menu.
The Edit Bank Account Card form appears.
- Click the Link to Online Bank Account button in the Home ribbon.
The Link to Online Bank Account form appears.
- When prompted, ensure that you’re on a secure connection, enter your banking information, click Next, and then click OK.
A new screen appears, displaying the accounts already linked.
- Click OK.
Doing so brings you to the next section, where you set up automatic bank imports.
- Click to select the account name for which you want to set up automatic bank imports, and then click the Automatic Bank Statement Import Setup button.
You configure this on the bank account card, which tells you the bank account linking status in the top right corner of the general section.
- In the Import Setup window, select the number of days to include in the import and then select OK.
The specified transactions are imported into your payment journal.
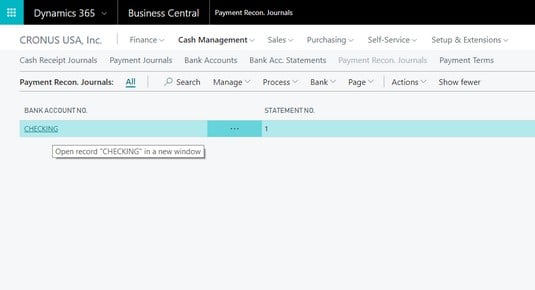 Business Central's Payment Reconciliation Journals window.
You can use the Bank Account Payment Reconciliation Journal form to import bank transactions manually via a bank file transaction download. The automatic import simply saves you the trouble of having to download a file daily or weekly from your banking institution.
The Bank Account Payment Reconciliation Journal form lets you execute these actions on a transaction:- Have the system apply payments automatically
- Post payments only
- Transfer the difference to another account
- Apply payments manually
- Remove specific applications already made
- Post payments only
As you can see, Microsoft Dynamics 365 Business Central makes bank reconciliation a much swifter process by using intelligent algorithms to match payments to outstanding invoices, credit memos, and accounts. This makes the month-end closing procedures much more efficient, with fewer manual entries being required for bank reconciliation. This kind of automation is a tremendous time-saver for you and your staff.
When selecting anything from a list (including transactions on the Bank Account Payment Reconciliation Journal form), you can hold down the Ctrl button on the keyboard to select multiple items at the same time. If you’re on a touchscreen, tap the Ellipse button from any line item and then tap the Select More option from the menu that appears. This brings up a previously hidden check box column. Simply tap the transactions you want to select.