
To ease your transition to Excel 2013 from Excel 2003, you can customize the Quick Access Toolbar so that it contains every button from the Standard and Formatting toolbar in Excel 2003 with the exception of the Permission, Drawing, Zoom, and Help buttons. The Permission button is so esoteric and seldom used that you shouldn't bother to add it.
The Drawing button has no equivalent in Excel 2013. And neither the Zoom button nor the Help button is really needed because the Zoom slider that enables you to quickly select a new screen magnification percentage always displays in the lower-right corner of the Excel 2013 Status bar and the Help button always displays on the right side of the bar containing the Ribbon tabs.
To customize your Quick Access toolbar with every button from the Standard and Formatting toolbars except the Permission, Drawing, Zoom, and Help buttons, follow these steps:
Click the Customize Quick Access Toolbar button at the end of the Quick Access toolbar and then click the Show Below the Ribbon option.
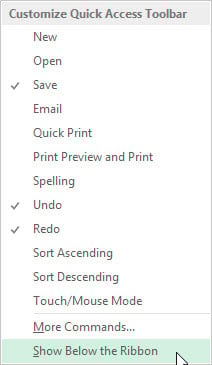
When filling the Quick Access toolbar with buttons, you need to place the bar beneath the Ribbon so that it won’t crowd the name of the current workbook file.
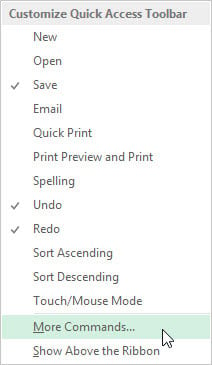
Click the Customize Quick Access Toolbar button again and this time click the More Commands option.
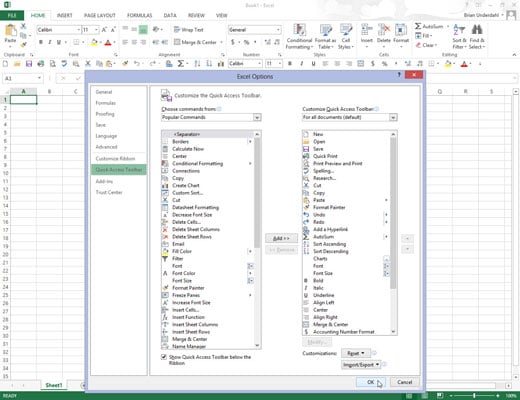
Excel opens the Excel Options dialog box with the Quick Access Toolbar tab selected. The Customize Quick Access Toolbar list box on the right side of this dialog box shows all three of the default buttons in the order in which they now appear on the toolbar.
Click the New option in the Popular Commands list followed by the Add button.
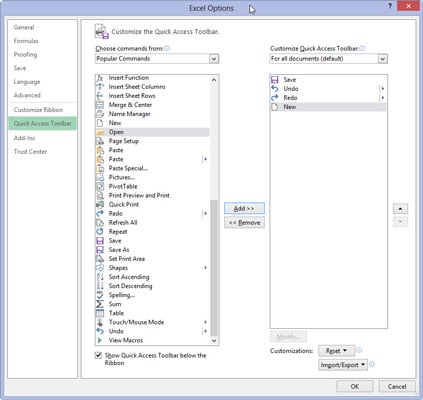
Excel adds the New command button at the end of the toolbar indicated by the appearance of the New button at the bottom of the list in the Customize Quick Access Toolbar list box on the right.
Click the Move Up button (with the triangle pointing upward) three times to move the New button to the top of the Customize Quick Access Toolbar list box and the first position on the Quick Access toolbar.
The New button is now in front of the Save button on the toolbar.
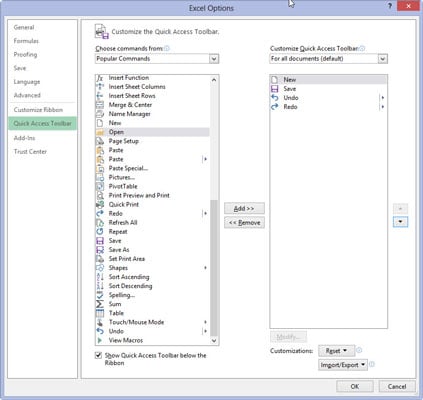
Click the Open option in the Popular Commands list box on the left and then click the Add button.
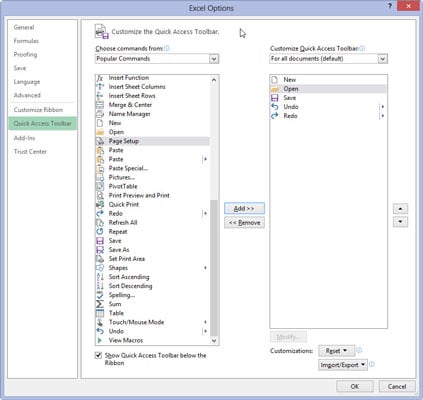
Excel inserts the Open button in the Customize Quick Access Toolbar list box between the New and the Save buttons, which is exactly where it appears on the Standard toolbar.
Click the Save button in the Customize Quick Access Toolbar list box on the right to select this button. Then, click the Quick Print option in the Popular Commands list box on the left and click the Add button.
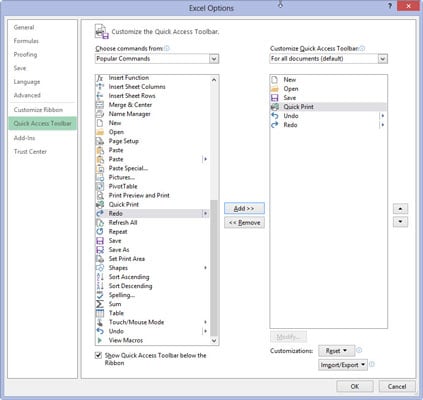
Excel inserts the Quick Print button after the Save button.
Click the Print Preview and Print button near the bottom of the Popular Commands list box and then click the Add button.
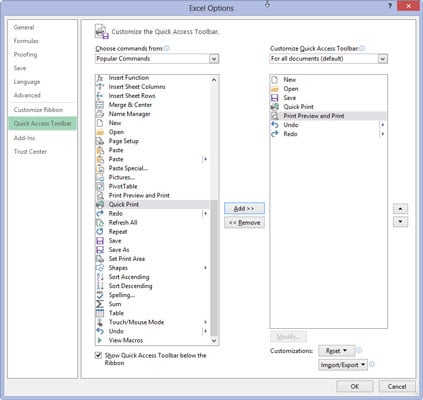
Excel inserts the Print Preview and Print button after the Quick Print button in the Customize Quick Access Toolbar list box.
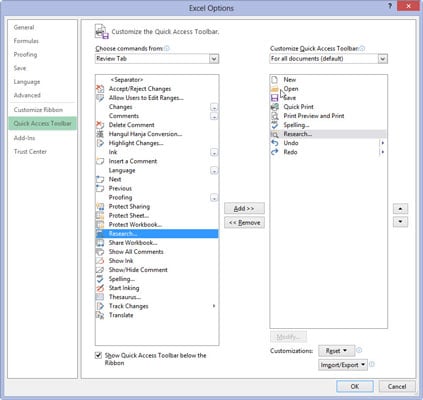
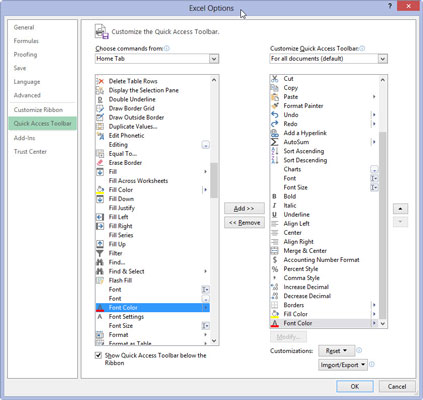
Now, you need to add the Spelling and Research buttons. They are located on the Review tab in Excel 2013. Before you can add the buttons to the Quick Access toolbar, you need to replace Popular Commands with Review Tab by selecting this option on the Choose Commands From drop-down list.
Click the Choose Commands From drop-down button and then click Review Tab in the drop-down list.
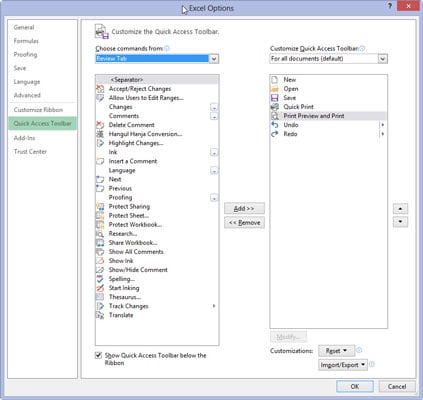
Excel now displays all the command buttons on the Review tab of the Ribbon in the list box below.
Add the Spelling and Research buttons from the Review Tab list box to the Customize Quick Access Toolbar list box and position them so that they appear one after the other following the Print Preview and Print button.
Next, you need to add the Cut, Copy, Paste, and Format Painter buttons to the Quick Access toolbar. These command buttons are on the Home tab.
Click the Home Tab option in the Choose Commands From drop-down list and then add the Cut, Copy, and Paste buttons to the Customize Quick Access Toolbar in this order in front of the Undo button.
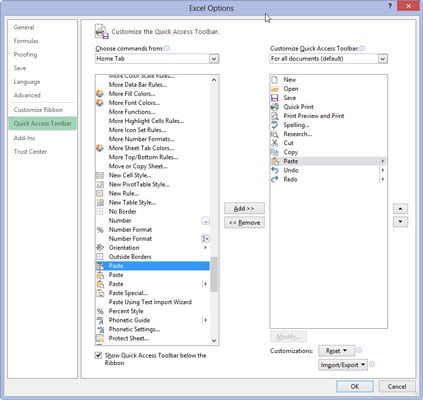
Note when adding the Copy and Paste buttons that Choose Commands From displays more than one button for these options. The first Copy and Paste buttons are the regular command buttons that were on the Standard toolbar.
The other Copy and Paste button (with a continuation button icon) display a drop-down button that, when clicked, opens a menu with all the Copy and Paste options. You can add either one, although the ones with the drop-down menus are much more versatile.
Click the Format Painter option in the Home Tab list box and then click the Add button.
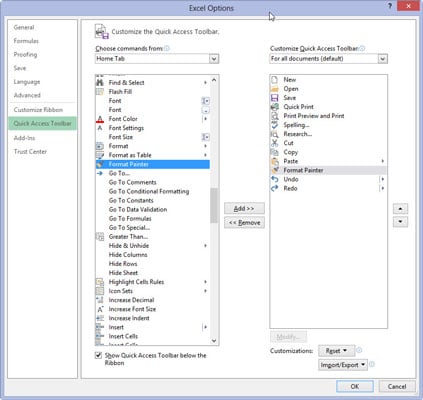
Excel adds the Format Painter button after the Paste button in the Customize Quick Access Toolbar list box on the right.
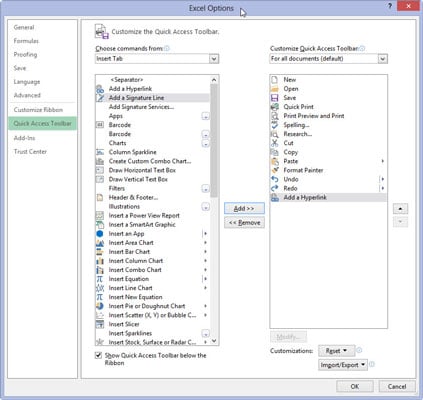
Click the Redo button in the Customize Quick Access Toolbar list box to select its icon, click Insert Tab on the Choose Commands From drop-down list, and then add the Add a Hyperlink button to the Quick Access toolbar.
Add the remaining Standard toolbar buttons — AutoSum, Sort Ascending, Sort Descending, and Charts — to the Quick Access toolbar.
The AutoSum, Sort A to Z, and Sort Z to A buttons are available in the Home Tab list box and the Charts button (the closest thing to the Chart Wizard in Excel 2013) is on the Insert Tab list box.
Add the buttons on the Formatting toolbar to the Quick Access toolbar in the order in which they appear.
The Formatting toolbar contains the tools all found on the Home tab.
Click the OK button to close the Excel Options dialog box and return to the Excel program window.
Your Quick Access toolbar should now have the same buttons as the one shown.