The Electronic Banking Thing
Before we discuss using the QuickBooks online banking and payment services, you need to consider whether these features even make sense for you and your business. Online banking does make sense for some people — maybe even you. Then again, it may be more like the fins on a ’62 Cadillac: cool, but not that cool.So what’s the commotion about?
For QuickBooks, online banking includes two parts: online banking itself and online bill payment. Basically, online banking enables you to transmit account transfer instructions to your bank and download (retrieve) account information electronically by using your computer and the Internet. Online bill payment enables you to transmit payment instructions electronically. (You essentially tell your bank to write, stamp, and mail a check so that you don’t have to.)And that, my friend, is about all there is to online banking.
A handful of reasons to be cautious about banking online
I don’t know whether you should bank online, really, but I’ll share some thoughts with you. And no kidding, I’ve had my reservations over the years about this feature. Is it safe? Is it easy? Is it just another way for a software company and my bank to make more money off me?Here’s my latest thinking on the matter: You ought to use online banking. It is safe, if you don’t share your personal identification number (PIN), and it saves you tons of time. In fact, online banking should allow many business owners to do their books themselves for just a few minutes of work at the end of the week.
That being said, I should quickly point out the few flies in the ointment, so to speak:
- Your bank needs to use the Intuit service. To use the full-blown online banking service, you need to use a bank that has signed up for this Intuit service. Many, many big banks have signed up. More banks sign up all the time, of course, but some haven’t yet. So if your bank hasn’t jumped on the bandwagon — that is, the Intuit bandwagon — you can’t jump on the bandwagon either, at least not as a full-fledged member of the band.
To find out whether your bank provides online banking, choose Banking→ Bank Feeds →Participating Financial Institutions. After you’re connected to the Internet, QuickBooks displays a list of the banks that support the Intuit flavor of online banking.
- It isn’t totally paperless. Although a totally electronic system sounds really efficient and very slick, you need to realize that online bill payment (a key component of online banking) often isn’t that efficient or slick because, to be quite honest, the system isn’t totally electronic.
“What the …?” you’re asking. “I thought that was the point.” For better or worse, most businesses are still set up to — and still expect to — receive paper checks with remittance advices. What often happens when you transmit payment instructions is that the bank or online payment service simply prints a check for you. Think about that for a minute. If the bank is printing your check, you still have all the disadvantages of a printed check, including the following:
- You still need to allow extra time for mailing.
- You still have the possibility that the check will get lost.
- You still have the possibility that the check will be misapplied. In other words, the check to pay your power bill might be applied to your neighbor’s account instead.
- There’s a greater chance for error. What’s more, you have the extra complication of having your bank, rather than you, mucking up all this stuff.
- It (usually) ain’t free. Worst of all, the bank most likely charges for this service. And so does Intuit. (Remember that banks and software companies think that online banking is a way for them to make money.)
- You might run into possible vendor confusion. Receiving payments from your bank, as opposed to directly from you, might confuse your vendors. The confusion occurs because the checks that they receive come all bundled up in these cute little envelopes that must be torn along the perforation on just about all sides. And because you can’t send a remittance slip with an online payment, vendors can easily credit your account incorrectly, which can lead to problems. (My power company regularly threatens to turn off the gas to my office because even though my electric and gas charges are included in the same bill, the power company doesn’t like me to send one check via the QuickBooks online bill payment system. It needs two checks: one for the electric bill and one for the gas bill.)
One other problem bears mentioning. When you use online banking, you create a complex system without clear responsibilities for problem-solving and technical support. And that means that when you have problems, you can’t always call someone to get help. (No kidding. Just the other day, some poor guy emailed me because his online banking stuff wasn’t working. Intuit blamed the bank; the bank blamed his PC hardware; the PC company blamed Intuit. This guy has a problem that nobody can solve or will solve.) This is important to understand, so let me briefly outline the steps that an online payment might take:
- You enter the transaction in QuickBooks.
- You make (or QuickBooks makes) an Internet connection.
- QuickBooks uses the Internet connection to send the transaction to the bank.
- The bank receives the transaction information and typically creates a check, which it mails to the person you’re paying.
- The person you’re paying gets the check (you hope) and credits your account.
- Bugs happen. If QuickBooks or your computer has a bug, it might say that you entered and transmitted a transaction when in fact you didn’t. This has happened to me.
- Ya gotta get online. If your Internet connection doesn’t work or doesn’t work dependably, you can’t send the online transaction. I’ve had problems with online banking at home over a cable-modem Internet connection (storm outages) and at work when using a network and a fiber-optic connection (either an incorrectly configured network or bad hardware).
- Banks are fallible. If the bank screws up in printing or mailing the check, of course your check won’t get there. QuickBooks lets you enter a five-line address on a check, but the check printed by the bank or online payment service can have only four lines. So QuickBooks just removes the fifth line of the address block.
Making sense of online banking
So, what should you do? Let me make a suggestion: If you use a bank that provides online banking, go ahead and try the service. Absolutely! It isn’t very expensive — possibly free or (worst case) only a few dollars per month. If you decide later that you don’t like the service, you can always go back to banking the old-fashioned way.If you use a bank that doesn’t provide online banking services, and you’re really bummed out about it, you can try the online bill payment component of online banking by using the Intuit online bill payment service. Online bill payment is the part where you send instructions to your bank (if it provides the service) or to Intuit to write and mail checks for you. You can use the online bill payment service with any account. In essence, you give Intuit permission to automatically deduct money from your account to make payments for you.
Signing up for the service
All you need to do to sign up for online banking service is choose Banking→ Bank Feeds→ Set Up Account for Online Services. QuickBooks starts an online application wizard that walks you through the steps to apply for the online banking services. Just follow the onscreen instructions, and voilà! That’s it. Another benefit of being literate.To actually begin transmitting online payments or making account inquiries, you need to complete the application and have that application processed. Note, too, that you can usually complete the application by filling out paperwork from your bank and turning that in. You might not have to use the online application process.
Making an online payment
Plan to create and send online payments a good week before they’re due. Processing your request and then printing and sending a check takes time for the online bill payment service, and a check that your bank sends doesn’t go through the mail any faster than a check you send yourself. So, don’t expect online bill payment to save you any time compared with sending checks that you print or handwrite yourself.After you sign up for online banking, making payments is easy. Just follow these steps:
1. Choose Banking→Write Checks.
You can also click the Write Checks icon on the home screen. If you’ve written checks with QuickBooks before, you probably recognize your old friend the Write Checks window, as shown.
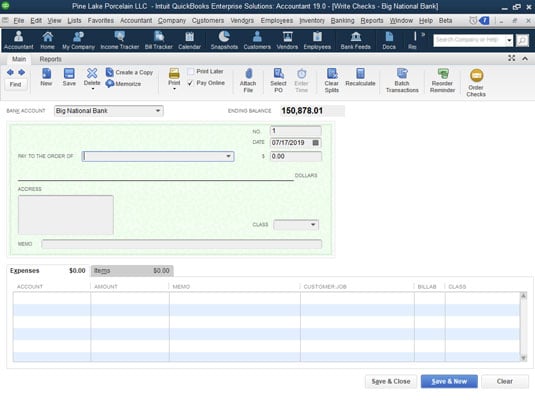 The Write Checks window.
2. Click the Bank Account drop-down menu at the top of the window and then choose the account from which you want to write this check.
Choosing the account is a really important step. Make sure that you’re accessing the correct account before you write a check.
3. Select the Pay Online check box on the ribbon.Selecting this check box is another important step. If you don’t select this check box, you aren’t making an online payment; you’re just writing a regular check that you need to print or handwrite.
4. Fill in the check.If the payee appears on one of your name lists, the AutoFill feature fills in the name of the payee in the Pay to the Order Of line after you type a few letters. For online bill payment, you must have the correct address. If the address is incomplete, QuickBooks warns you and asks you to correct it. If you haven’t entered a transaction for this person or party before or added that individual or party to a list, QuickBooks asks you to Quick Add or Set Up the payee name. Do that.
By the way, QuickBooks makes you collect more information about anyone you’re going to pay with an online payment.
Enter the amount of the check next to the dollar sign and then press Tab. QuickBooks writes out the amount for you on the Dollars line.
5. Fill in the Expenses and Items tabs, if necessary.6. Click the Save & New button or the Save & Close button to finish writing the check.
Click Save & New to write another check, or click Save & Close if you’re finished writing checks for the moment. There you have it. Your check is written, entered in the Checking register, and ready to be sent so that your bank or Intuit can print and mail it.
And you thought this stuff was going to be tough, didn’t you?People who have grown accustomed to Quicken, a cousin product of QuickBooks, may want to use the Register window to make online payments. You can use the Register window in QuickBooks, too, although doing so isn’t quite as slick. You enter the payment in the usual way, except that you type the word SEND in the Check Number text box.
Transferring money electronically
You can electronically transfer money between bank accounts, too, as long as the accounts are at the same bank. (Both accounts, of course, also need to be set for online banking.) Here’s what you need to do:1. Choose Banking→ Transfer Funds.
You see the Transfer Funds Between Accounts window.
2. From the Transfer Funds From drop-down menu, choose the bank account that you’re going to transfer the money from.3. From the Transfer Funds To drop-down menu, choose the bank account to which you want to transfer the money.
4. Select the account that you want to receive the funds.
5. Select the Online Funds Transfer check box.
Doing so tells QuickBooks that you want to make this transfer electronically. (This box doesn’t appear if you’re not set up for online banking.)
6. Enter the amount that you want to transfer in the Transfer Amount field and then fill in the Memo text box.Someday, you might go into the register for the account that you’re transferring money from and wonder where you transferred this money and why. Filling in the Memo line solves this little mystery beforehand.
7. Click Save & Close.The transfer is recorded. After you transmit the transfer instructions, the transfer transaction is posted to your account — maybe not immediately, but as fast as a telephone transfer or an ATM transfer is posted.
Changing instructions
QuickBooks doesn’t actually send, or transmit, your payment and transfer instructions until you tell it to. This little fact means that you can change or edit your payment instructions (what you enter with the Write Checks window) and your transfer instructions (what you enter with the Transfer Funds Between Accounts window) until you actually transmit them. You edit online payments and account transfers in the same way that you edit regular payments and account transfers.Transmitting instructions
After you describe the online payments and account transfers that you want QuickBooks to make, you transmit that information to the bank. To do so, follow these steps:1. Choose Banking → Bank Feeds → Bank Feeds Center.
You see the Bank Feeds window, which identifies the bank account you’ll be working with.
2. From the Financial Institution drop-down menu in the window pane on the left side of the screen, choose the bank to which you’re transmitting payment and transfer instructions.3. Review the payment and transfer instructions one last time.
Take one last peek at the Items to Send list to make sure that any payment and transfer instructions that you’re sending are correct. If you have questions about a particular instruction, click it and then click the Edit button. If you know that a particular payment instruction is incorrect, click it and then click the Delete button.
4. Click the Send/Receive button to transmit the payment and transfer instructions.QuickBooks prompts you to provide a PIN in a cute little dialog box. If you’re transmitting payment and transfer instructions for the first time, QuickBooks probably prompts you to change your PIN. If you don’t have any transactions to send, QuickBooks renames the button Receive Transactions.
5. Review any transactions that the bank tells you about.After QuickBooks makes the connection and sends and receives transactions, QuickBooks updates the information shown in the Online Banking Center window. You can get more information about many of the items listed by clicking them. You can add transactions that QuickBooks downloads from the bank but that aren’t yet in your bank account registers by clicking the Add Transactions to QuickBooks button, which appears at the bottom of the window.
6. Click Close.Hey, when you’re done, you’re done.
Message in a bottle
Doing all your banking electronically can be a little unsettling when you’re starting out. What if you have a question, for example? All you do is send an email to the bank, asking the people there whatever question you’d normally ask in a telephone call or at the drive-through window. To do so, follow these steps:1. Choose Banking→ Bank Feeds → Create Online Banking Message.
QuickBooks displays the Bank Feeds Message window and fills in the bank name (as long as you use online banking services with only one bank). If you use online banking services with more than one bank, choose the name of the bank to which you want to send a message from the Message To drop-down menu
2. Click the Subject text box and then type a brief description of your message’s subject.I may be telling you something you already know, but most email programs simply display a list of messages that includes the sender, the message subject, and the date. Therefore, the message subject that you use is one of the first bits of message information that the bank folks see.
3. Select the online account that you’re going to discuss in the message.4. Click the Message text box and then type your message.
You’re on your own here.
5. (Optional) Click the Print button to print a copy of your message.6. Click OK.
When you click OK, you add the message to the list of stuff that’s ready to send the next time you go online with your bank.
Other online opportunities
Intuit provides several other small-business-type online services to QuickBooks users. The company has also arranged for a merchant credit card service, for example; you can apply for this service online and then use it online to receive payments and even get charge authorizations. QuickBooks automatically connects you to its online search marketing service. Some of QuickBooks’ payroll services are very online-ish.If you have questions about the current state of any of these products or services, visit the QuickBooks website and search for the name of the service.