


OBS is also something of a blank slate. After installing and launching the application, you are staring at blank screens. Pretty much, your imagination is all that you need to get things going. Streamlabs OBS is, without question, the best friend of the new and veteran Twitch streamer. While OBS is a blank canvas, Streamlabs OBS (or SLOBS, as some streamers call it) comes out-of-the-box with a variety of bells and whistles just waiting to be implemented. Streamlabs integrates with your OBS a wide array of widgets (small applications that add functionality to your stream) as well as a dashboard that tracks everything from follows to subscriptions to donations.
How to incorporate an overlay template in Streamlabs OBS
Along with all of the many add-ons you can implement, Streamlabs also offers up overlay templates that range in themes, moods, applications, and colors. With just a few clicks, your stream is transformed from the basics to breathtaking. And if you have the processing power to back it, your overlays and widgets can be animated, adding an even more dynamic look to your Twitch Channel.OBS and Streamlabs OBS are not the same application. While Streamlabs did develop from OBS, the latest version of OBS has different features and functionality from Streamlabs.
But what you will find the best attribute of Streamlabs is how insanely easy it is to get cracking with it.- Go to Streamlabs and single-click the Login button in the upper-right corner of the browser.

- You will be asked to login with Twitch, YouTube, or some other streaming service. Login in with Twitch. Depending on whether or not you ask Twitch to remember Streamlabs or not, you may be prompted to perform a full login of username and password, and enter in your generated authorization code. Otherwise, Twitch will automatically sync with Streamlabs and take you to the Dashboard.
- From the upper-left of your browser, single-click the Download Beta Streamlabs OBS button.
- Once downloaded onto your PC, launch Streamlabs OBS. This application is no longer the website but the standalone Streamlabs, which syncs with the website, as well.
- In the top-left section of the Streamlabs OBS application, single-click the Themes option.
- Find a theme for your stream either by searching through the various templates offered, or by using the Scene Theme Category located on the left-hand side. Click a template’s preview image to see a full-screen preview of it. Streamlabs offer Scene Theme Category filters that narrow down search parameters to templates matching your mood. If you are known for streaming adventure or FPS games, or if you are hosting a talk show, filters make the decision process a little easier.
- Once you find a theme you like, click the Install Overlay button on the top, right-hand side of the preview. Here, I am using the “Alpha Sections” template. You can use this template, if available, and follow along with me; or find one that appeals to your own interests.
 The Themes section of Streamlabs OBS offer you a variety of moods, looks, and atmospheres for your stream. All of these options are customizable, too.
You now have a template in place. What you need to do now is populate this look with all your incoming video and audio sources in order to get your stream up and running. This is something OBS, both Streamlabs and the original software application, makes incredibly easy. It comes down to series of clicks and knowing where your resources are.
How to add a console in your template
- Click on the Editor option in the upper-left section of Streamlabs OBS.
 If you have multiple templates loaded into your version of Streamlabs, they can all be accessed from the lower-left menu that will show the current active template.
 - The template, if it has a “Starting Soon” scene, will begin with an introduction screen. As shown, under the name of the template, you will see other items or scenes listed. Scenes are the various stages of your stream. From introduction images to intermission placards, scenes should follow a progress for your Twitch channel.
- Click on the “Live Scene” scene to see where your stream will happen.
If you have your webcam already plugged in, the template should recognize it straight away, as shown here.
 Scenes are different segments of your stream, and in OBS, you segue from one to the next whenever you want to go to different segments.
 - Look into the Sources window a select the Background source. You will see the background image surround itself with a bounding box. Sources are exactly what they sound like: sources of audio and video needed to make your stream happen. Instead of the console managing it, you and OBS are managing all sources independently of one another, and using OBS something like a mixer.
- Single click the + (plus sign) to add a source to this “Live Scene” scene. The Add Source window comes up. Select the Video Capture Device option, and then click the Add Source button.
- In the Add New Source field, type “Console” for the name of the source. Click the Add New Source button.
- This is your Properties window where you tell OBS where the signal source is coming from. From the Device drop menu, select your Capture Card. Click the Done button.
As shown here, when OBS sees a signal, it will drop in the source directly into your scene’s layout. We will adjust this in the next step.
 Once you tell OBS where the signal is coming from, OBS will render the source in your template.
 - Grab the bottom-right handle of the console video and click-and-drag the video to fill the entire screen.
- In the Sources window, click-and-drag “Console” down the list of your sources until it is just above the “Background” source.
- Single-click the “Background” scene and then click the – (minus sign) icon to remove it. Click OK when prompted.
- Look at the Mixer section and click the gear icon off to the right corner of the window. Where you see the Console source, go to Audio Monitoring and select the Monitor and Output option from the drop-menu.
How to customize your Streamlabs template
In bringing your game into the template, you also have an idea of how to customize your template to your own specifications. Let’s personalize this template beyond just bringing in your console. Let’s put your stream’s title in here so people know exactly where they are.- Find the header of your template in the Sources window and single-click the eyeball to the far right of it. This will hide the layer from view. Single-click the eyeball again to make the source visible.
 These two icons are Source Lock and View/Hide options. When a source is locked, it cannot be edited (but it can still be removed). Single-clicking the View/Hide option will make a source visible or invisible. It can still be repositioned and edited, but it is either hidden from view or visible.
 - Where you see the Stream Label widget, click on the View/Hide icon to hide it from view. Then lock it.
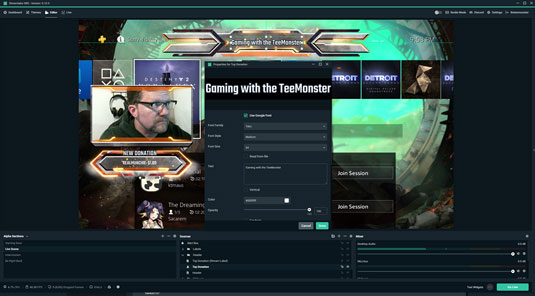
- Where you see the Text Element (designated by an A icon), single-click and move that in place of the Stream Label, as shown in the figure. Each template will be different, but in many of these templates, there will be Stream Labels in place, small widgets that offer up some simple automation between your dashboard and your template. (In the case of this template, the widget reports who gave the most recent donation to your stream.) Text Elements are just that: static text generated by OBS, most of the time used for headers, footers, and titles of some description.
- Double-click the Text Element to get to its Properties window. In the Text field, type in a title for your stream. Hit the Tab button to see the changes, and click-and-drag the new title in your template to center it. In the Properties window, you can change other attributes of the text, ranging from font to font size to color.
- Click the Done button to accept the changes.
 Templates in Streamlabs OBS are easy to customize and make your own.
This is how you make the template your own. Perhaps you're beginning to see how your stream can evolve creatively with the help of Streamlabs OBS. This is a very common look you will find from stream to stream, a personalized look with animated elements adding a touch of flair to your Channel.
From here, you can tinker around with SLOBS to add more depth to your stream: extra cameras for in-studio co-hosts, a keyboard-mouse camera to show off your mad gaming skills … or your struggle to refine said skills, depending on what your stream wants. Or maybe adding in an external audio source to bring in some tunes of your own as a backdrop. The more you dive into Streamlabs OBS, the more possibilities are there for you. It’s now a matter of what you want to accomplish and how you want to present yourself on stream.
