- Set up an account on Twitch with a preferred email account.
- Find on your gaming console where you can broadcast your game.
- Select something to play.
- Start streaming on Twitch.
Insert coins to begin: The basics of creating a Twitch account
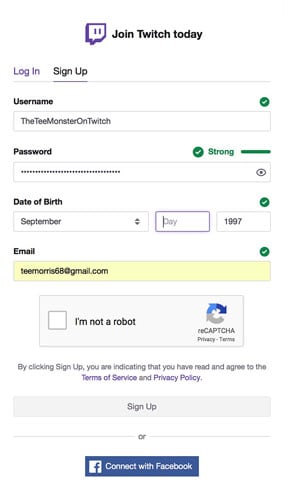
Within moments you can have a Twitch account activated and running, but that’s all you would have. It would be an empty space with the most basic of contact info and no details to speak of. Right now, you’re thinking “Okay, so when do I start streaming?” Let’s start from the beginning and then spend some quality time filling in the blanks and understanding this platform.- Go to Twitch.tv and select from the top-right side of your browser window the Sign Up option.
You can still watch Twitch streams without being signed up with the platform. However, if you want to take advantage of the Chat features, you will need an account.
- Come up with a username for yourself on Twitch.
This is how you will appear in Chat. This can be a nickname you go by, a play on words, or your own name. There can be a lot of different ways you can approach the Username. Just make sure you are not violating any Terms of Service on creating it.
When establishing a username for yourself, avoid picking something overly generic. Usernames like “Fortnitelover01” and “LeagueLegend2245” isn’t going to stand out in a crowd and will lead to a branding change if your channel grows to something bigger. Additionally, if you are constantly changing your handle, it can become problematic with people finding you — and yes, trusting you — on Twitch.
- Create a password.
- Enter in your birthday. Again, this is based on an honor system, but the birthday is there to verify your age and that it is within the Terms of Service as established by Twitch.
- Enter a valid email. This email is where all notifications and any news from Twitch are sent.
- After reviewing the Terms of Service and the Privacy Policy, click Sign Up to complete the application.
 Setting up a Twitch Channel only takes a few minutes and is free.
Congratulations! Your Twitch account is now active. Technically, from here, you are ready to start streaming. You have a place on Twitch, but presently, the state of your Twitch account is a lot like the state of a Twitter account newly launched where the Profile Picture is the egg, the bio is blank, and the username is your Twitter handle. When you come across Twitter accounts like that, you can’t avoid a hint of skepticism as to how genuine these accounts are.
So begins the work on completing the Twitch account and understanding the platform. These are details that, if you forge ahead without tending to them, you will find growth a challenge, ease of use a little elusive, and overall performance lacking. The sooner you sort them out, the better of a first impression you’ll make. Maybe these details feel tedious, but they are the “wax on, wax off …” of Twitch. Completing these steps will grant you a deeper understanding of the platform.
New Twitch, who dis: Completing the Profile
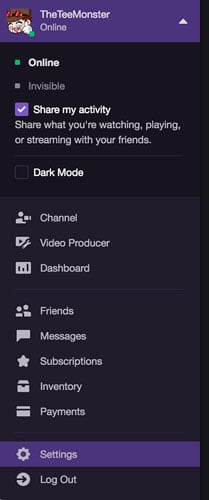
Signed into Twitch with a newly minted account, you have a blank slate where you begin assembling a persona for yourself. The Profile is where you introduce yourself to the public, many times through a brief bio, maybe a few visual touches like a photo or a banner image. Think of the Profile as the interior decoration of your house. When people walk into your home, they will learn quickly what kind of personality you are. That’s what we are going to build for you right now.- Go to your Twitch account and select from the top-right side of your browser window your Account Status’ drop menu. Select Settings (located near the bottom of the drop menu) to enter your Twitch account’s Profile. Your Account Status is always visible on the Twitch website. It tells you what is happening on your Channel and shares your activities with friends. You can also go “Invisible” or enable a “Dark Mode” scheme for the Twitch website.
- Find a good Profile Picture best representative of you. It can be anything (within reason), but it should be a simple image easily identified at a small size.
Twitch recognizes images in JPEG, PNG, and GIF formats. The dimensions of the image should not exceed 256x256 pixels or be larger than 10MB in file size.
As with other social media platforms, the best profile pictures are simple, basic images. You want backgrounds that aren't too busy and photos that are taken in close up. So long as you can tell what the image is at a glance, you have a good Profile Picture.
- Upload for your Profile Banner an image that sets a tone or an atmosphere for your account and Twitch Channel page. Twitch recognizes images in JPEG, PNG, and GIF formats. The dimensions of the image should not exceed 1230x380 pixels or be larger than 10MB in file size.
- Scroll down to Profile Settings and either review or enter in your desired email. Again, this email is where all notifications and any news from Twitch are sent.
- If needed, click on the pencil icon in the Username field to edit your Twitch handle. This email is where all notifications and any news from Twitch are sent.
- In the Display Name field, edit your Username to appear the way you want it to appear. For example, my username is “theteemonster” but “TheTeeMonster” is how I want it displayed.
- Scroll down to Bio and write up a brief biography of who you are.
- Single-click the Save Changes button to accept your changes.
 Selecting the Settings option will take you to the Profile option of your Twitch account. When completed, it should look something like Tee’s, pictured here.
The Profile section of your Settings is now complete, and when people visit your Channel, either online or through the Twitch app, they will see a completed profile as opposed to the default settings. It’s always best to put your best foot forward, you know?
If you decide that Twitch is not for you, go to Status →Settings →Disabling Your Twitch Account. You can follow the link offered to where you can shut your account down.
All in the details: Twitch channel and videos settings
Once your Profile is complete, you can progress to the right of the Settings options. The Twitch Prime option, quickly described, is the option for you to connect your Twitch account with an Amazon Prime account. This is an on-going special deal for Twitch users where various perks and deals are offered if you do this. Continuing past this, you have Channel and Videos where you set specific details about your Twitch Channel. While you now have an active account, that is not the same as having an active Channel. There is a subtle difference, and in Channel and Videos we will set parameters for our channel that helps you manage your Twitch Channel once content begins streaming.Twitch is always looking to improve their website and their User Interface (UI). That means some features highlighted here have moved from the “Settings” section to your “Dashboard” section. Throughout this exercise, we will be jumping between these two sections of Twitch.
- From your Account Status’ drop menu, select Dashboard and then select the Settings → Channel option.
- Upload or create a good Video Player Banner image (shown in the following figure) representative of your channel. It can be anything (within reason), but it should be representative of you or your channel.
The Video Player Banner is an image that works as your channel’s placeholder when you are not streaming or hosting another streamer’s Channel. Twitch recognizes images in JPEG, PNG, and GIF formats. The file size should not exceed 10MB.
The Video Player Banner, as shown, can also serve as banners for special events coming to your Channel. When creating banners, don’t be afraid to use them as promotional opportunities.
- Scroll up to Content Settings and either select Mature Content or leave the switch in the OFF position. Twitch’s Terms of Service dictate that, if your channel is broadcasting sexual activity, nudity, threats, or extreme violence, and your Channel is not marked as “Mature,” then Twitch can immediately and irrevocably terminate your account.
- Return to your Account Status’ drop menu. Select Settings and then select the Channel & Video option.
- Scroll down to Chat Options and either review or edit your settings.
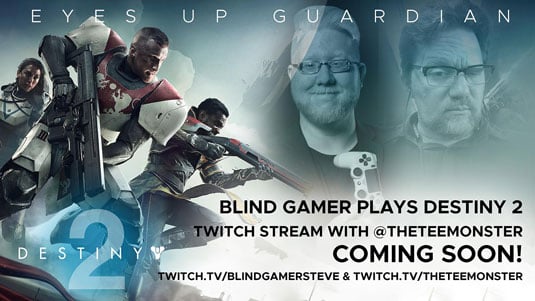 When choosing a Video Player Banner, consider an image that informs people of your stream, whether it is your schedule or additional social links like Twitter and Instagram.
Many of these details in your Channel can also be managed by Virtual Assistants like Nightbot and Deepbot.
Controlling the signal on Twitch: From privacy to connected third parties
Twitch, and social media on a whole, is all about sharing. That’s the truth about all of these platforms: You reap what you put into them. So, garbage in? Garbage out. Quality talk? Quality stream. Twitch is an investment both on an emotional as well as a financial level. But what if there are details you don’t want to share, or visitors to your Channel you don’t want to share with? If you want to keep it private, keep it offline. And there is nothing wrong with that. There is no Prime Directive of Social Media saying you will be cast out if you do not share everything. And maybe you want to only be notified of certain details with your account activity, and connect with only certain third parties.Here’s the final steps needed in keeping control of your account. It’s good to know what is running by default, and exactly what kind of control you have over your Twitch experience.
- In the Settings window, single-click the Security and Privacy option.
- Under Password is where you change your password.
- Activate Two-Factor Authentication for additional security with your Twitch account. Two-Factor Authentication is where, along with your password on Twitch, you enable an app like Authy to generate on your phone a security key. This is an additional layer of security in order to protect your account, something I and other streamers strongly recommend.
- Review Privacy settings to see if this is how you wish for people to reach out to you. Whispers are direct messages between you and other members of Twitch. By default, anyone — be they Friends or not — can reach out to you and swap messages and URLs. If managing Whispers is not preferred, you can block that avenue of communications here.
- Single-click Notifications and review here all the different ways Twitch keeps you informed on what is happening in your account and on your channel.
Twitch has broken down the various ways you are notified of people going live, when Whispers arrive, and when special events launch, into the following categories:
- On Twitch
- By Email
- On Mobile
- Advanced These are all the different parameters you can set up for Twitch to send you notifications of when certain actions occur. When a channel you follow goes live, when special events begin, or when Friends whisper to you, Twitch will send notifications. The Advanced tab lists of every channel you follow. If you decide, after clearing out your Inbox, that you would rather not be notified in email when Channels you follow go live, you can disable those notifications here.
- Single-click Connections and review here the various third-party extensions and services that you have connected with your Twitch account. These different connections — Amazon, Facebook, Twitter, and so on — are like plug-ins for social media platforms. They all, in some way, help your channel in notifying others when you go live, making the most out of your console’s connection to Twitch, and much more. Think of these Connections as digital accessories to your Twitch Channel.