Within the TI-Nspire Shapes menu, you find the Circle, Triangle, Rectangle, Polygon, and Regular Polygon tools. Here are the steps to use the Circle tool:
Choose [MENU]→Shapes and select Circle from the list.
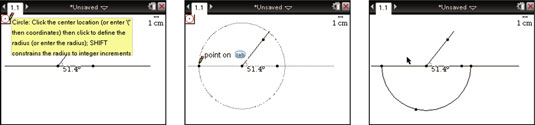
Hover over the Circle icon in the upper-left corner of the screen. See the first screen.
Move the cursor to the vertex of the angle and press [CLICK] to mark the starting point.
For the Triangle, Rectangle, and Polygon tools, the starting point is a vertex; for the Circle and Regular Polygon, the starting point is the center.
Use the Touchpad to adjust the size of the circle and press [CLICK] to lock it in place.
As with the Line and Ray tools, you have the option of pressing e and then [CLICK] to draw a second point on the circle. Or, just click somewhere on the line and a point will automatically appear. See the second screen.
Overlay a semicircle on the bottom half of the circle you just drew. Press [MENU]→Points & Lines→Circle arc.
Press [CLICK] on one of the intersection points of the line and the circle, press [CLICK] somewhere on the bottom half of the circle, and then press [CLICK] on the other intersection point of the line and the circle.
Hide the circle. Move your cursor over the top half of the circle, right-click ([CTRL][MENU]), and choose Hide.
See the third screen.
Press [ESC] to exit the current tool.