
You can easily access the flash by tapping on the little lightning bolt icon at the top left of your screen, as shown. Please keep in mind that the iPhone X and earlier series models look a bit different, but the functionality is pretty much the same.
Try the iPhone 11 series flash operation, visually illustrated in the figure that follows:
- Tap your flash icon at the top left to the On position.
- Tap the arrow icon in the upper middle of your screen.
- At the bottom left of your camera screen, tap on the flash icon.
- Choose Flash Auto if you are unsure of when your photos will need a flash. (Your iPhone will choose to activate the flash based on its assessment of the scene).
- Choose On if you want to force the flash to fire for every shot you take, even if your photo may not really need the flash to fire.
- Choose Off to return your flash to the never fire position, which is what most people use as a default for their photography.
- To return to the normal camera’s app appearance, retap the arrow at the top middle of your camera screen.
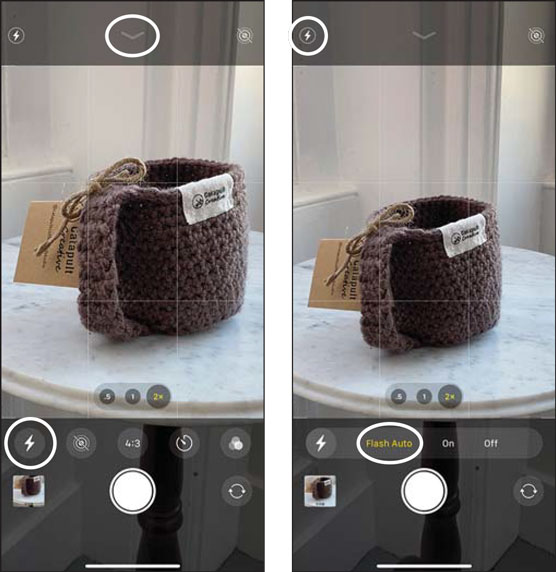 Screenshot samples of iPhone 11 series flash operation.
If you have an iPhone X series or earlier model, flash operation is super simple:
- Tap the flash icon at the top left of your iPhone camera screen
- Choose either Auto, On, or Off using the same decision-making parameters that you just read about in the preceding iPhone 11 flash instructions.
- Take your photo, remembering to switch back to flash off mode when finished.
 A side-by-side comparison of flash on versus flash off.
Most of the time viewers prefer the photo without the flash. The primary reason for this choice is that a flash tends to flatten out the look of the object being photographed. What previously had a three-dimensional organic appearance, now has a cold-looking, two-dimensional feel. A flash usually takes the viewer outside of what they’re used to seeing with their own eyes, to a view that is far less appealing due to the harsh, artificial, and directional light source.
You may be wondering when you would ever even bother with the flash. The following list can help you make your decision:
Turn on Auto Flash when you are
- In a poorly lit room photographing a specific object that isn’t too large.
- Photographing receipts for business (take the photo at a slight angle for best results).
- Doing selfies in darker environments.
- Taking fun snapshots of kids playing.
- Photographing an object or person with light shining from behind them.
- Unsure of when a photo would be better with a flash.
- Documenting scientific or medical findings.
- Creating progress report photos of detailed work if you’re a contractor.
- Any other trade-related work that favors sharp detail over artistic appearance.
- Artistic and creative photos.
- Portraits of people (selfies are an exception).
- Product photography.
- Any large space, as the flash won’t be strong enough to illuminate the room.
- Pretty much any scenario where you want an attractive, natural looking image.
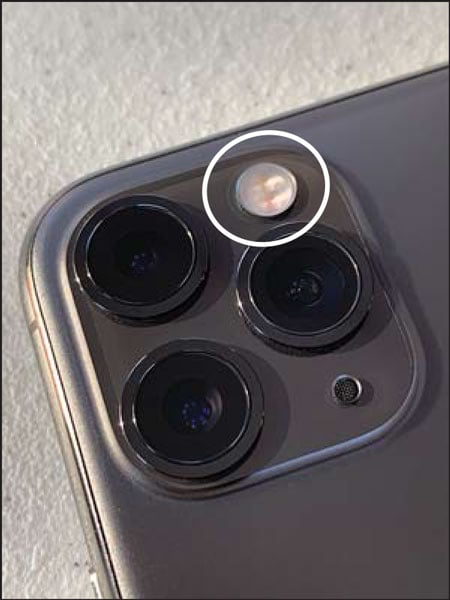 The location of an iPhone flash.
An off-camera flash setup is what the amateurs and pros use for stunning flash photography. Their flash or flashes are not attached to their camera, and they have different ways to make sure that their flashes fire at the same time that they take their photo. Because their flash(es) are not illuminating the subject directly straightforward (as in your iPhone), the subject maintains its sense of three-dimensionality and organic look.
Keep in mind, though, that with advancements in electronics, optics, and programming, each generation of iPhone produces better and better flash photographs. A great example is the selfie camera’s (front-facing camera) flash. While it’s technically not a flash but a full screen of continuous light, it produces remarkably good facial illumination when photographing yourself or you with a friend.
Give it a try . . . switch your camera to selfie mode, turn your flash to the On position, and take the photo. If you have kept your iPhone updated (the most recent operating system), then you will see a pleasing warm light fill your entire screen. The following figure shows how the selfie camera shines with a warmish-looking soft light.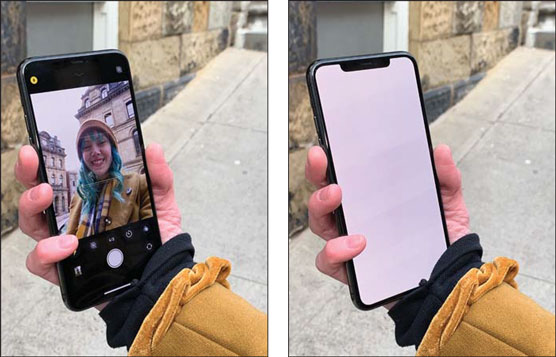 The selfie camera’s method for illuminating faces.