


Windows 10 allows you to enable different panes to make the most of your user experience. The different panes include: The Preview pane, the Details pane, and the Navigation pane. Here, you find details about enabling and using each of these panes.
Enable and use the Preview Pane
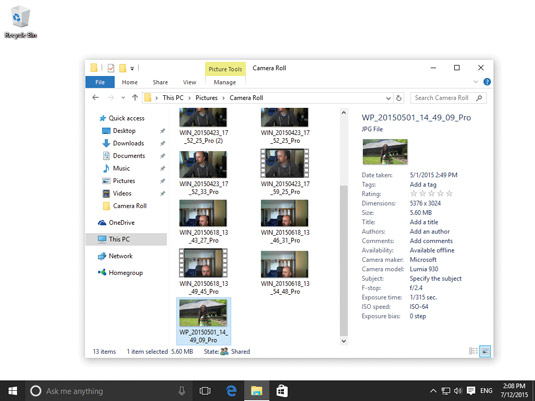
In File Explorer, you can enable a Preview pane that is shown on the right side of the window. As the name implies, you can use it to preview the contents of certain types of files. For example, if you select an image file in File Explorer, you can see a preview of it; if you select a text file, you can preview its contents.

You can see previews of only certain file types: text, images, and videos.
To enable the Preview pane, open File Explorer and follow these steps:
In the File Explorer window, click the View tab.
The View tab is shown.
In the Panes section, click the Preview Pane button.
The Preview pane is added to the right side of the File Explorer window.
Select several files one by one.
You can preview their contents in the Preview Pane, if they are text, images, or videos.
 Enabling the Preview pane in File Explorer.
To disable the Preview pane, just follow the preceding steps.
You can also enable and disable the Preview pane in File Explorer by pressing Alt+P on your keyboard.
Enable and use the Details Pane
In File Explorer, you can enable a Details pane that is shown on the right side of the File Explorer window. As its name implies, you can use the Details pane to find more information about each file, such as its size, the date it was created, and the date it was last modified. The fields of data shown in this pane vary from file to file. For some files, such as pictures, you see lots of data; whereas for other files, such as PDF files, you see less data.
To enable the Details pane, open File Explorer and follow these steps:
In the File Explorer window, click the View tab.
The View tab is shown.
In the Panes section, click the Details Pane button.
The Details pane is added to the right side of the File Explorer window.
To see a file’s details, click it to select it.
 Enabling the Details pane in File Explorer.
To disable the Details pane, just follow the preceding steps.
You can also enable and disable the Details pane in File Explorer by pressing Alt+Shift+P on your keyboard.
Disable or enable the Navigation Pane
In File Explorer, the Navigation pane is shown, by default, on the left side of the window. As the name implies, you can use it to quickly jump to different locations on your computer.
When the Navigation pane is disabled and you start File Explorer, either Quick Access or This PC is loaded, depending on your start location for File Explorer.
It’s generally not a good idea to disable the Navigation pane because doing so makes navigation more difficult.
If you decide to disable the Navigation pane, follow these steps:
Open File Explorer.
Click the View tab.
The View tab is shown.
In the Panes section, click the Navigation Pane button.
The Navigation Pane menu appears.
In the menu, click Navigation Pane.
The Navigation pane no longer appears at the left side of the File Explorer window.
 Disabling the Navigation pane in File Explorer.
To enable the Navigation pane, follow the preceding steps.
Enable the Libraries section in the Navigation Pane
By default, the Navigation pane doesn’t show the Libraries in Windows 10, as it did in Windows 7. Fortunately, the libraries aren’t gone; they’re just hidden. To enable and use the libraries in Windows 10, open File Explorer and follow these steps:
In the File Explorer window, click the View tab.
The View tab is shown.
In the Panes section, click the Navigation Pane button.
The Navigation Pane menu appears.
In the menu, click Show Libraries.
The Libraries are now added to File Explorer.
Click the Libraries shortcut in the Navigation Pane to view your libraries.
 Enabling the Libraries section in File Explorer.
