


Smartsheet’s web forms are an easy way to collect information you need — not from just your collaborators, but from anyone outside of your project team. Say you’re looking for feedback on a product and you plan to ask a hundred people some questions about it. Can you imagine how long it would take to input all the responses you get using a standard questionnaire? With Smartsheet web forms, you can have people fill out an online questionnaire and have that data automatically fed into a sheet in Smartsheet.
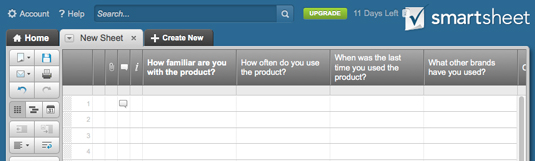
The first thing you’ll want to do is set up your sheet how you want it. That is, if you’re going to be asking questions, it’s best to set up your sheet’s column structure to mimic the questions you’re going to ask. See the example in Figure 1.
To change a column’s name in a sheet, right-click the column header and choose Rename Column. From there, you can rename your column. You can also choose the type of input you want for the cells in that column. For example, if you want to provide options for the viewer to choose from, you can choose Dropdown List as the column type and input the values you want the viewer to choose from. Note that the primary column must always remain a text/number field.
Source: smartsheet.com
Next, follow these steps to turn this sheet into a web form that automatically populates the rows of the sheet with filled-in data:
With the sheet open, click the Web Forms tab at the bottom.
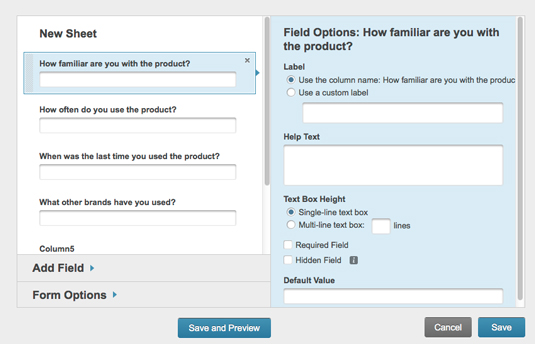
Click Create New Form. The web form options dialogue box appears (see Figure 2)
On the left, you see a basic layout of how your form will look. Click the section of the form you want to change.
If you click on the sheet title, you can give the form a new title and include a description, which is great for providing instructions.
If you click on one of the questions, you can change the question label, provide help or explanatory text for the question, determine how many lines tall the text box should be, and decide if the field is required (that is, if the viewer has to fill in the field).
If you want to create new fields without going back to your sheet to change it, click Add Field. Click Create New to add a new question, specifying the type of column you want. You can also add headers and dividers to the form layout on the left.
Click Form Options to further fine-tune your form:
Confirmation Options: Choose to display a message after the user completes the form, to reload the same form for a new entry, or send the user to a separate Web page. You can also allow users to receive an e-mail message noting their completion of the form.
Location of New Entries: When users fill out the form, you can specify whether new entries appear at the top or bottom of the sheet. If you want to see the entries chronologically, then choose bottom of the sheet; if you want to see the newest entries first, choose top.
Style: If you branded your sheet with a logo or different colors (or just kept the standard Smartsheet branding), your form will use that branding in its formatting if you choose Branded. Plain forms are just black text on a white background with no formatting.
When finished, click Preview to view your form and/or click Save to close out of it.
If you add columns to the form inside the web form options box, they are added to the sheet itself. No need to update the sheet.
Source: smartsheet.com


