


Am I saying that when you conceive of a project you need to know whether or not the output is aimed at print output or screen output or both? Basically, yes. Although you can change horses in the middle of the stream, you might create unnecessary complications in sizing and coloring objects. It's best to anticipate the output, and—to repeat my mantra—working backward from there.
How to make basic choices for an Illustrator document
Shortly I walk you through my curated set of options for creating a document, but all the options boil down to three essential choices: color mode, units of measurement, and dimensions:- Print color or web color: Projects destined for commercial printing should probably be created with CMYK color. That said, even high-quality personal printers, and some commercial print workflows, accept or prefer RGB color. CMYK (cyan, magenta, yellow, and black) is referred to as subtractive color because these four colors are printed on top of each other to create a full range of colors. RGB (red, green, blue) is referred to as additive color because red, green, and blue dots of varying intensity are combined on a screen to generate a spectrum of color.
- Units of measurement: You use pixels for web and other increments (such as inches, centimeters, or points) for print projects.
- Dimensions (height and width): Because vector graphics are infinitely scalable, sometimes dimensions are not that relevant. But when illustrations are aimed at a specific device with a set width and height (such as a mobile phone app), viewport (a defined website width), or print output (such as a poster or postcard), you want to define an artboard (or multiple artboards) that match those dimensions. Artboards are defined spaces in the Illustrator canvas that can be easily shared for print or screens.
Using document presets in Illustrator
Illustrator comes loaded with document presets. You access these presets by clicking the Create New button in the opening Illustrator screen, or by choosing File→New. Those presets are grouped into the tabs shown here: Recent, Saved, Mobile, Web, Print, Film & Video, and Art & Illustration.The tabs at the top of the screen provide access to the different categories. After you select a category, the opening screen displays both presets and templates (more developed projects that you can customize).
The View all Presets link pushes the templates down the screen and displays all the available presets. The following figure shows presets available in the Mobile tab of the New Document dialog, as well as the Preset Details panel on the right, which displays (and can be used to configure) basic color mode, dimension, and print settings.
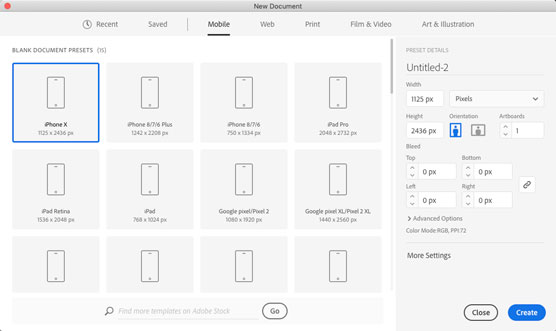 Mobile presets.
Presets are handy time-savers. And most of them are pretty self-explanatory: The Recent tab shows presets and custom document configurations you’ve used recently, and the other presets are organized by output. They provide instant access to color mode, units of measurement, and dimensions for different kinds of projects, as well as more detailed options (such as printer-only features) applicable to specific media.
I think most readers will find adding profiles to the Saved tab in the New Document dialog to be more hassle than it is worth. But if you have a need to create saved profiles, and you are fluent in navigating hidden system folders, you can save new profiles.
To save a new profile on a Mac, save a blank document with the appropriate settings to the New Document Profiles folder in this path: Users→Library→Application Support→Adobe→Adobe Illustrator 23→[your language>→New Document Profiles.To save a new profile in Windows, save a blank document with appropriate settings to the New Document Profiles folder in this page: Users→AppData→Roaming→Adobe→Adobe Illustrator 23→[your language>→x64→New Document Profiles.
My preferred work-around for custom presets is to simply create blank documents with settings I need, and save them as an Illustrator document that I can edit and resave with new filenames.
Define color mode, artboard size, and raster resolution
Although the presets are nice, they don’t match every project you will do. So you need to know how to configure document features by hand.To define document color mode, units of measurement, dimensions, and other details, click the More Settings button. This opens the More Settings dialog, revealing the full set of options for new documents.
The essential document setting options are as follows:
- Name defines the default filename when you save or export the entire document.
- Profile can shortcut the process of defining document settings by letting you choose or change the kind of document you are creating.
- Number of artboards defines how many artboards of the defined size will be generated. The set of diagrams to the right of the number of artboards defines how the artboards will be arranged. The Spacing drop-down configures the space between each artboard on the canvas, and the Rows/Columns spinner defines the number of rows or columns that will display artboards.
- Size drop-down options can shortcut the process of defining the width and height for your document. The options depend on the profile you selected. For example, if you choose a print profile, sizes include A4, a Letter, or a Tabloid, among others. If you choose Mobile profile, the options include iPad, Apple Watch, and Google pixel.
- Width and Height boxes define the width and height of your project. If you are generating multiple artboards, all the artboards will inherit this width and height. The Orientation options toggle between portrait and landscape orientation.
- Units is where you choose a unit of measurement appropriate to your project: pixels for digital output or points, picas, inches, millimeters, or centimeters for print.
- Bleed is relevant only for files sent directly to print production, such as postcards, posters, or other print media (for example, shirts or mugs). If you're preparing graphics to send directly to a print shop, consult with the printer on what kind of bleed to define, if any.
- Color Mode options are RGB for screen output and CMYK for commercial printing.
- Raster Effects settings define the resolution of bitmap effects (such as Photoshop Effects) applied to your illustration.
- Preview mode is normally left at the default setting. The Overprint option allows you to preview how commercial print output will look. Consult with your commercial printer on if, when, and how to use this options.
What if you change your mind about a document setting? You can change settings at any stage of a project by choosing File→Document Color Settings (for color mode) or File→Document Setup (for everything else including units of measurement).


