


The Liquify tools
The Liquify tools can accomplish all sorts of creative or wacky (depending on how you look at it) distortions to your objects.You can choose from eight Liquify tools. You should experiment with these tools to understand their full capabilities. Here are some tips:
A variety of Liquify tools are available by holding down the mouse button on the default selection, the Width tool. If you use the tools frequently, drag to the arrow at the end of the tools. You can then position the tools anywhere in your work area.
Double-click any Liquify tool to open a dialog box specific to the selected tool.
When a Liquify tool is selected, the brush size appears. Adjust the diameter and shape of the Liquify tool by holding down the Alt (Windows) or Option (Mac) key while dragging the brush shape smaller or larger. Press the Shift key to constrain the shape to a circle.
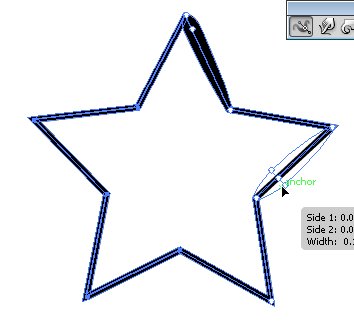
Using the Width tool, cross over a selected path. When a hollow square appears, click and drag outward (or inward), and the stroke width at that location is adjusted.
 Use the Width tool.
If you want a little more accuracy, you can double-click the stroke by using the Width tool and create, modify, or delete the width point by using the Width Point Edit dialog box.
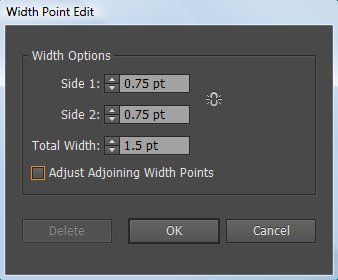 Customize the Width tool in this dialog box.
To create a discontinuous width point, just create two width points on a stroke with different stroke widths and then drag one width point on to the other width point to create a discontinuous width point for the stroke.
| Width Tool Function | Windows | Mac OS | |
| Create non-uniform widths | Alt-drag | Opt-drag | |
| Create a copy of the width point | Alt-drag the width point | Opt-drag the width point | |
| Copy and move all the points along the path | Alt+Shift+drag | Opt+Shift+drag | |
| Change the position of multiple width points | Shift-drag | Shift-drag | |
| Select multiple width points | Shift-click | Shift-click | |
| Delete selected width points | Delete | Delete | |
| Deselect a width point | Esc | Esc | |
| Icon | Tool Name | What It Does to an Object | |
| Width | Increases the stroke width or height when you click and drag a path. | ||
| Warp | Molds it with the movement of the cursor. (Pretend that you’re pushing through dough with this tool.) | ||
| Twirl | Creates swirling distortions within it. | ||
| Pucker | Deflates it. | ||
| Bloat | Inflates it. | ||
| Scallop | Adds curved details to its outline. (Think of a seashell with scalloped edges.) | ||
| Crystallize | Adds many spiked details to the outline of an object, such as crystals on a rock. | ||
| Wrinkle | Adds wrinklelike details to the outline of an object. | ||
Using the Envelope Distort command
Use the Envelope Distort command to arch text and apply other creative distortions to an Illustrator object. To use the Envelope Distort command, you can use a preset warp (the easiest method), a grid, or a top object to determine the amount and type of distortion.Using the preset warps
Experimenting with warp presets is a little more interesting if you have a word or an object selected before trying out the warp options. To warp an object or some text to a preset style, follow these steps:- Select the text or object that you want to distort and then choose Object → Envelope Distort → Make with Warp.
The Warp Options dialog box appears.
- Select a warp style from the Style drop-down list and then specify any other options you want.
- Click OK to apply the distortion.
If you want to experiment with warping but also want to revert to the original at any time, choose Effect → Warp. You later change or delete the warp effect by double-clicking it in the Appearance panel or by dragging the effect to the trash can in the Appearance panel.
Reshaping with a mesh grid
You can assign a grid to an object so that you can drag different points and create your own, custom distortion.Follow these steps to apply a mesh grid:
- Using the Selection tool, select the text or object that you want to distort and then choose Object → Envelope Distort → Make with Mesh.
The Envelope Mesh dialog box appears.
- Specify the number of rows and columns you want the mesh to contain and then click OK.
- Drag any anchor point on the mesh grid with the Direct Selection tool to reshape the object.
To delete anchor points on the mesh grid, select an anchor point by using the Direct Selection tool and press the Delete key.
You can also use the Mesh tool to edit and delete points when using a mesh grid on objects.Reshaping an object with a different object
To form letters into the shape of an oval or to distort selected objects into another object, use this technique:- Create text that you want to distort.
- Create the object you want to use as the envelope (the object to be used to define the distortion).
- Choose Object → Arrange to ensure that the envelope object is on top.
- Select the text and Shift-click to select the envelope object.
- Choose Object → Envelope Distort → Make with Top Object.
Choose Effect → Distort and Transform → Free Distort to take advantage of the Free Distort dialog box. You can edit or undo effects at any time by clicking or deleting the Free Distort effect from the Appearance menu.


