


Here, you are directed through the steps to create a simple button with a solid fill and some text in Adobe XD. Follow along with these simple steps.
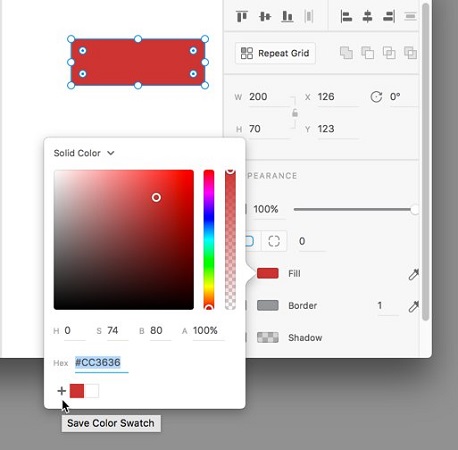 Apply a color with the color picker. Save a color by clicking on the Save Color Swatch + sign.
- Select the Rectangle tool and click and drag to create a rectangle of any size on an artboard.In this example, the standard iPhone 6 template is selected.
- With the rectangle still active, type 200 into the Width textbox and 70 into the Height textbox. Press Tab after you type each to confirm the value.
Applying a solid fill
Here, you add a solid fill color to your shape:- Make sure your rectangle is still selected. Click the white box to the left of Fill in the Properties panel to open the color picker.
- Scroll through the colors by clicking and dragging on the Hue slider. After you have entered the hue color that you like, click a color in the color panel to apply it to your rectangle.
You can save colors that you might use often by clicking the Save Color Swatch plus sign at the bottom of the color picker.
You can apply transparency to your fill by using the slider on the right side of the color picker window.
- Uncheck the checkbox to the left of Border to remove the stroke around the rectangle.
Apply a color with the color picker. Save a color by clicking on the Save Color Swatch + sign.Rounding your corners
You can leave the corners square or follow either of these next steps to round the corners of the shape:- You can round corners visually by clicking and dragging the corner widgets inside the corners of the rectangles.
 Click and drag the corner widgets to round your corners.
Hold down the Alt (Windows) or Option (Mac OS) key and drag one corner radius to make it an independent value.
- You can also enter values for your corner radius entering values in the Corner Radios textboxes in the Properties panel.
 Enter values into the Properties panel to add varying sizes in the corner radius.
Adding text to your button
Now you add the text to the button:- Select the Type tool from the Tools panel and then click inside your button. A text cursor appears. Don’t worry about the exact placement of the textbox because this can be moved later.
- Type the word Submit, and then select the text by pressing Ctrl+A (Windows) or Command+A (Mac).
- With the word selected, change the properties in the Text area of the Properties panel to select a font and a type size you like. You can also change the alignment by selecting the Left Align, Center, or Right Align buttons.
You can select your current font size in the Font size textbox and press the arrow up or down to increase or decrease the font size.
- Click on the Fill box to change the color of your text.
 Select your type properties using the Text section in the Properties panel.


