

Toothpaste effect
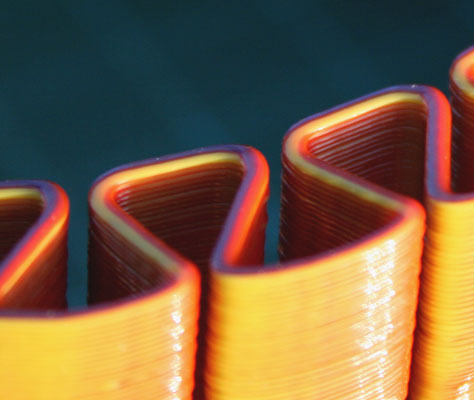
In one of the many RepRap experiments conducted at Bath University in the United Kingdom, Myles Corbett and Dr. Adrian Bowyer investigated mixing two colors in a single nozzle. They discovered that plastic materials don’t blend naturally; instead, they produce a “toothpaste effect,” similar to striped toothpaste. Corbett and Bowyer continued to develop the extruder. After trying all sorts of baffles, chambers, and passive methods of achieving a mix, they concluded that only an active method of stirring the melted plastic together inside the hot-end would provide true mixed-color output. They did this — and it worked.
If you’d like to read more about this work, you can find an excellent report on color mixing at Bath (more than 50 MB of it).
Three-way color mixing
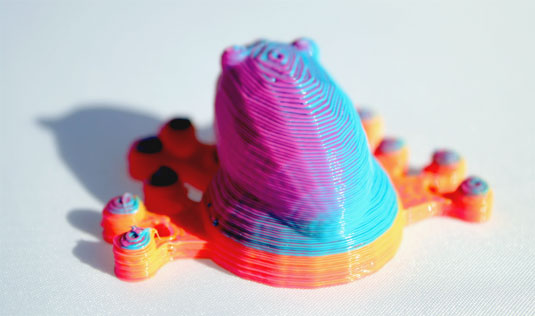
Richard’s efforts with color and material mixing led to the creation of a three-way extruder that feeds three materials into a single nozzle. He found that each extruder could be controlled and that the toothpaste effect would be interesting, so he decided not to implement an active mixing system. This approach produced unique prints, with different colors appearing on two or three sides of an object.
Further details on this approach to three-way color mixing are available.
Two-color printing
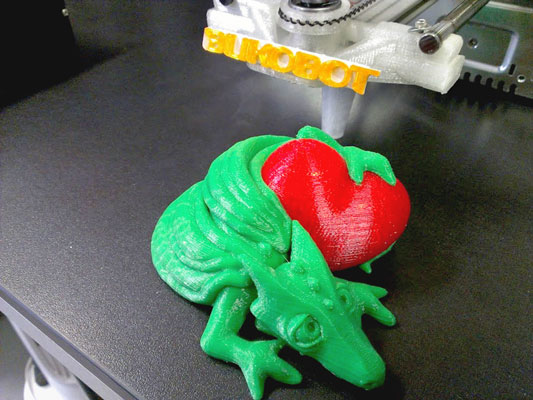
A much more common way to produce a two-color print is to use two separate extruders and two hot-ends. You can load one color into the first extruder and a different color into the second. For that matter, you could load different types of materials if you find that they’ll print together. The slightly more complex process, which uses thermoplastic, involves these general stages:
- Design two 3D objects that fit together, and load them into your slicing software.
- Specify a different extruder for each printed object, and combine the G-code output into a single G-code file that the printer understands.
- The 3D printer heats both extruders. While it prints the first object with Extruder 1, it drops the second extruder’s temperature enough to keep the plastic from oozing out.
- The printer lowers Extruder 1’s temperature, and Extruder 2 prints the first layer of the second model.
- The printer repeats the process until both models are printed, fused as one object in two colors.
Here, the dragon and heart are separate 3D objects, placed together in the slicing software. One extruder is specified for each object; each extruder is fitted with a different-color filament.
Layer-selective color printing
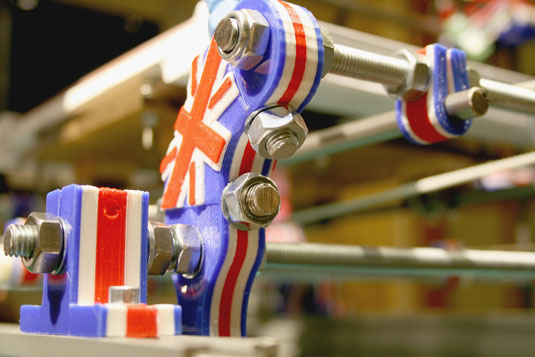
What if you have only one extruder but want to try some multicolor prints? You can achieve impressive, colorful results on almost any RepRap 3D printer by using a process called layer-selective color printing.
When Richard first made multicolored objects, he designed a simple filament joiner. This approach allowed sections of different filaments to be melted together; when the fused filament line was used in a 3D printer, it made objects with stripes of different colors. You can 3D-print a wide range of useful objects using different colored layers. For example, signs allow a colored background to be printed first and a different color of text to be added on subsequent printed layers. Either joining filament strands together or switching filament color during a 3D print allows production of many separate colors by designing the object’s features with different layer heights and printing different-colored layers on top of each part. The flag shown here was designed with the red, white, and blue features at slightly different heights; when one color finished printing, another color printed on top of it. Selecting the parts of specific layers to expose produces a multicolored object.
Cut-and-follow-on printing
A simpler method doesn’t join the filaments, but uses a two-stage cut-and-follow-on process, as follows:
- Carefully cut the filament close to the extruder while an object is being printed.
- Feed another color manually as the extruder draws down the cut end.
With a little patience and practice, you can use this technique to produce all sorts of interesting color effects.
The only down side is that the filament oozes during printing. With a normal, solid length of filament, the extruder retracts a little after each print move. But the extruder retracts while a section of cut filament isn’t joined to the preceding section; a little filament oozes out of the hot-end. A very fast travel move can compensate for the ooze, but such fast moves weren’t possible in the early days of home printing; in general, filament joining was a better solution.
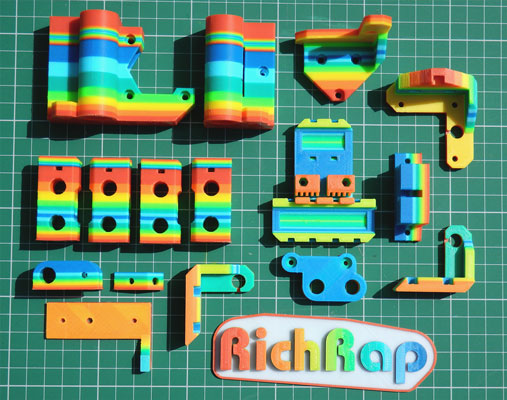
If you print an entire plate of many parts, and if you can cut and load a new color every 15 minutes or so (or however often you desire), you could end up with an entire set of printed parts in fabulous colors. These parts were printed in rainbow colors with a single extruder, using the cut-and-follow-on method for continuous printing.


