


- Sign into AWS by using your user account.
- Navigate to the RDS Management Console.You see a Welcome page that contains interesting information about RDS and what it can do for you. However, you don’t see the actual console at this point. Notice the Navigation pane at the left. You can click the left-pointing arrow to hide it as needed. Many of the RDS Dashboard options are the same as those used by EC2, which is no surprise, given that you use EC2 to support the database.
 Getting started with the Amazon Relational Database Service (RDS).
 - Click Get Started Now.
You see the Select Engine page. Notice that you can select a major vendor and then a specific version of that vendor’s product. For example, the screenshot shows three versions of SQL Server (others are available).
 Choose a vendor and then a specific vendor product.
You can download a free local copy of MySQL from. The MySQL Community Edition is free, and you can obtain trial versions of the other editions. Most vendors do provide a free version of their product for testing and learning purposes.
Select Free Tier Eligible Only if you want to select only a free-tier database. You still see the other options, but the Select button is grayed out so that you won’t inadvertently select a paid option. Using free options can save you money on software, but developers must also choose an option that works with the database the organization uses. Otherwise, you encounter potential problems when moving your application from testing to production.
- Click Select next to the MySQL Community Edition entry.
You see the Specify DB Details page. Notice that the Navigation page specifies that this DBMS is free-tier eligible. The right pane contains all the details about the DBMS instance.
 Specify the details used to create the database instance.
 - Select the Only Show Options that are Eligible for RDS Free Tier.Choosing this option helps ensure that you don’t choose features that will require payment later.
- Choose MySQL 5.6.27 in the DB Engine Version field.
The DB Engine Version field doesn’t automatically select the most current version. It appears to select the most commonly used version instead. In addition, the drop-down list doesn’t display the versions in order. Make sure that you look through the entire list for the version you need before assuming that AWS might not make it available.
- Choose db.t2.micro in the DB Instance Class field.To retain free-tier compatibility, you must choose this particular class. It pays to review the free-tier requirements. This informational page provides details about free-tier usage, such as the instance type, the kinds of database product you can choose, memory requirements, and so on.
Because the free-tier requirements can change at any time, you must review the free-tier materials before making choices about the database you want to work with. You may need to modify the selections to ensure that you maintain free-tier support and don’t incur any expenses.
- Ensure the Multi-AZ Deployment field displays a value of No.
When using the free-tier options, AWS greys this field out and automatically selects No for you. A Multi-Availability Zone (Multi-AZ) configuration makes your setup more reliable and faster by creating duplicate databases in multiple zones. Check out this discussion for additional details specifically regarding Multi-AZ.
- Choose General Purpose (SSD) in the Storage Type field and type 20 in the Allocated Storage field.When working with MySQL Community Edition, you must allocate at least 5GB of storage. However, the free tier allows you to allocate up to 20GB, which is the maximum amount that the MySQL Community Edition can use. To get the maximum performance from your experimental setup, you want to allocate as much memory as you can.
Depending on the DBMS you choose, the wizard may warn you that choosing less than 100GB of storage can cause your application to run slowly when working with high throughput loads. This warning isn’t a concern when creating an experimental setup. However, you do need to keep the storage recommendations in mind when creating a production setup.
- Type MyDatabase in the DB Instance Identifier field.
The instance identifier provides the means for uniquely identifying the database for access purposes. Usually you choose a name that is descriptive of the database’s purpose and is easy for everyone to remember.
- Type a username in the Master Username field.
The master user is the administrator who manages the database and will receive full access to it. A specific person should have the responsibility, rather than assign it to a group (where responsibility for issues can shift between people). When working as a sole developer on a project, you should type your username in this field to keep things easy. When working in a group setting, make sure you get the correct username and password from the group leader or administrator.
- Type a password in the Master Password field, repeat it in the Confirm Password field, and then click Next Step.
You see the Configure Advanced Settings page. This page lets you choose the VPC security group used to identify incoming requests (before they arrive at the DBMS); the authentication directory used to authenticate database users who rely on Windows Authentication; the networking options used to access the DBMS (such as the port number); the backup plan; the monitoring plan; and the maintenance plan. You do need to set the VPC security group to ensure that you can access the database.
 Define the connectivity, backup, monitoring, and maintenance details.
 - Choose the Default-Launch security group created as part of defining the EC2 setup.
Depending on the DBMS you choose, you may find other database options that you can set. For example, MySQL lets you provide the name of an initial database. It pays to go through the settings carefully to ensure that you make maximum use of wizard functionality.
- Type FirstDatabase in the Database Name field and then click Launch DB Instance.AWS starts the instance creation process.
- Click View Your DB Instances.You see the RDS Management Console.
 Creating your first database provides access to the RDS Management Console.
The database creation process can take several minutes to complete. The Status field tells you the status of the database. As long as the Status field continues to say Creating, you must wait to perform any additional tasks. However, you can download and install any products required to access the database (if you haven’t done so already).
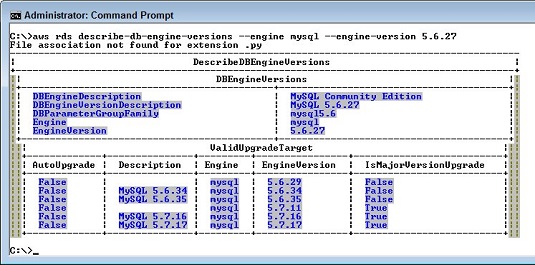 Use the CLI to obtain useful information about the database engine or to manage it.


