


Before you can capture cinema quality photos and video with your drone, you must configure your GoPro. You can configure your GoPro by navigating the small screen on the front of the device. Or you can use the GoPro mobile application, if you have an Apple, Android, or Windows smartphone.
Once installed on your phone, the GoPro app gives you the ability to remotely configure camera settings, livestream video from the camera, and even share content to the web. You can also start and stop video recording and snap photos remotely with the mobile app.
If you want to control your GoPro with your smartphone, you must first download the app to your mobile device from your device’s app store. The process for pairing your phone to the GoPro varies depending on the version of GoPro you have and the type of phone you have. To get detailed instructions for all devices, visit GoPro Support online.
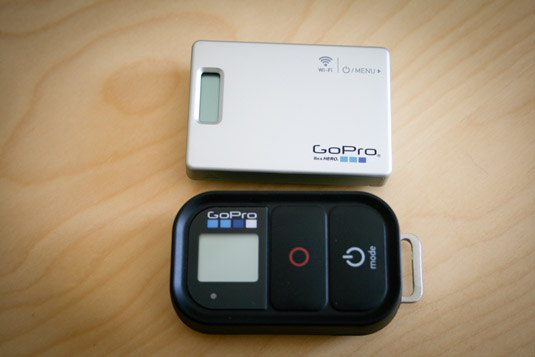
If you don’t have a smartphone available, you can also use a GoPro remote to control your GoPro while it is flying high on your drone. The remote will give you control of the camera distances topping nearly 600 feet. Snap photos, start and stop video, and configure you camera on the fly with the remote.
Before you purchase the GoPro remote, you should consult your drone’s user manual to ensure that your GoPro’s Wi-Fi will not interfere with your Drone’s wireless communication system. The DJI Phantom drones do not play nicely with GoPro Wi-Fi and therefore you can’t use the app or the remote.
If your drone does not support wireless control, then your next best bet is to set the GoPro to record just prior to taking off. When you land your drone, you will need to stop the recording. The downside to this is that you will have to process a video file that is as long as your flight from takeoff to landing.
The GoPro Hero4 Black shoots in several video modes going all the way up to 4k which is essentially 4 times bigger than High Definition video which is commonly referred to as 1080p. The settings in 4k are somewhat restrictive and the files are so big they can be nearly impossible to work with for some computers, therefore, the best setting to get you started is 1080p Video at 60 frames per second (FPS), and a narrow field of view (FOV).
To configure your GoPro Hero4 with the settings detailed above using your mobile phone, follow these steps:
Turn your GoPro on so that your smartphone can detect it.
The GoPro camera indicator screen should light up and indicate that it is powered on. Unless you configured your GoPro camera otherwise, it should also flash blue to indicate that Wi-Fi is on.
Connect your smartphone to the GoPro camera’s Wi-Fi.
You should see the Wi-Fi from the GoPro camera listed under your wireless connections from your smartphone. You may need to set up the Wi-Fi name and password on your GoPro camera; for instructions on how to do this, see the manual for your GoPro camera.
Using your smartphone, launch the GoPro application.
The app loads the main screen with several options, including a Connect and Control button.
Tap Connect and Control to take control of your GoPro camera.
If your phone is able to successfully connect to your GoPro camera, the app loads a streaming video feed from your GoPro camera and presents you with several options for controlling your GoPro camera remotely.
To configure your Camera, tap the wrench icon located in the bottom of the screen. On an iPhone, this is located in the bottom right.
The Configuration screen loads, giving you several options for your camera.
 Credit: Courtesy of Mark LaFayThe settings button is in the bottom right side of the camera control screen on the GoPro app for iPhone.
In the Video Settings section of the configuration screen, locate and tap Resolution and change the resolution to 1080p (not 1080p Superview).
The setting changes, and then you are returned the configuration menu.
In the Video settings section of the configuration screen, locate and tap FPS (Frames Per Second), and set it to 60. If you have an older model GoPro camera, you may top out at 30. This is acceptable, as well.
The setting will change and then you will be returned the configuration menu.
In the Video settings section of the configuration screen, locate and tap FOV (Field of View) to change it to Narrow.
This will remove the fish-eye effect that can appear on GoPro footage when the FOV is set to Medium or Wide.
Locate the Done button at the top of the screen and tap it to return to the camera control screen.
Configuring your GoPro camera will be a little bit of a chore, mainly because the screen and buttons are so small. But once you’ve gotten your GoPro camera configured and connected to your smartphone, getting up and running each time you fly will be fast and easy.


