


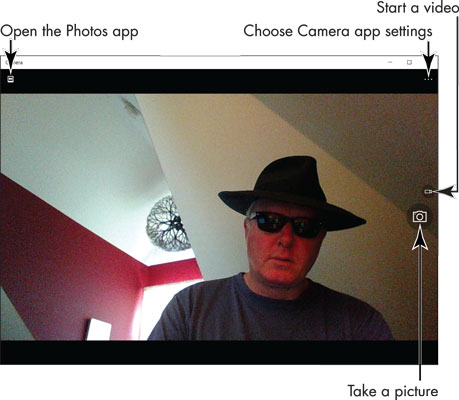
To take quality photos in the Windows 10 Camera app, you need to understand and be able to change the app's settings. If the Camera app isn't open, open it now. Select the Settings button located in the upper-right corner of the Camera window. A panel appears with two options, Self Timer and Settings.
Choose Settings.
The Settings panel opens, as shown here. From here, you can tell the Camera app how to take photos and videos.

Under Press and Hold Camera Button, choose what happens when you hold down the Camera button rather than click or tap it.
The Video option creates a video; the Photo Burst option creates a series of snapshots; the Disabled option turns this feature off.
Under Photos, decide how you want to take photos:
Aspect ratio: These options determine whether you shoot narrow (the 4:3 option) or widescreen (the 16:9 option) photos.
Framing grid: These options help you aim the camera. For example, the Crosshairs option places crossing lines in the center of the screen so that you know where the center of your photos will be.
Under Videos, decide how you want to take videos:
Video Recording: These options determine how many pixels appear in your videos across the screen horizontally and vertically. A pixel is one point of color. Suffice it to say, the more pixels in the setting, the larger the video screen is.
Flicker Reduction: These options reduce the flickering that can occur when video is taken under fluorescent light. Consider choosing an option other than Disabled if you are filming indoors. The 50 Hz (hertz) setting applies to the U.S. and Canada, where the AC (alternating electrical current) runs at 50 Hz; the 60 Hz setting applies to rest of the world.
Digital Video Stabilization: This option helps prevent blurring in videos. Turn it off only if you want blurring.
Return to the Camera app by clicking or tapping the Camera app screen.
Return to the Start screen.

