

This feature is handy when you want to peek at the contents of a file without having to open it.
To take a Quick Look yourself, select an icon and do any of the following:
- Choose File →Quick Look.
- Right-click or Control-click the file’s icon and choose Quick Look from its contextual menu.
- Choose Quick Look from the Action button/menu on the toolbar.
- Use one of its two keyboard shortcuts: Command+Y or the easiest shortcut ever, spacebar.
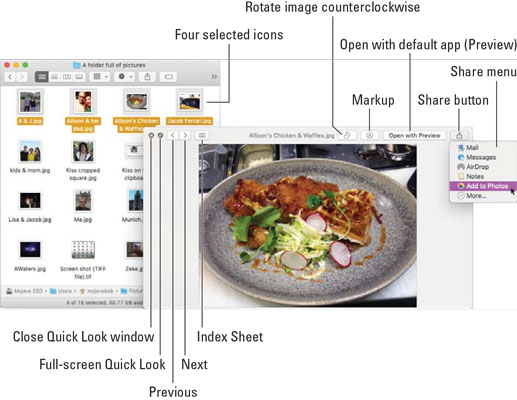 The Quick Look window (right) displaying an image from one of the four selected icons in a folder full of pictures (left).
The cool part is that while the Quick Look window is open, you can select different icons in the Finder window and quickly peek at their contents in the Quick Look window. Try using the arrow keys to select the next or previous icon!
The bad news is that although Quick Look works with many types of files — Microsoft Office, Apple iWork, plain-text, PDF, TIFF, GIF, JPEG, PNG, and most types of audio and video files — it doesn’t work with all files. You’ll know it doesn’t work if Quick Look shows you a big document, folder, or application icon instead of the contents of that file.
If you select multiple items before you invoke Quick Look, three buttons appear at the top of the Quick Look window near the left side: Previous, Next, and Index Sheet. With these controls, you can view all selected items at the same time as an index sheet, as shown, or view them one at a time by clicking the Next or Previous buttons.
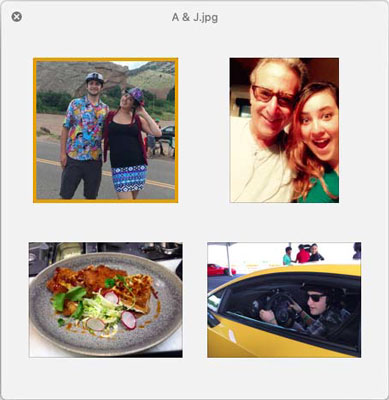 Four selected files displayed as a Quick Look index sheet.
The outline around the image at the top left indicates that the pointer is hovering over that image (A & J.jpg); if I were to click, that image would fill the window, and the icons shown at the top of the Quick Look window shown would reappear.
New in Mojave is the capability to invoke Markup from the Quick Look window. Just click the Markup icon and the Markup tools appear.
Share and share alike with the Share menu
If you use an Apple iDevice, you’re surely familiar with the rectangular button with an arrow escaping from it. That’s the Share menu, and it has as many as seven options (depending on the type of file you selected):- Mail: Launches the Mail app and attaches the selected file to a blank message, ready for you to address and send.
- Messages: Launches the Messages app and puts the selected file in an outgoing message, ready for you to address and send.
- AirDrop: Sends the selected file to other Mac users or iDevice users. As long as you’re on the same Wi-Fi network, your file transfer takes but a single click (or a single tap on iDevices).
- Notes: Sends the selected file to the Notes app, where you can add it to an existing note or create a note for it.
- Flickr: Posts the selected file to Flickr, a popular photo-sharing site. Note that this option appears only when you select an image file. If you don’t see it when you click your Share button, you probably selected a PDF or other type of file that can’t be uploaded to Flickr.
- Add to Photos: Adds the selected item to the All Photos album in the Photos app.
- More: Mojave’s extensible architecture lets you add other services (such as Vimeo or LinkedIn) and apps (such as Photos or Aperture) to your Share menu. To manage these extensions, choose More from the Share menu. Alternatively, you can launch the System Preferences application, click the Extensions icon, and then click the Share Menu item on the left side of the window.
Slide into Slideshow (full-screen) mode
Quick Look really shines in its Slideshow (full-screen) mode, which you can start with any of these techniques:- Hold down Option and choose File→ Slideshow.
- Press Command +Option+Y.
- If your file is already open in the Quick Look window, click the full-screen button, as labeled.
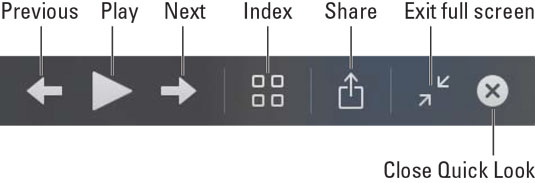 The Slideshow controls appear automatically in full-screen Slideshow mode.
The Slideshow controls disappear after a few seconds of inactivity; if you don’t see them when you need them, just wiggle the pointer anywhere on screen, and they’ll magically reappear.
To exit Slideshow (full-screen) mode, press Esc or click the Exit Full Screen button to return to the Quick Look window or the Close Quick Look button to both exit Slideshow mode and quit Quick Look.When you’re finished with the Quick Look window, click the X button in the top-left corner. If you’re in full-screen mode, click the X button in the control bar or press Command +Y, which works in either mode.


