If you like to photograph landscapes with your Canon EOS 7D, Aperture Priority mode is right up your alley. When you take pictures with Aperture Priority mode, you choose the desired f-stop and the camera supplies the proper shutter speed to achieve a properly exposed image.
A large aperture (small f-stop value) lets a lot of light into the camera, and a small aperture (large f-stop value) lets a small amount of light into the camera. The benefit of shooting in Aperture Priority mode is that you have complete control over the depth of field. You also have access to all the other options, such as setting the ISO speed, choosing a picture style, working in an AF mode or a Drive mode, and so on. To take pictures with Aperture Priority mode:
Press the Mode Lock button and then rotate the Mode dial to Av.

Press the Flash Compensation/ISO button and then rotate the Main dial to change the ISO speed to the desired setting.
When choosing an ISO speed, choose the slowest speed for the available lighting conditions.
Rotate the Main dial to select the desired f-stop.
As you change the aperture, the camera calculates the proper shutter speed to achieve a properly exposed image. The change appears in the LCD panel and the viewfinder. As you rotate the dial, monitor the shutter speed in the viewfinder. If you notice that the shutter speed is too slow for a blur-free picture, you have to put the camera on a tripod or increase the ISO speed setting.
If you see the minimum shutter speed (30 seconds) blinking, the image will be underexposed with the selected f-stop. If you see the maximum shutter speed (1/8000 second) blinking, the image will be overexposed with the selected f-stop.
Press the shutter button halfway to achieve focus.
A green dot appears in the viewfinder when the camera achieves focus.
Press the shutter button fully to take the picture.
The image appears on your LCD monitor almost immediately.

Controlling depth of field
Depth of field determines how much of your image looks sharp and is in apparent focus in front of and behind your subject. When you’re taking pictures of landscapes on a bright sunny day, you want a depth of field that produces an image in which you can see the details for miles and miles and miles.
Other times, you want to have a very shallow depth of field in which your subject is in sharp focus but the foreground and background are a pleasant out-of-focus blur. A shallow depth of field is ideal when you’re shooting a portrait, for example.
You control the depth of field in an image by selecting the f-stop in Aperture Priority mode and letting the camera do the math to determine what shutter speed will yield a properly exposed image. You get a limited depth of field when using a small f-stop value (large aperture), which lets a lot of light into the camera. A fast lens:
Has an f-stop value of 2.8 or smaller
Gives you the capability to shoot in low-light conditions
Gives you a wonderfully shallow depth of field
When shooting at a lens’s smallest f-stop value, you’re letting the most amount of light into the camera, which is known as shooting wide open. The lens you use also determines how large the depth of field will be for a given f-stop. At the same f-stop, a wide-angle lens has a greater depth of field than a telephoto lens. When you’re photographing a landscape, the ideal recipe is a wide-angle lens and a small aperture (large f-stop value).
When you’re shooting a portrait of someone, you want a shallow depth of field. Therefore, a telephoto lens with a focal length that is the 35mm equivalent of 85mm with a large aperture (small f-stop value) is the ideal solution.
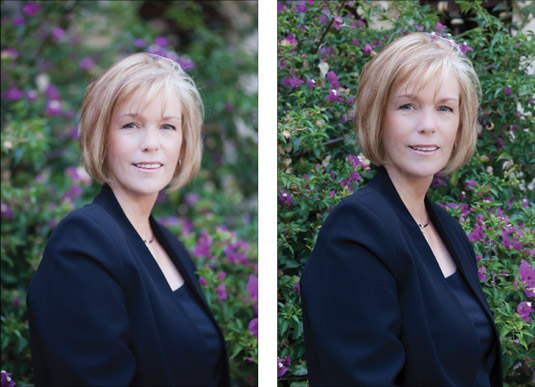
Here are two pictures of the same subject. The first image was shot with an exposure of 1/640 second at f/1.8, and the second image was shot with an exposure of 1/80 second at f/10. In both cases, the subject was the focus. Notice how much more of the image shot at f/10 is in focus.

Using depth-of-field preview
You can preview the depth of field for a selected f-stop by pressing a button on your camera, which closes the aperture to the f-stop you use to take the picture. To preview depth of field:
Compose the picture and choose the desired f-stop in Aperture Priority mode.
Press the shutter button halfway to achieve focus.
A green dot shines solid on the right side of the viewfinder when the camera focuses on your subject.
Press the Depth-of-Field Preview button.
The button is conveniently located on the front right side of the camera when your camera is pointed toward your subject. You can easily locate the button by feel. When you press the button, the image in the viewfinder may become dim, especially when you’re using a small aperture (large f-stop number) that doesn’t let a lot of light into the camera. Don’t worry, the camera chooses the proper shutter speed to compensate for the f-stop you select.
When you use depth-of-field preview, pay attention to how much of the image is in apparent focus in front of and behind your subject. To see what the depth of field looks like with different f-stops, select what you think is the optimal f-stop for the scene you’re photographing. Then, press the shutter button halfway to achieve focus, and then rotate the Main dial to choose different f-stop values.
As long as you hold down the Depth-of-Field Preview button while you’re choosing different f-stops, you can see the effect each f-stop has on the depth of field.


