When you photograph a scene or image on your Canon EOS 7D, your camera sensor captures the colors and subtle nuances of shadow and light to create a faithful rendition of the scene. At times, however, you want a different type of picture. For example, when you’re photographing a landscape, you want vivid blues and greens in the image.
You can choose from a variety of picture styles and create up to three custom picture styles. When you take pictures in Full Auto mode, this option isn’t available. To choose a picture style:
Press the Creative Photo/Comparative Display button.
The Creative Photo options display and the Picture Style option is selected by default. Note that you can also access this option by choosing Picture Style from the Shoot3 menu.
Press Set.
The Picture Style menu displays on your LCD monitor.

Press Set again and then rotate the Quick Control dial to choose one of the following styles:
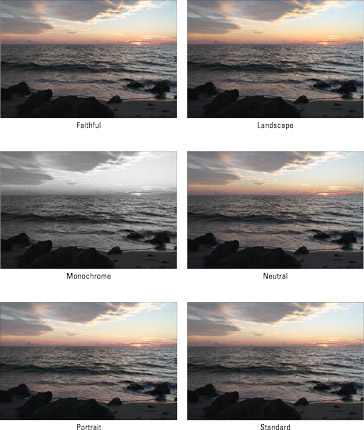
Auto: The color tone will be adjusted automatically to suit the scene or subject matter you are photographing. Images photographed with this style will have vivid colors. This is a great mode for landscape photography to ensure vivid blue skies and crisp bright greens.
Standard: The default style captures crisp, sharp images and is suitable for most photography situations.
Portrait: This style renders a soft image with flattering skin tones. This style is ideally suited for portraits of women and children.
Landscape: This style renders an image with vivid blues and greens. Landscape is ideally suited for — you guessed it — landscapes.
Neutral: This style renders an image with no in-camera enhancement and is ideally suited for photographers who will be editing and enhancing their images with a computer image-editing application, such as Adobe Photoshop or Photoshop Lightroom. The resulting image has natural colors.
Faithful: This is another style ideally suited for photographers who like to edit their images with a computer image-editing application. When you photograph a subject in daylight with a color temperature of 5200K, the camera automatically adjusts the image color to match the color of your subject.
Monochrome: This style creates a black and white image. If you use this style and choose JPEG as the file format, you can’t convert the image to color with your computer. If you use this style when using the JPEG format, make sure you switch back to one of the other picture styles when you want to capture images with color again.

User-Created Styles: These slots are for styles you’ve created.
After choosing the desired option, press Set.
All JPEG images will have the style applied to them until you change the style or restore camera settings to their defaults.
If you use the JPEG mode, the picture style will be applied to the saved image. However if you use the RAW picture style, the picture style will show up in the preview on your LCD monitor, but will not be applied to the image when it is saved to your card. In other words, what you see on the monitor is not what you’ll get when you shoot RAW. If you shoot RAW, try the Faithful style.