


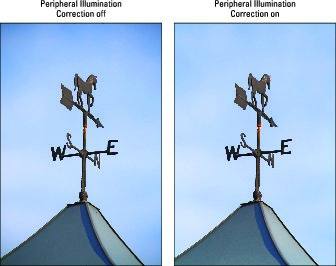
To help compensate for vignetting, your camera offers Peripheral Illumination Correction, which adjusts image brightness around the edges of the frame. In the left image, just a slight amount of light fall-off occurs at the corners, most noticeably at the top of the image. The right image shows the same scene with Peripheral Illumination Correction enabled.
 Peripheral Illumination Correction tries to correct the corner darkening that can occur with some lenses.
Now, this “before” example hardly exhibits serious vignetting — it’s likely that most people wouldn’t even notice if it weren’t shown next to the “after” example. But if your lens suffers from stronger vignetting, Peripheral Illumination Correction can help correct the problem.
The adjustment is available in all your camera’s exposure modes. But a few factoids need spelling out:
- The correction is available only for photos captured in the JPEG file format. For Raw photos, you can choose to apply the correction and vary its strength if you use Canon Digital Photo Professional to process your Raw images.
- For the camera to apply the proper correction, data about the specific lens must be included in the camera’s firmware (internal software). You can determine whether your lens is supported by opening Shooting Menu 1 and selecting Peripheral Illumination Correction, as shown on the left. Press Set to display the right screen. If the screen reports that correction data is available, the feature is enabled by default.
 Access the feature through Shooting Menu 1.
If your lens isn't supported, you may be able to add its information to the camera; Canon calls this step registering your lens. You do this by using the supplied USB cable to connect the camera to your computer and then using tools included with Canon EOS Utility software. (The software is available for free download from the Canon website; look for the download links in the support section of the site.) Check out the software manual for help on this bit of business.
- For non-Canon lenses, Canon recommends disabling Peripheral Illumination Correction even if correction data is available. You can still apply the correction in Digital Photo Professional when you shoot in the Raw format.
In some circumstances, the correction may produce increased noise at the corners of the photo. This problem occurs because exposure adjustment can make noise more apparent. Also, at high ISO settings, the camera applies the filter at a lesser strength — presumably to avoid adding even more noise to the picture.


