
The main menu items for Dynamics 365 for Field Service are shown on the Tile Selector pull-down menu when you click the Field Service tile.
To view the main Field Service-related menu items, follow these steps:
- On the black navigation bar at the top of the screen, click the down arrow to the right of the name of the module you’re in.
The Tile Selector pull-down menu appears.
- Click the Field Service tile.
The Field Service tile is the blue tile to the right of the orange Marketing tile.
The menu items and menu item headings change to reflect the choices most closely related to the Field Service module.
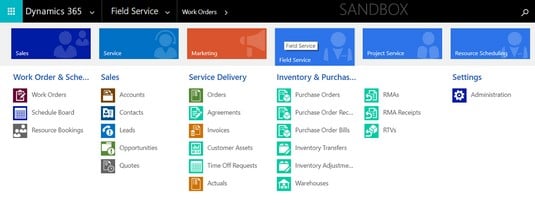 Dynamics 365 for Field Service Tile Selector menu items.
This list describes the key components of Dynamics 365 for Field Service:
- Work order: The work order is the heart of the Field Service module. It’s where you specify all the facets of a service call: where to go, what needs to be done, what parts are used, who is doing the work, and so forth.
- Schedule board: The schedule board is your master control center — you can see at a glance where everyone is and where they need to go next. Color coding is used to show the status of each booking in real-time. This schedule board is flexible. You have the ability to instantly switch the view between hours, days, weeks, or months or to view a person’s schedule horizontally in rows, or vertically in columns. You can assign a technician to a service call directly from the schedule. You can see the work orders on a map (like Google Maps or Bing Maps) that you can zoom in or out. The work orders appear as pushpin icons that are located on the map where the work is to be performed. Pushpins are color coded, with each technician having her own color. Unassigned work orders appear with a gray pushpin.
- Resource booking: A resource booking is the assignment of a resource to a work order. A resource is usually a technician or another worker, but it can also be a piece of equipment that is needed for the job or even another resource type.
- Customer asset: A customer asset is a piece of equipment that is located at a customer’s site in the field. You can specify subcomponents, which is especially useful if the equipment has parts inside that have their own, separate serial numbers and warranties, such as a condenser coil or a compressor inside of an air conditioning unit.
- Agreement: An agreement is a sort of template for generating work orders and invoices and is similar to a contract that you have in place with your customer. The agreement can specify the price of the service and can contain one or more schedules; this way, you can have one agreement that covers different types of work that are performed at different periodic intervals.
- Time-off request: A time-off request is important because, after it has been approved, it shows up on the schedule board as a grayed-out area for the technician who is taking time off. In this way, the dispatcher avoids booking technicians who are on vacation or otherwise unavailable for work.
- Purchase order: A purchase order can be used to acquire inventory (parts) that can be either stocked in a warehouse or sold directly to a customer on a work order.
- Inventory transfer and adjustment: Inventory transfers record the movement of inventory items between warehouses so that the system knows the correct on-hand quantity at each warehouse location. Inventory adjustments are used to correct the on-hand quantity, usually after a physical count has revealed that the quantity in the system doesn’t agree with what is actually on the shelf. You could use an inventory adjustment to add inventory to the warehouse, but normally you add purchases of inventory using a purchase order receipt; so adjustments are mainly for error correction.
- Warehouse: A warehouse is a physical location where inventory is stocked. A warehouse doesn’t necessarily have to be a warehouse building; it can be a van, a truck, a room in an office building or any place you want to isolate inventory for managing it more effectively.
- Return merchandise authorization (RMA): The term RMA is commonly used in inventory management parlance related to inventory returns. You issue an RMA so that your customer can return a bad or unwanted piece of equipment to you. Usually, it’s the technician who is returning it on the customer’s behalf, because it’s the technician in the field who has probably assessed that the equipment is faulty in some way. You have three options for returns: Return to the warehouse, return to the vendor (supplier), or change the equipment ownership. When you return an item to the warehouse, it usually means that the part is still good and you can use it elsewhere later on for a different customer. If you return an item to the vendor, doing so involves a return-to-vendor (RTV) order. In the RMA approval process, more than one part can be added to a single RMA. You may also need to issue a credit memo to your customer for the return.
- Return to vendor (RTV) order: RTVs are used to track inventory items that you have returned to a vendor. Use RTV substatuses to track the status of the individual parts of the RTV.
The schedule board is an exciting functionality that can be used in several areas within the Dynamics 365 for Customer Engagement application. In other words, the schedule board is a global feature of Customer Engagement. Even though scheduling is an essential feature of Field Service applications, you can also use it in the Sales module. For example, you can schedule opportunities as part of the Sales module, not just work orders as part of the Field Service module.
Living the dream of efficient field service: The work order lifecycle
In Dynamics 365 for Field Service, the work order completes a lifecycle. The work order lifecycle consists of several sequential steps (some of which are optional), including these:- Work order creation: Work orders can be created in several ways, including being keyed into the system manually (from scratch), generated automatically from an agreement, or converted from a case.
- Schedule (booking): The work order then needs to be added to the schedule (in other words, booked). You can do this manually on the schedule board from the list of unscheduled work orders, directly on the work order using the Add Bookings button, or by using the schedule assistant (a tool that uses a complex query to match a technician to a work order based on a variety of factors, such as distance and skill set).
- Dispatch: A technician is dispatched to the customer site.
- Approval: Approval is a status change. A manager reviews and then approves the work order if she is satisfied that everything looks in order — changing its status from “unapproved” to “approved”.
- Billing: Customers are invoiced for completed work orders.
- Return: Returns are optional, based on the discretion of the technician, who assesses whether any parts need to be returned. RMA and RTV functionality is available.
- Inventory adjustment: Inventory adjustment transactions may sometimes be necessary to account for parts used on the service call.
- Credit memo: You may need to issue a credit memo to a customer to give credit for a part, listed on an invoice, that was paid for but later returned because it was eventually determined that it wasn’t needed.
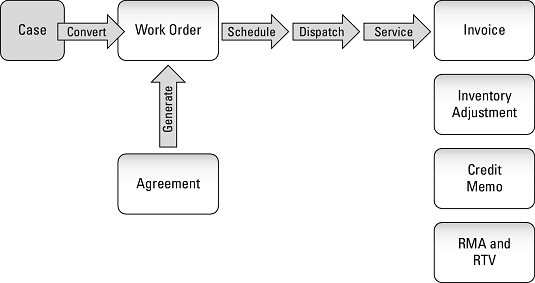 The work order lifecycle in Dynamics 365 for Field Service.
Configuring administrative settings for Dynamics 365 for Field Service
To view the Field Service menu items related to the configuration (settings), follow these steps:- On the black navigation bar at the top of the screen, click the down arrow to the right of the name of the module you’re in.
The Tile Selector pull-down menu appears.
- Click the Field Service tile.
The Field Service tile is the blue tile to the right of the orange Marketing tile.
The menu items and menu item headings change to reflect the choices most closely related to the Field Service module.
- Under the Settings menu heading, click Administration.
The Administration menu item is the blue box that has the Gear icon inside it.
Dozens of settings related to configuring the Field Service module appear, each with an icon, a title, and a short description of which features that setting controls.
One setting has the Gear icon and the title Field Service Settings. Clicking this icon opens even more settings related to Field Service. Keep in mind that all these icons are related to the Field Service module, not just the one labeled Field Service Settings.
 Dynamics 365 for Field Service Administration menu items.
As you can see, the Field Service module has lots of different settings; some of these are optional, but many are required, and many optional settings are still likely to be appropriate for your organization. Setting up the Field Service module requires expertise and careful analysis. You’ll be wise to set up a sandbox (test) instance to try out some of these settings during the design phase of your implementation. Consult with your authorized Dynamics 365 solution provider about configuring Dynamics 365 for Field Service to ensure that you’re provided with a detailed project plan. Also, when the solution provider prepares a design document, be sure that you read it carefully and provide feedback about it, before the setup is performed in your production Dynamics 365 instance.