
You can even add new fields (create user-defined fields, in essence) without computer programming or IT involvement. Your Dynamics 365 system administrator has to grant you permissions to personalize your forms (screens). You need a separate, higher-level permission to allow you to add custom fields, which may not be so easy, given that most system administrators tightly control who gets to add custom fields.
Adding custom (user-defined) fields is a big deal. You can easily imagine how that situation can get out of hand. If everybody is adding their own fields to the database via the user interface in a willy-nilly manner with no centralized coordination, you can end up with fields that are only haphazardly updated and that are missing from key reports. Even the more basic type of screen personalizations (ones that don’t involve adding custom fields) can get out of hand; if every user has a different screen layout, it can cause confusion or outright chaos.
Fortunately, D365O provides a way for the Dynamics 365 system administrator to centrally control personalization. D365O has a Personalization page with the following tabs:- Apply: Personalization files can be imported and then applied to multiple users by selecting a role and the users who are assigned to that role.
Also, an existing personalization can be applied to multiple users.
- Clear: Personalizations can be cleared (removed) for one or more users and from a page or a workspace.
- Manage per User: Here’s where the administrator can control who is allowed to create personalizations, either for specific pages or as a global system setting for that user.
The administrator can also see which pages the users have personalized and then enable or disable those personalizations.
- System: In this clean-up utility area, the administrator can delete all personalization and start over if it gotten a little out of hand.
Another option is to disable all personalizations rather than delete them. In this way, the administrator can easily enable them again later.
Deleting a personalization in the System area of the Personalization page is permanent. You should export any personalizations that you may want to reuse later. You have no way to recover a deleted personalization, other than to import a saved personalization file. These personalization files are generated for you by the system in XML format during export.
A personalization that a user makes to modify the appearance of a user interface form (page) — such as moving fields around, adding existing available fields, changing field labels, or hiding fields — is an explicit personalization. An explicit personalization is made by putting the form (page) into Interactive Personalization mode.For example, the Vendor Maintenance window can be personalized to add the Federal Tax ID field to the General section; doing so makes that field more visible to the user and easier to access quickly. For example, perhaps this field in your system gets lost in the confusion of having so many fields and the accounts payable manager insists that the field be considered when creating or editing a vendor record.
To add the field in this example, follow these steps:
- Choose Modules → Accounts Payable → Vendors → All Vendors from the Finance and Operations navigation pane.
The Vendor List page appears, displaying all vendors.
- Click any vendor ID in the Vendor Account column (the first data column in the list).
The Vendor Maintenance window opens (by default) to the General section of the vendor master data record (row) you clicked.
- Click the General section heading to toggle that section, first hiding and then showing the fields in that section.
The General section collapses, hiding the fields in that section.
When you click General again, the section expands, displaying the fields, such as Vendor Account, Name, Search Name, and Group.
- Right-click anywhere in the General section.
The Form drop-down menu appears, displaying choices such as Form Information, Collapse All, and Expand All.
- Select Personalize: General from the drop-down menu.
If you don’t see this choice on the drop-down menu, right-click directly on the word General or on other sections of the screen in the General section.
The Personalize: General pop-up menu appears.
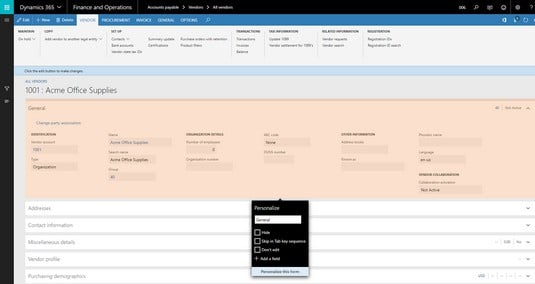 The Personalize: General pop-up menu.
The color of the General section changes to indicate that you’re now in Personalization mode.
You can change the name of the section by overwriting the text in the text box under the word Personalize; as you type, you see the section name change on the screen.
On the Personalize: General pop-up menu, you also have choices to hide the section, skip it when you tab through it, disallow editing, and add a field.
- Choose Add a Field from the Personalize pop-up menu.
The list of existing available fields you can add to the page appears on the right side of the web page.
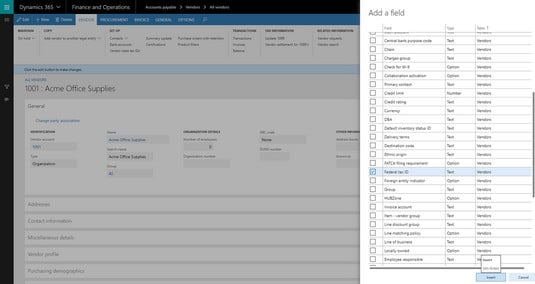 Adding a field to the General section.
This list of fields can be sorted by any column by clicking the column header.
To add one or more fields to be inserted on the form, simply click the check box in the far left column next to the field(s) of your choice.
- Click Table (the column heading for the rightmost column in the list of fields), and then select Sort A to Z.
The list of fields is sorted by the Table column.
You can see that you can insert fields from tables that are related to the vendor table, in addition to fields in the vendor table itself.
- Press Page Down on the keyboard, or use the scroll wheel or slider bar to scroll down the list.
The fields in the Vendor table are toward the bottom of the list.
Look for the field labeled Federal Tax ID. (This is an important field that it would be nice to see in the General section of the form.)
- Select the check box for Federal Tax ID.
You’re now ready to insert the Federal Tax ID into the General section.
- Click the Insert button.
The field you selected is visible on the form, and the screen changes back to the normal color to indicate that you’re no longer in Personalization mode.
To move, for example, the Federal Tax ID field you just added, follow these steps:
- Right-click the Vendor Maintenance window's General section.
The Form drop-down menu appears.
You have choices, for example, to see form information, collapse all, or expand all.
- Select Personalize: General.
The Personalize: General pop-up menu appears.
The color of the General section changes to indicate that you’re now in Personalization mode.
- Choose Personalize This Form from the Personalize: General pop-up menu.
The Personalize toolbar appears.
- Click the Move button. (the second button from the left on the Personalization toolbar.)
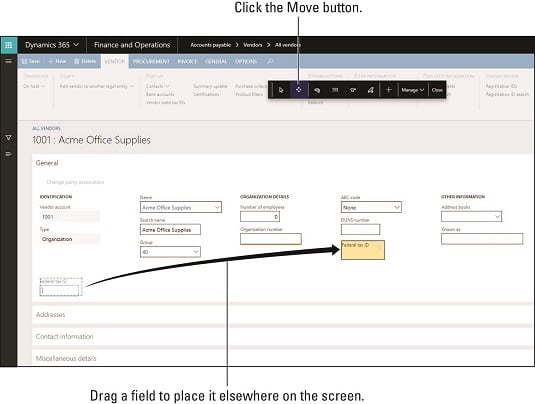 Moving a field in the General section.
The screen is now in Move mode.
- Click the label of the field you want to move.
In this example, click the Federal Tax ID field.
The field becomes surrounded by a gray dashed line to indicate that it’s ready for repositioning
- Click to select the Federal Tax ID field, and then, while holding down the left mouse button, drag-and-drop the field to another position in that section of the form.
The screen automatically adjusts to fit the field, automatically shuffling other fields around in the process.
You can always move the field again, as many times as you need to, to position it where you want.
- Click the Close button on the Personalization Toolbar.
The field is moved, and your personalization changes are saved.
You can export the personalization from the Manage button menu, to ensure that you have a backup copy of your personalization.
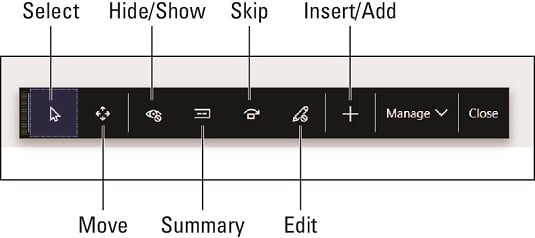 The Personalization toolbar in Dynamics 365 for Finance and Operations.
From left to right, the nine buttons on the Personalization toolbar are described in this list:
- Select: Clicking the Select button activates Select mode. When in Select mode, clicking an element onscreen brings up the Properties window for that element, allowing you to change the field label, hide it, include it in the FastTab summary, skip it in the tab sequence, or lock it so that it cannot be edited.
You’re unable to hide a required field (and for good reason), so sometimes that option isn’t available; in fact, the properties you can change may differ, depending on the element you have selected.
- Move: Clicking the Move button activates Move mode. Now whenever you click a screen element, such as a field, a dashed gray line appears around the element, indicating that it’s now ready to move.
Click it, and then drag-and-drop the element to another location. You cannot precisely position the field; instead, the screen adapts to wherever you drop the element and readjusts itself to fit it in with other elements.
- Hide/Show: Clicking the Hide/Show button gets you to Hide/Show mode, which, as its name suggests, lets you choose whether to hide or show an element onscreen.
In Hide/Show mode, hidden fields appear in a different color, to distinguish them from visible fields.
Simply click the label of any field to toggle it between Hidden and Shown (Regular).
When you click the Close button, the hidden fields disappear from the screen.
- Summary: Clicking the Summary button activates Set Summary mode.
In Set Summary mode, summary fields appear in a different color to distinguish them from nonsummary fields.
Simply click the label of any field to toggle it between Summary and Non-summary (Regular).
When you click the Close button, the summary fields start appearing in the FastTab summary.
- Skip: The Skip function is for making a field skip the tab sequence.
If your organization doesn’t make use of a particular field, you can save the user’s time by skipping that field in the tab sequence, so when the user tabs to the next field, they don’t have to keep pressing tab
This tool works like the Show/Hide and Summary tools.
You click the label of the field to set the field as skipped; the color changes to indicate that it’s no longer to be included in the tab sequence.
- Edit: The default here is for Editing to be enabled, but you can toggle it off to lock an element.
This tool works like the Show/Hide, Summary, and Skip tools.
You click the label of the field to set the field as locked; the color changes to indicate that it’s no longer allowed to be edited.
After clicking the Close button, and later going back into that screen, you notice that the field is grayed out (disabled for editing); any data in that field is visible, but you cannot make changes.
- Insert/Add: This tool allows you to add fields.
Click the Insert/Add (+) button, and then click a section of the screen. Doing so opens a list of fields that you can add; the list pops up on the right side of the screen.
- Manage: Clicking the Manage button causes a drop-down menu to appear with these choices:
- Clear removes (deletes) your personalization from the page section you’re personalizing. This acts as a reset button, in essence — if you have messed up the personalization beyond salvaging, use this.
- Import allows you to load a personalization file that you or someone else has previously exported. This is a way to share a personalization that another user has created.
- Export allows you to save your personalization to a file.
Personalization files are in XML format and are downloaded to your Download folder on export.
- Close: Click the Close button to exit the Personalization toolbar, thereby saving your personalization changes.
Reload the page to see all your changes take effect; you may need to close the window and then navigate back to it later to see your personalization take effect.