
Quickbooks Item List
If you choose the Lists → Item List command, QuickBooks displays the Item List window, as shown. The Item List window lists all the items that you’ve set up as part of running QuickBooks Setup and items that you’ve added manually since running the Setup Wizard.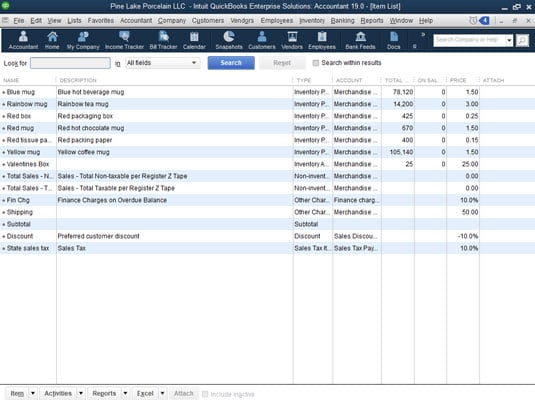 The Item List window.
The QuickBooks 2019 Price Level List
The Price Level list lets you create price adjustments that you can use on the fly as you invoice customers, issue credit memos, and so forth.Sales Tax Codes in QuickBooks 2019
The Sales Tax Code list keeps a list of codes, or abbreviations, that you can use to describe items as taxable or nontaxable. If you choose this command, QuickBooks displays a window listing the existing sales tax codes. (Usually, you see two existing codes: Tax and Non.)The Sales Tax Code list doesn’t appear unless you tell QuickBooks to track sales tax during setup or afterward. To add sales tax codes, take the following steps:
- Choose Edit → Preferences.
- Click the Sales Tax item in the preferences list.
- Click the Company Preferences tab.
- Answer the Do You Charge Sales Tax question by clicking the Yes box.
How to Set Up a Payroll Item List in QuickBooks 2019
The Payroll Item list identifies items that appear on employee payroll check stubs. If you’re using an outside payroll service bureau to handle your payroll — and this isn’t a bad idea — you don’t even need to worry about the Payroll Item list. If you’re using the QuickBooks Enhanced Payroll Service, again, don’t worry about the Payroll Item list. (In either case, the QuickBooks folks set up the payroll items that you use for recording payroll.) And in the case of Intuit’s full-blown “we-do-everything” Payroll Service, you don’t even need to track payroll inside QuickBooks, because the QuickBooks people do it at their office location on their computers.If you do need to add payroll items, follow these steps:
1. Choose the Lists → Payroll Item List command.
QuickBooks displays the Payroll Item list window.
2. To add a new Payroll Item, click the Payroll Item button and then choose Payroll Item → New.QuickBooks displays the Add New Payroll Item dialog box (not shown). You can choose to set up a new payroll item by using either the EZ Set Up method or the Custom Set Up method:
- EZ Set Up: If you want QuickBooks to help you, and you’re setting up a common payroll item, click the EZ Set Up button, click Next, and simply follow the onscreen instructions.
- Custom Set Up: If you want to perform a custom setup of a payroll item, click the Custom Set Up button and then click Next. QuickBooks walks you through a multiple-screen interview that asks you about the payroll item to set up. The first dialog box that QuickBooks displays, for example, asks you to identify the type of payroll item that you want to create. You answer this question by selecting one of the radio buttons and then clicking Next.
After you identify the type of payroll item, you name it. QuickBooks provides another version of the Add New Payroll Item dialog box that includes a field you fill in to give the new item a name.
4. To finish the payroll item setup, click the Next button to move through the remaining payroll item setup questions.You identify the name of the government agency to which the liability is paid, the taxpayer identification number that uniquely identifies you to the taxing agency, the liability account that you use to track the items, the tax-form line that you use to report the item, the rules that QuickBooks should use for calculating the item (such as whether the item is subject to taxes), and a couple of other miscellaneous pieces of data. After you supply all this information and click the Finish button (which appears in the last Add New Payroll Item window), QuickBooks adds the new payroll item to the Payroll Item list.
The Payroll Item menu supplies commands that are useful for working with the Payroll Item list. In addition to the commands that you use to add an item to the list, the menu supplies commands for deleting payroll items, renaming payroll items, making payroll items active, and printing the list of payroll items.
How to Set Up the QuickBooks 2019 Class List
QuickBooks lets you use classes to segregate or track financial data in ways that aren’t possible when you use other bits of accounting information, such as the account number, the customer, the sales rep, the item, and so forth. A firm can use classes, for example, to segregate financial information by stores, business units, or geographical territories.To set up classes, follow these steps:
1. Choose the Lists → Class List command. QuickBooks displays the Class List window, as shown.
 The Class List window.
If you don’t see the Class List command, choose Edit → Preferences, click the Accounting icon, click the Company Preferences tab, and select the Use Class Tracking for Transaction check box.
2. To create a new class, choose Class → New at the bottom of the window.QuickBooks displays the New Class dialog box, as shown.
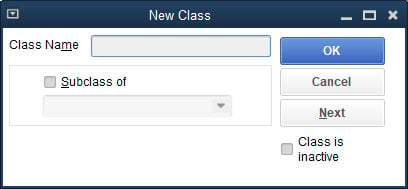 The New Class dialog box.
3. To name the new class, enter a name or abbreviation in the Class Name box.
Note that you enter the class name whenever you record a transaction that falls into the class. For this reason, you don’t want to create lengthy or easy-to-mistype class names. Keep things short, simple, and easy.
4. If the class that you’re setting up is actually a subclass of a parent class, select the Subclass Of check box and then choose the parent class from the Subclass Of drop-down list.5. Click OK to save the class.
Alternatively, click Cancel to not save the class or click the Next button to save the class and redisplay the New Class dialog box.
If you don’t want the class to be used anymore, you can select the Class Is Inactive check box.
The Class menu, which appears when you click the Class button, also supplies commands for editing the information of the selected class, for deleting the selected class, for making the selected class inactive, and for printing a list of classes, as well as several other useful commands. All these commands are pretty straightforward to use. Experiment with them to find out how they work.
How to Set Up a QuickBooks 2019 Customer List
A Customer list keeps track of all your customers and customer information, such as billing and shipping addresses.Follow these steps to add a customer to the Customer list:
1. Choose the Customers → Customer Center command.
QuickBooks displays the Customer Information window.
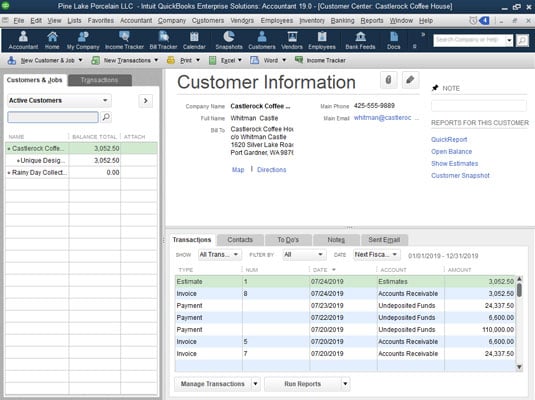 The Customer Information window.
2. To add a new customer, click the New Customer & Job drop-down list and then choose the New Customer command.
QuickBooks displays the New Customer window.
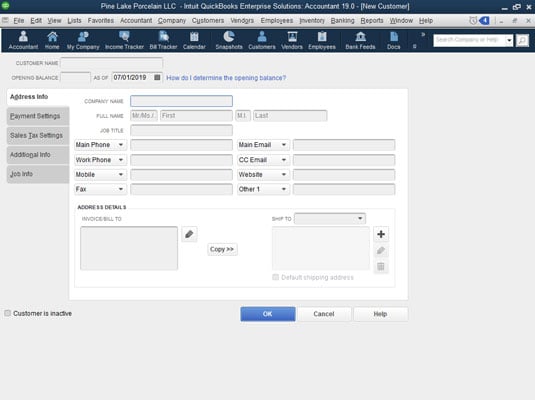 The New Customer window.
3. Use the Customer Name box to give the customer a short name.
You don’t need to enter the customer’s full name in the Customer Name box. That information can go in the Company Name box, shown on the Address Info tab. You just want some abbreviated version of the customer name that you can use to refer to the customer within the QuickBooks accounting system.
4. (Optional) If you bill your customer in a currency different from your usual home currency, choose that currency from the Currency drop-down list.If you told QuickBooks that you work in multiple currencies — you would have done this during the EasyStep Interview setup process — QuickBooks wants you to identify when you invoice a customer and collect payments from a customer in a currency different from your home currency.
5. (Usual rule) Ignore the Opening Balance and As Of boxes.You typically don’t want to set the customer’s opening balance by using the Opening Balance and As Of boxes. That’s not the right way to set your new customer accounts receivable balance. If you do this, you’re essentially setting up the debit part of an entry without the corresponding credit part. Later, you’ll have to enter crazy, wacky journal entries to fix your incomplete bookkeeping. But an exception to the usual rule exists, as discussed in the tip that follows.
6. Use the boxes of the Address Info tab to supply the company name and contact information, including contact name, phone numbers, fax numbers, email addresses, billing and shipping addresses, and so on.I’m not going to tell you that you should enter somebody’s first and last name in the Full Name boxes or that the phone numbers of your customer go in the boxes labeled Main Phone and Work Phone.
7. Click the Payment Settings tab to display the set of boxes shown.You can record the customer’s account number, his or her credit limit, payment terms, preferred payment and delivery methods, and even credit card information. Note that the Online Payments check boxes let you indicate a customer can pay you using a credit card or bank transfer — but you need to have set up these services already. If you haven’t set up the services, QuickBooks prompts you to set them up when you check one of these boxes.
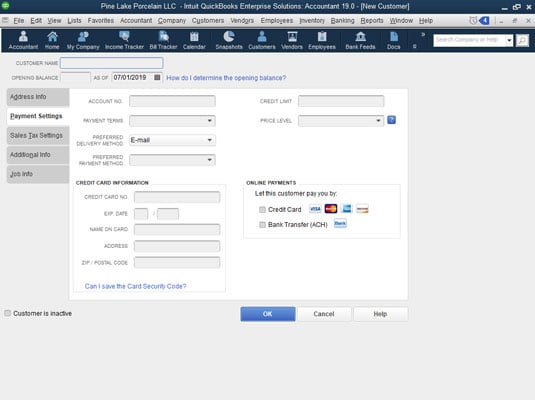 The Payment Settings tab.
8. (Optional) If you’re tracking sales taxes, click the Sales Tax Settings tab to display the boxes you’ll use to identify this customer’s sales tax rate.
The Sales Tax Settings tab, for example, includes a Tax Code drop-down list that you use to indicate which sales tax code applies to this particular customer. You can also identify the actual sales tax item and, if relevant, the resale number.
9. Supply a bit of additional information about the customer.If you click the Additional Info tab, QuickBooks displays several other boxes that you can use to collect and store customer information. You can use the Customer Type drop-down list, for example, to categorize a customer as fitting into a particular customer type. And you can use the Rep drop-down list to identify the customer’s default sales rep. Finally, you can click the Define Fields button to specify additional fields that you want to collect and report for the customer.
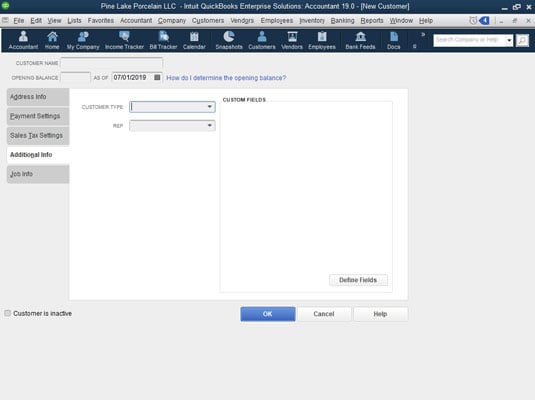 The Additional Info tab.
10. (Optional) Click the Job Info tab to describe the customer job.
The Job Info tab lets you describe information associated with a particular job being performed for a customer. You use the Job Info tab if you not only set up a customer, but also set up a job for that customer.
11. When you finish describing the customer, click the Save & Close or Save & New button to save your description.Set Up the Vendor List in QuickBooks
Just as you use a Customer list to keep records of all your customers, you use a Vendor list to keep records of your vendors. Like a Customer list, a Vendor list lets you collect and record information, such as the vendor’s address, the contact person, and so on.To add a vendor to your Vendor list, follow these steps:
1. Choose the Vendors → Vendor Center command.
When you do, QuickBooks displays the Vendor Information window.
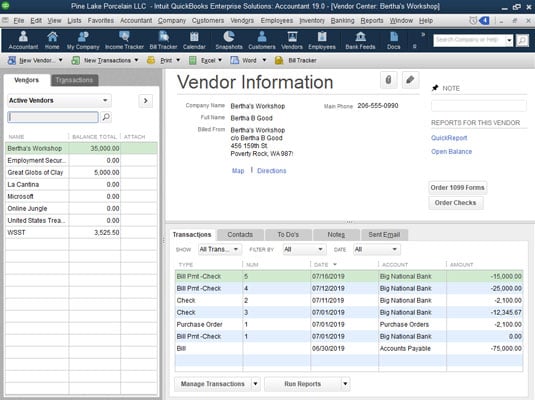 The Vendor Information window.
2. To add a new vendor, click the New Vendor drop-down list and then choose New Vendor.
QuickBooks displays the New Vendor window.
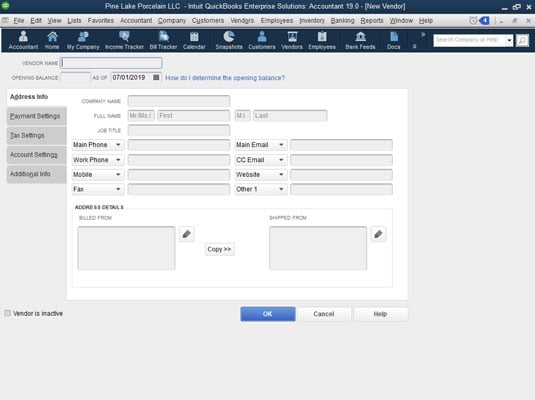 The New Vendor window.
3. Give the vendor a name in the Vendor Name box.
As is the case with the Customer list, you use this name to refer to the vendor within QuickBooks. For this reason, an abbreviation is fine. You just want something easy to enter and easy to remember.
4. (Optional) If you pay your vendor in a currency different from your usual home currency, choose that currency from the Currency drop-down list.If you told QuickBooks that you work in multiple currencies — you would have done this during the EasyStep Interview setup process — QuickBooks wants you to identify when you receive bills from or pay a vendor in a currency different from your home currency.
5. (Usual rule) Ignore the Opening Balance and As Of fields.Don’t do anything with the Opening Balance and As Of boxes. People who don’t know better use those boxes to enter the opening balance owed a vendor and the date the amount is owed, but these entries only create problems later. At some point in the future, this poor soul’s accountant will need to find and correct this error. As when you add new customers, however, an exception to the usual rule exists, as discussed in the tip that follows.
Although the usual rule is that you don’t want to set an opening balance for a vendor, this rule has an important exception. You record your accounts payable balance on the conversion date by setting an opening balance for each vendor as of the conversion date. The sum of these opening balances is what QuickBooks uses to determine your total accounts payable on the conversion date.
6. Supply the vendor address information.The Address Info tab supplies a bunch of easy-to-understand boxes that you use to collect vendor name and address information. You enter, predictably, the vendor’s full name in the Company Name box.
You can click the Edit buttons on the Address Info tab to display another dialog box called the Edit Address Information dialog box, which lets you enter the address in typical street address, city, state, and zip-code format. The Edit buttons appear to the right of the Billed From and Shipped From address blocks.
7. Supply any additional information necessary.The Payment Settings tab collects the most relevant vendor information, including account number, credit limit, and payment terms, but if you click the Tax Settings tab, the Account Settings tab, or the Additional Info tab, QuickBooks displays a handful of other boxes that you can use to collect and store information:
- The Tax Settings tab lets you collect the vendor’s tax identification number so that you can (as sometimes required by federal tax laws) send the vendor a Form 1099 at the end of the year.
- The Account Settings tab lets you specify which accounts QuickBooks should use to prefill account fields when entering a transaction for the vendor.
- The Additional Info tab lets you categorize the vendor according to type and also lets you create other custom fields.
If you’re paying a vendor for the first time, a good guideline is to get his tax ID number. If somebody won’t give you his tax ID number — thereby making it impossible for you to report payments that you make to him — it’s probably a sign that something is a bit amiss.
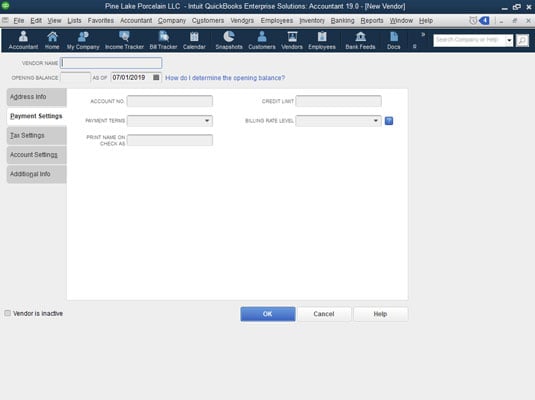 The Payment Settings tab.
8. Click OK.
The New Vendor window closes, and you go back to the Vendor Center.
If you click the Account Settings tab (the fourth tab available in the New Vendor window), QuickBooks displays boxes you can use to list the accounts that you want QuickBooks to fill in for you automatically when you record a check to some vendor or when you record a bill from some vendor. If the check to the phone company pays telephone expenses, for example, you could tell QuickBooks to prefill that expense category the next time you enter a bill or record a check to pay that vendor. It won’t enter an amount, as (obviously) the amount can change, but you won’t have to search all your accounts to find telephone expenses if you use this option.
Set Up a Fixed Assets List in QuickBooks
If you choose the Lists → Fixed Asset Item List command, QuickBooks displays the Fixed Asset Item list window. You can use this window to see a list of the fixed assets — furniture, equipment, machinery, vehicles, and so forth — that you’ve purchased. That is, you can see this list after you click the Item drop-down list, choose New, and fill in the New Item window for each fixed asset.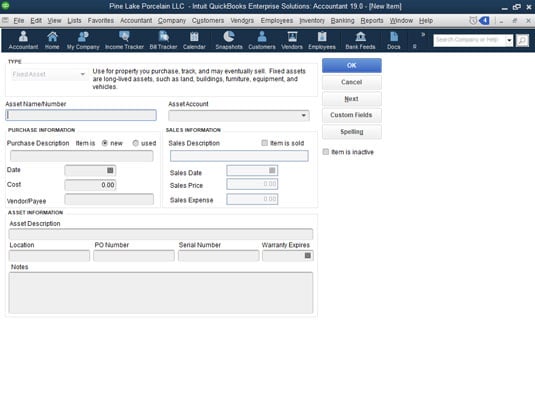 You describe each fixed asset by using the New Item window.
The Fixed Asset Item list doesn’t really integrate with the QuickBooks general ledger. You record the purchase or disposal of fixed assets by using regular old QuickBooks transactions. You might record the purchase of a particular fixed asset simply by entering a check in the usual fashion. And you might record the disposal of a fixed asset by entering a general ledger journal entry.
The Fixed Assets Item list, then, just acts as a stand-alone list that lets you track the fixed assets you purchased.
Set Up a QuickBooks Price Level List
A price level changes the sales price up or down when you do things like invoice. You might create a price level that amounts to a preferred customer discount on specified items. When you create an invoice for those items, rather than use the standard price for the item (which appears in the Create Invoice window’s Price column), you could select the price level preferred customer discount (in the Price column) to use the discounted preferred customer.To create a price level, choose the Lists → Price Level command. When QuickBooks displays the Price Level list window (not shown), click the Price Level drop-down list and then choose New. When QuickBooks displays the New Price Level dialog box, give the price level a name in the Price Level Name text box, use the Price Level Type box and list to specify to which items the price level applies, and then use the Adjust Price and Rounding boxes to set the new price level’s prices. When you click OK, QuickBooks redisplays the Price Level list window — this time with your new price level. You can edit and delete existing price levels by using other commands that become available when you click the Price Level button.
Set Up a QuickBooks Billing Rate Level List
A billing rate sets the amount that you charge for service items. Whereas a law firm might sell only hours of legal advice, for example, the item “legal advice” would be billed at different rates for different attorneys. An attorney just out of law school might have his or her time billed at one rate, whereas a senior partner in the firm might bill at another, probably much higher rate.To set up a billing rate, you choose the Lists → Billing Rate Levels List command. When QuickBooks displays the Billing Rate Level window (not shown), click the Billing Rate Level drop-down list and then choose New to display the New Billing Rate Level dialog box. You use the New Billing Rate Level dialog box to define a billing rate, giving the billing rate level a name, and then set a fixed hourly rate for the billing-rate level or different hourly rates for different service items.
After you create billing-rate levels with the Billing Rate Levels List command, by the way, you need to connect those levels with specific employees so that the correct rate gets used when an employee’s time is billed. To do this, display the Employee Center window by choosing the Employees → Employee Center command. Then right-click the employee, choose Edit Employee from the shortcut menu, click the Additional Info tab when QuickBooks displays the Edit Employee dialog box, and select the appropriate billing rate in the Billing Rate Level list box.
Set Up the Profile Lists
If you choose the Lists → Customer & Vendor Profile List command, QuickBooks displays a submenu of commands that you use to create some of the mini lists that QuickBooks uses to ease your bookkeeping and accounting. The Profile lists include lists of sales reps, customer types, vendor types, job types, payment terms, customer messages, payment methods, shipping methods, and vehicles. Most of the Profile lists are pretty darn simple to use. If you choose the Sales Rep list command, for example, QuickBooks displays the Sales Rep list window. Then you click the Sales Rep drop-down list and choose New. QuickBooks displays the New Sales Rep dialog box. The New Sales Rep dialog box.
In case you’re still experiencing a certain amount of accounting anxiety, let me just point out that you enter the name of the sales representative in the Sales Rep Name box. Then, throwing caution to the wind, you enter the sales rep’s initials in the Sales Rep Initials box. When you click OK, QuickBooks adds the sales rep to your Sales Rep list.
The other Profile lists work in the same simple, scaled-down fashion. You choose the Profile list from the submenu, click the Profile List button, and choose New. When QuickBooks displays a window, you use one or two boxes to describe the new Profile list.