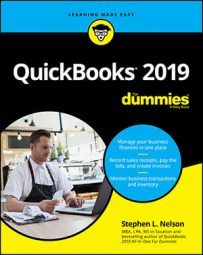
 The Preferences dialog box for Items & Inventory.
Here’s the second thing you need to do: Create an Item list. This list is a description of all items that you might conceivably put on an invoice. In other words, all items that you order and sell belong on the Item list.
You should’ve set up your initial Item list during QuickBooks Setup. If you need to add an item to your list, choose Lists→ Item List. Then click the Item button, choose New from the drop-down menu, and fill in the New Item window.
After you turn on the inventory stuff and set up (or update) your Item list, you can track your inventory.As you unload items from a truck, receive them in the mail, or buy them from a street peddler, you have to record the items so that QuickBooks can track your inventory. How you record the items and pay for them depends on whether you pay cash on the barrelhead, receive a bill along with the items, or receive the items without a bill (in which case you pay for the items later).
And you may have filled out a purchase order (PO) for the items that you’re receiving. If that’s the case, receiving the items gets a little easier. I strongly recommend filling out a PO when you order items that you’re going to receive and pay for later.
Record items that you pay for up front
Okay, you just bought three porcelain chickens in the bazaar at Marrakesh, and now you want to add them to your inventory and record the purchase. How do you record inventory you paid for over the counter? By using the Write Checks window, of course — the same way you record any other bills you pay for up front.Record items that don’t come with a bill
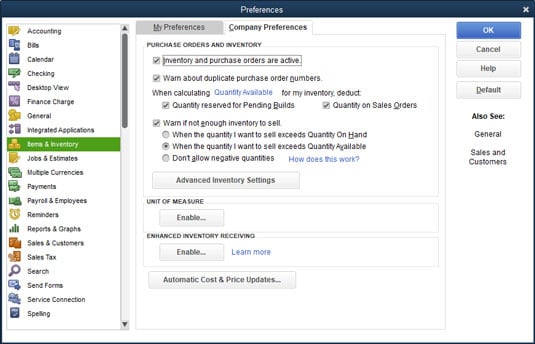
What happens if the items come before the invoice? Lucky you — you have the stuff, and you don’t have to pay for it yet. You do have to record the inventory you just received, however, so that you know you have it on hand. You can’t do that in the Write Checks window because you won’t be writing a check to pay for the stuff — at least not for a while. How do you record items that you receive before paying for them? Read on:1. Choose Vendors → Receive Items or click the Receive Inventory icon on the home screen, and select the option to Receive Inventory without a bill.
You see the Create Item Receipts window, as shown. This window is similar to the Enter Bills window, but it reads Item Receipt. (You see the Enter Bills window again when you receive the bill for items.)
 The Create Item Receipts window.
2. Fill in the top part of the window.
If you want to record items from a vendor who’s already in the Vendor list, click the down arrow and then choose the vendor. If the vendor is a new vendor, choose Add New from the drop-down menu and then, in the New Vendor dialog box that appears, describe the vendor in detail. When you’re done with the New Vendor dialog box, click OK.
3. Click the Items tab.You need to click the Items tab only if it isn’t already displayed. It probably is. But the computer book writers’ code of honor and a compulsive personality require me to tell you that there’s another tab — the Expenses tab — and you could possibly display it instead.
4. Move to the Item column, and type a name for the item.Notice the down arrow in the Item column. Click it to see the Item list. Does the item that you’re paying for appear on this list? If so, click it. If not, enter a new item name. You see the Item Not Found message box. Click Yes, fill out the New Item dialog box, and then click OK.
You may just as well go down the packing slip, entering the items on the Items tab. Make sure that the Items tab accurately shows what’s on the packing slip. And put a brief description of the items in the Memo field because that description may prove to be useful later, when you want to match up your item receipt with the bill. When you finish, the Create Item Receipts window should look something like the preceding figure.
5. Provide quantity and cost, as follows:- Qty column: Describe the quantity you received.
- Cost column: Describe the item unit cost. If the item unit cost you enter represents a change, QuickBooks asks whether you want to update its standard item cost (as stored in the Item list) and whether you want to update your standard price for the item.
The items are officially part of your inventory. The item receipt has been entered on the Accounts Payable register. Not only that, but also, you’re all ready for when the bill comes.
Pay for items when you get the bill
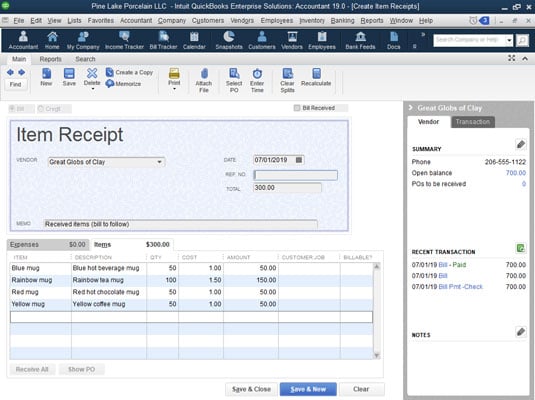
The items arrive, and you fill out an item receipt. Three weeks pass. What’s this in your mailbox? Why, it’s the bill, of course! Now you have to enter a bill for the items that you received three weeks ago. This job is easy:1. Choose Vendors→Enter Bill for Received Items.
Or, from the home screen, click the Enter Bills against Inventory icon. If you’re in the Vendor Center, click New Transactions and then Enter Bill for Received Items. The Select Item Receipt dialog box appears, as shown.
 The Select Item Receipt dialog box.
2. Click the Vendor drop-down menu and choose the name of the vendor that sent you the bill.
You see one or more item receipts in the box, with the date you put on the receipt, its reference number, and the memo that you wrote on the receipt.
3. Select the item receipt for which you want to enter a bill and then click OK.The Enter Bills window appears, as shown . Does this information look familiar? It should — it’s the same information that you put in the Create Item Receipts window, only now you’re working with a bill, not a receipt.
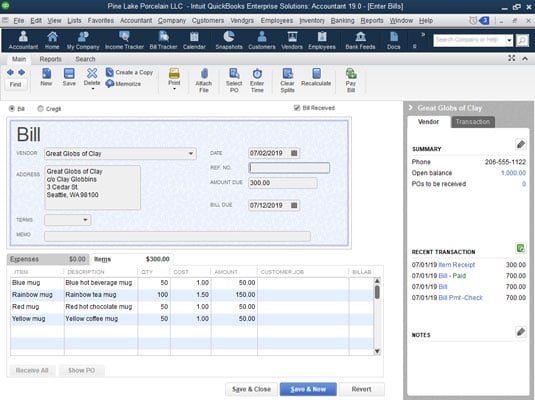 The Enter Bills window.
4. Compare the Items tab in the window with the bill.
Are you paying for what you received earlier? Shipping charges and sales tax may have been added to your bill. You may also need to adjust the price because you may have been guessing when you recorded receiving the items. If so, add to and adjust the original receipt information by using the Items tab. (You can click the Recalculate button to add the new items.)
How many days do you have to pay this bill? Is it due now? Take a look at the Terms line to see what this vendor’s payment terms are. Change the payment terms if they’re incorrect by choosing a different entry from the drop-down menu.
You want to pay your bills at the best possible time, but for you to do so, the terms in the Enter Bills window must match the vendor’s payment terms.
5. Click Save & New or Save & Close to record the bill.You still need to pay the vendor’s bill, of course. Fair enough.
Record items and pay the bill all at once
Suppose that you receive the bill when you receive the goods. The items are unloaded from the elephant’s back, and the elephant driver takes a bow and hands you the bill. Here are the steps you follow:1. Choose Vendors → Receive Items and Enter Bill.
Or, from the home screen, click Receive Inventory and then select the Receive Inventory with Bill option there. Or, from the Vendor Center, click New Transactions and then Enter Bill for Received Items. You see the Enter Bills window. You’re familiar with this window, and you know exactly what it is and what it does. If you landed cold turkey on this page by way of the index, you need to know, for inventory purposes, how to record the items you’re paying for.
2. Fill out the top part of the window.This stuff is pretty basic. Choose a vendor from the drop-down menu, and make sure that the vendor’s terms for paying this bill are shown correctly. If this vendor is new, choose Add New. QuickBooks asks you to fill in an information dialog box about the vendor. Do it. Make sure that you fill out the Bill Due line correctly.
3. Click the Items tab, and list all the items that you’re paying for.To see the Item list, move the cursor to the Item column, and click the down arrow that appears. Make sure that the quantity and cost of the items are listed correctly on the Items tab.
4. Click Save & New or Save & Close.QuickBooks adds the items you listed to the Item list and makes them official parts of your inventory.
When you sell stuff
Maybe you've noticed the similarities between the Items tab in the Enter Bills window and the Quantity/Item Code/Description/Price/Each/Amount box at the bottom of an invoice. QuickBooks uses both for keeping inventory.When you sell stuff, QuickBooks automatically adjusts your inventory. In other words, if you buy 400 porcelain chickens and sell 350 of them, you have only 50 on hand. QuickBooks updates records for this change. No muss, no fuss. Gosh, isn’t this great? No more lying awake at night, wondering whether you have enough chickens or wombats or whatever. The same thing happens when you make cash sales. When you list the items on the sales receipt, QuickBooks assumes that they’re leaving your hands and subtracts them from your inventory.
One other neat thing to note about good inventory accounting: In QuickBooks windows that let you enter inventory item quantities (such as the window you use to record an invoice), QuickBooks puts a little button inside the Quantity field. You can click this button to see a dialog box that describes current and future availability of the item.
One moral of this story is “Keep a good, descriptive Item list.” The other moral is “Enter items carefully on the Items tab of checks and bills and in the Item/Description/Qty/Rate/Amount box of sales receipts and invoices.”