

Adobe Photoshop creates HDR files from your bracketed images, as you would expect, smoothly and professionally. To generate high dynamic range images in Photoshop, follow these handy-dandy steps:
Launch Photoshop, and (optional) open the bracketed photos.
You have the option of opening your bracketed images now — the ones that will be the source photos for creating HDR. You also have the option later to automatically select all open images to merge into HDR instead of navigating and selecting them yourself.
Choose File→Automate→Merge to HDR.
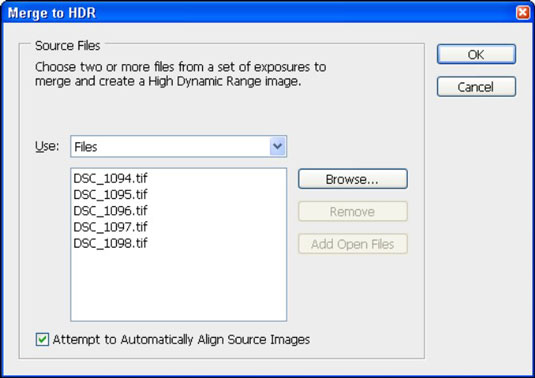
The Merge to HDR dialog box opens, as shown. Add your source images using this dialog box.
Choose source images as follows:
If the images are open: Click the Add Open Files button. If the images aren’t open: Choose Files from the Use drop-down list, and then click the Browse button. Navigate to the folder that contains the bracketed photos and select them.
If you add a photo you don’t want, select it after it appears in the Merge to HDR dialog box and then click the Remove button. To add all images from a folder: Choose Folder from the Use drop-down list, and then click the Browse button. Navigate to the folder you want and select it.
(Optional) Select the Attempt to Automatically Align Source Images check box.
This option helps align details in images and is especially helpful for hand-held brackets. If you shot your images using a tripod, you might not need to align source images. If you see smeared details, ghosting from static objects, or what looks like a double-exposure, come back and select this check box.
Click OK to continue.

Photoshop merges the files into an HDR image. If there is a question about the exposure values of the images, Photoshop displays the Manually Set EV dialog box, as shown. Enter the correct camera parameters in the Exposure Time, f-Stop, and ISO text boxes, or select EV and enter the value in the EV text box, then click OK.
When finished, the Merge to HDR dialog box reappears in a new form. A large preview window and the bracketed images appear on the left.
Select the images you want to remove from the preview from the left side of the dialog box. Select them again to add them back.

This allows you to change the balance of the HDR file toward under- or overexposure. You should be well served by trusting in your brackets, but experiment if the fancy strikes you.
Click the +/– buttons at the bottom of the dialog box to zoom in and out of the Merged Result image.
You can experiment with the source images and white point.
To retain the most flexibility, choose 32 Bit/Channel from the Bit Depth drop-down list.
This allows you to save the resulting HDR file. If you set it to less (16 Bit/Channel or 8 Bit/Channel) and click OK, Photoshop automatically starts the HDR conversion process (Photoshop’s terminology for tone mapping) and reduces the bit depth of the image. If you don’t need to save the HDR file, selecting the bit depth saves time.
Drag the Set White Point Preview slider left or right to alter the image’s exposure.
This is not a permanent change. You have the chance to review and finalize the image’s exposure during HDR conversion. This change shows up in the Exposure slider of the Exposure and Gamma method of the HDR Conversion dialog box.
(Optional) If desired, load a camera response curve from disk by selecting the Load From File radio button and clicking the button.
You can also save the current camera response curve for use in later HDR projects by clicking the Save Response Curve As button. If you want to keep things absolutely consistent across a photo shoot, save the a camera response curve for the first set of images, and then load it for subsequent sets from the same shoot.
Click OK to create the HDR file.
You’re done. The HDR image opens in Photoshop. There is no obvious indication from the image itself that this is an HDR image and not an ordinary photo. However, if you look at the image title bar, Photoshop includes HDR in the name.
(Optional) Save the HDR image (choose File→Save As).
Photoshop supports many different HDR file types, including the standard Radiance RGBE and OpenEXR formats. You may also choose from any other 32-bits-per-channel format within Photoshop, such as TIFF or PSD. If you choose PDS, though, you might not be able to open these images in other HDR applications.
