And because candle making isn’t an expensive hobby, you can decorate your home with candles, as well as give them as gifts.
Waxing about the types of candle waxes
Without wax, your candle won’t burn. But certain waxes are more appropriate for certain types of candles.Paraffin wax: The winner and still champion
Paraffin wax is a petroleum-based wax and the most popular wax for making candles. If you’re new to candle making, paraffin wax makes a great starting point. Paraffin wax is inexpensive, easy to color, and available practically anywhere. It has a colorless and odorless nature that enables you to easily add and reliably predict your end colors and aromas. Paraffin wax is commonly available in chunks and large slabs.Don’t be tempted to do one-stop shopping and buy your paraffin wax at the grocery store. This wax isn’t the type you use in candle making; instead, it’s used for sealing food that you’ve jarred.
Beeswax: No stings attached
A popular choice, beeswax is an all-natural product that has a pleasant honey aroma when burned. In addition to its natural golden shade, beeswax is available in white and other colors. You can buy beeswax in honeycomb sheets, blocks, or beads. If you have your own backyard colony of bees, you can harvest the honeycombs right out of your hive.Beeswax’s low melting point (approximately 140°F) and strength (if you drop it, it dents but doesn’t shatter) makes beeswax a great wax to use when you’re making container candles with children.
Gel wax: Feels like jelly
A newer product on the market, gel wax is basically mineral oil combined with resin to create a mixture that’s the consistency of jelly. Gel wax is also called (surprise!) jelly wax and looks like a clear gel. You can find gel wax at most craft stores, usually in a round, bucketlike container.If you’ve ever purchased a gel candle, you’re aware that gel wax doesn’t set hard. Because gel wax is clear, it’s popular for embedding nonflammable objects, such as shells or decorative glass objects.
Vegetable-based wax: Straight from the earth
Believe it or not, waxes made from items such as soybeans, palm wax, and other vegetable bases are available. Fans of these waxes say they burn cleanly and are longer lasting than other chemical-based waxes, such as paraffin. But the main reason to opt for this type of wax is if you’re a vegan.If the package doesn’t specifically say that the wax is all vegetable, it probably isn’t.
Find the right wick
Any wick you choose should cause your candle to burn. But a well-chosen wick consumes all the melted wax at just the right pace, so that the wax doesn’t drip off the candle and so that there’s enough wax to keep the flame going.This table lists the types of wicks and for which candles they’re most appropriate.
| Type of Wick | Best Use |
| Flat braided | Tapers |
| Square braided | Beeswax candles, pillars, and other large candles |
| Metal cored | Any type of candle, but especially container candles, gel candles, votives, and tealights |
| Paper cored | Votives, tealights, and container candles (but don’t use in gel candles) |
| Candle diameter | Suggested wick size |
| 0–1 inch | Extra small, 20 ply |
| 1–2 inches | Small, 24 ply |
| 2–3 inches | Medium, 30 ply |
| 3–4 inches | Large, 36 ply |
| 4 inches or more | Extra-large, 40-plus ply |
How to roll beeswax candles
This may just be the perfect first candle for beginners. You don’t need to melt any wax or use a lot of fancy equipment. You simply roll sheets of beeswax into a round candle. No hot wax, no mess.And if your homesteading efforts include beekeeping, your annual harvest doesn’t have to begin and end with the honey; you can use your colony’s own honeycombs!
Beeswax candles are desirable; unlike paraffin, they don’t drip, don’t sputter, and don’t smoke, but they do burn a long time. Buy them in a gift store, and they’re fantastically expensive. But not when you make them yourself!
The only downside is that beeswax is sticky at any temperature, and it gets even stickier when it’s warm. But stickiness can work in your favor because the beeswax sheets adhere to each other as you roll them.
When you roll your candle, you want your beeswax sheet to be at room temperature. Ideally, it’s been at this temperature for at least a few days.
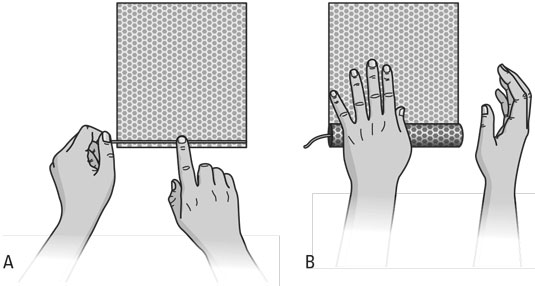
To roll a beeswax candle, you need two sheets of beeswax and a primed wick. Here’s what you want to do:- Cut your primed wick so that it’s 3/4 inch longer than the height of your finished candle. If you’re using a normal beeswax sheet, which measures 8 inches x 16 inches, your candle will be about 8 inches tall, so you want your wick to be approximately 8-3/4 inches. If you want to make two 8-inch tapers instead, just cut the sheet in half long ways and roll two candles.
- Lay your beeswax sheet on a hard surface and place your wick along the edge, as shown in the following figure.
- Apply pressure, smoothly but firmly rolling the edge of the sheet around the wick and continue rolling the beeswax into a cylinder shape.
You want to make sure that you’re rolling straight; otherwise, your edges won’t align. You also want to roll tightly enough so that you don’t trap air between the layers, which can affect how well your candle burns.
If you want to make a square candle, just flatten each side with a hard object as you roll. If you want to make a shorter candle, cut the short side of the beeswax sheet in half prior to rolling it.
- When you reach the end of the first sheet, attach your second sheet of beeswax by firmly pinching the edges of each sheet together and then continue rolling. For a larger candle, you can use as many sheets of beeswax consecutively until you reach your desired diameter.
- Trim your wick. Wait at least a day, preferably longer, before lighting.
 Making a beeswax candle is as simple as adding a wick and gently, but tightly, rolling it into a candle.
You want your beeswax to be at least room temperature or warmer, or it will break. If you’re having trouble, try using a hairdryer to heat the sheets. But don’t go too warm, or the wax may begin to melt and become a sticky mess.
How to make molded candles
The type of candle you’ll probably make the most is a basic molded candle. You can use this one basic technique to make many different types of candles. The type of mold you use doesn’t matter; the steps are pretty much the same.After you choose your mold, you need to figure out how much wax you need to melt. Pour water into your mold and measure the amount you used. For every 3.5 fluid ounces of water, you need 3 ounces of unmelted wax.
- Melt your wax to the package’s specified temperature.
Place the wax in the top part of a double boiler. Bring the water in the bottom section to a rolling boil over medium heat until melted. Use a wax or candy thermometer to monitor the temperature.
Don’t use a microwave to melt your wax because the temperature is too hard to control, and you can easily overheat the wax.
Unlike food, wax doesn’t look done, and you can’t test it with a fork. You need to constantly check your wax’s temperature. As a rule, if you’re registering temperatures in the 200°F range, you want to be careful. Most waxes combust if they’re 400°F or more, and wax heats up quickly. Each wax’s flashpoint — the temperature at which it combusts — is listed on its packaging. - Spray your mold with a mold release, such as silicone or vegetable spray.
Using a releasing agent helps you remove the candle from the mold.
If you make candles regularly, you may want to use commercial grade release spray instead of vegetable oil because the vegetable oil can leave a film on your mold over time. However, if you make candles only on occasion, the vegetable oil spray works just fine.
- Cut your wick so that it’s 2 inches longer than your finished candle’s height and then insert it into your mold.
- When your wax reaches the required temperature, add any additives, color, or scent. Unless you’re using a flexible mold, add stearin in proportion to 10 percent of your wax. Stearin has many benefits, but one in particular that is beneficial here is that it shrinks the wax, which makes your candle easier to remove from the mold. When you add ingredients, your wax’s temperature will probably drop, so continue heating your wax a little longer until it reaches the proper temperature again.
- Remove your wax from the heat and slowly and smoothly pour it into your mold. Be careful not to get any water into your wax. Remember that the container is hot, so you want to use potholders and get a firm grip on the container’s handle. Pour your wax into the mold until it’s almost full. Stop about 1/2 inch before you reach the top of the mold. Pouring smoothly is key. Don’t constantly change directions; you can wiggle the mold later to get it to set perfectly.
- Wait a few minutes and then gently tap the side of your mold to remove any air bubbles.
- As your wax cools, poke holes in the wax around the wick to release tension. If you don’t, the wax pulls the wick off center and may create a concave section on the outside of the candle.
- After your wax has cooled quite a while, reheat the extra wax you saved and pour it into any holes that have occurred as the wax cools. This step is called a repour.
- Let your wax cool almost completely and then do a second repour.
Don’t rush this step. If you repour the wax while the candle is still hot and liquid, you’re just adding more hot wax that has to shrink.
After your candle has completely cooled, you’re ready to remove it from the mold. You simply remove any mold sealer that you used, which should release the candle.
When you remove your candle from the mold, remember that the bottom of the mold now becomes the top of the candle.
If your candle isn’t coming out of your mold, you may not have let it cool long enough. Wait a few hours and try again later.After some practice, you’ll almost certainly want to add color or scent or both to your candles. You can add solid wax dye disks or liquid dyes to your wax during the melting process. To make a scented candle, use fragrances designed for candles and add it to the wax at the last possible moment before pouring. You can try essential oils, but they rarely work well in candles.
Take a dip with tapers
Dipping candles is a fairly easy process. You basically melt the wax, dip both ends of a wick in it, let it cool, and repeat 20 to 30 times or more until your candle is the desired width. (Most tapers are usually 1/2 inch in diameter, but don’t feel like you need to follow the crowd. Just remember that if you make the candle too thick, you’re creating a funny-looking pillar instead of a slim taper!) Fortunately, you don’t have to do anything special to create the tapered look; it just naturally happens.Here’s how the process works:
- Figure out how tall you want each taper, add a couple of extra inches so that your wick protrudes, double that amount, and then add 4 inches for space. When you make tapers, you usually dip in pairs, but you use only one wick. If you want to create a 6-inch taper, for example, then you take 6 inches plus 2 inches to get 8 inches. You multiply that number by 2 to get 16 inches (enough wick for two candles) and then add 4 inches to the total so that you have space in between the candle. (You don’t want the ends of your wick to touch each other when you dip.) So, to make two 6-inch tapers, you need to cut your wick to 20 inches.
- Tie a weight to each end of the wick so that it stays submerged and straight while you dip. Rocks work just fine as weights. You remove these weights later when the wick is strong enough to stay straight.
- Melt your wax. When you dip candles, you usually use paraffin wax or a mixture of beeswax and paraffin. Either way, you probably need to add the usual 10 percent stearin. Melt twice the wax you think you need. You need to have plenty left over so that you have enough wax to dip in. Dipping works best when your wax is approximately 160°F to 170°F.
- Fill your dipping can with wax. You need to make sure that your dipping can is tall enough to accommodate the size of the candle you want to make. Also fill the dipping can fairly full so that you can dip almost all the way up the wick. You have to keep adding wax to the dipping can throughout the process to keep it full.
- Dip your wick into your melted wax, allow it to cool, and then re-dip your wick repeatedly until you reach your desired diameter, as shown in the following figure.
You want to dip your wick deep enough so that you have only a few inches of undipped wick remaining. Don’t linger too long on this dip, though. You want your wick in the wax only for a second. Plunge it in and then remove it smoothly so that the wax doesn’t blob.
- If your taper looks bumpy, your wax isn’t warm enough.
- If your wax isn’t building up on your wick, your wax is too hot.
- If the wax isn’t firming up enough between dips, you need to let it cool longer in between dips.
Make sure that the ends of your wick don’t touch each other, or you'll end up with a wax glob. You can use your hands to keep the ends apart, or you may want to use a straw, dowel rod, or piece of cardboard.
- Place your wicks over a rack or dowel rod until they cool. The cooling process takes approximately 3 minutes. Basically, the wax should feel cool to your touch.
- Repeat Steps 5 and 6 until your candle is the diameter you want.
You may have to dip your candles 20 or 30 times or even more. Every time you dip, more wax builds up on your wick. Eventually, your wick becomes two tapers.
If you want your surface to be glossy, then dip it immediately into cool water after your last dip.
- Let your tapers cool a few hours before handling them and trimming your wick to 1/4 inch.
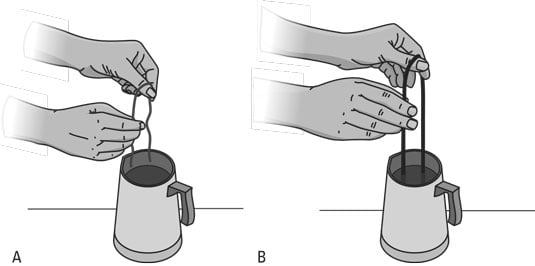 Dipping a taper candle.
In general, taper candles are 7⁄8 inch in diameter at the bottom so that they can fit into most candleholders. If you’re not using a mold, you probably need to cut the base of the candle down to that size.
Of course, if you already know which candle holders you’ll be using, you can cut your candle’s base down to that particular holder’s size. To do so, use a craft knife to score around the base of your cooled candle. Then simply remove the strips of wax until your taper fits perfectly into the holder.