


Ready for a little repotting? It's not that difficult even if it's your first try at repotting a plant, and if you're an old hand at it, you may discover some helpful new techniques. Before you remove a plant from its pot, always make sure that you have enough potting mix on hand, and then follow these steps:
1. A day or two before you plan to repot, give your plants a thorough watering because they're easier to repot when the growing mix is moist.
2. Pour some potting mix into a bucket or bowl and add an equivalent amount of warm water, then blend thoroughly.
Most soilless potting mixes are somewhat water repellent when dry, so you need to stir them. Aim for a consistency a little drier than muffin batter. If the mix is too dry, add more water; too liquid, add a bit more medium.Adding a drop or two of liquid soap to the water also helps the mix to absorb moisture more readily.
You can seal any leftover mix in a plastic bag or container and save it for your next potting session.
3. To remove the plant from its old pot, slip your hand over the top of the pot, holding the plant's stem between your fingers, and turn the pot upside down, as shown in Figure 1.
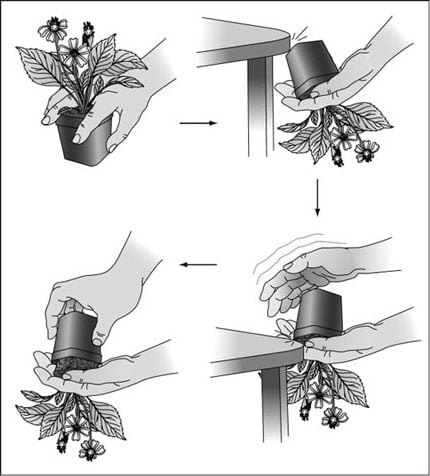 |
Figure 1: The correct technique for removing a plant from its pot. |
4. Tap the rim of the pot firmly against a hard surface, such as a table, and then gently pull the pot upwards to remove the plant (again, see Figure 1).
If the plant refuses to budge, tap the pot against the hard surface a few more times and try again. It may take two pairs of hands (one pair pulling on the pot while the other pair holds the plant) to remove big plants from large pots. You also may have to run a knife blade around the inside of the pot's rim to remove the plant or first cut away roots extending from the drainage holes. If that doesn't work, you may actually have to break the pot to remove the plant.
5. Examine the root ball.
If the root ball is less healthy or if the plant has been in the same pot for more than 18 months, you must do some cleaning up before repotting it.
If some of the roots appear dead, damaged, or rotten (or circle the inside of the pot, indicating probable underpotting), you need to prune them off.
6. If thick roots totally encircle the plant, cut away a 1/2- to 1-inch (2- to 3-centimeter) slice of roots and soil with a sharp knife — not only all around the pot, but also from the bottom (see Figure 2).
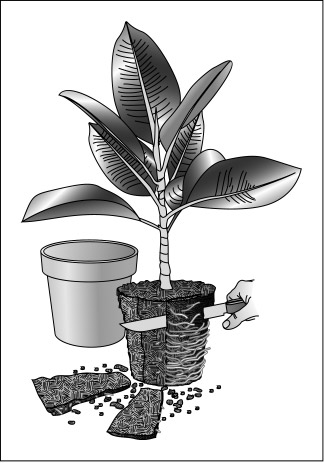 |
Figure 2: If the root ball is entirely circled by thick roots, slice a portion of roots and soil from the sides and bottom. |
Don't cut away healthy roots of plants that don't like being repotted, such as the clivia.
If you intend to repot the plant into a pot of the same size or smaller, prune back even more harshly. You can remove up to one-third of the old roots (or one-third of the root ball) without harming the plant.
7. Remove about one-third of the old potting mix from the root ball, loosening it gently with your fingers, a stake, a pencil, or a chopstick inserted straight down into the roots.
It's no loss — the soil is most likely contaminated with mineral salts.
8. Pour in a layer of the premoistened potting mix made in Step 2.
Use just enough so that the top of the roots are at the same level as the pot's rim projection.
9. Set the plant in the pot, turning it to make sure it is completely centered, and begin adding soil.
Use your fingers or a chopstick to work the potting mix down among the roots. Press just hard enough to eliminate any large air pockets without compressing the soil.
10. Add the potting medium until the roots are well covered, and then even out the mix with your fingers or a spoon.
11. Water well, let drain, and you're done!
Try to keep any newly repotted plant out of full sunlight for a week or so, and then reintroduce it to its permanent home. You can begin fertilizing again in about one month.
One important note before you actually repot the plant: Don't waste the already limited space in an average pot with a layer of useless pot shards. Use a good potting mix from top to bottom. Studies show that so-called drainage layers don't actually help drainage at all. On the contrary, pots actually drain better when the potting mix is evenly packed in the pot.
