

Note: The example here runs Slic3r in Simple mode. When you become more familiar with your 3D printer and its capabilities, you can switch to Expert mode, which offers many more options.
Slic3r is continually modified and upgraded, so use the following steps as a general guide to preparing an object for 3D printing and outputting the G-code file. Expect changes in the user interface, options, and degree to which the program detects the best settings for objects.
Position the model for printing by loading it into Slic3r.
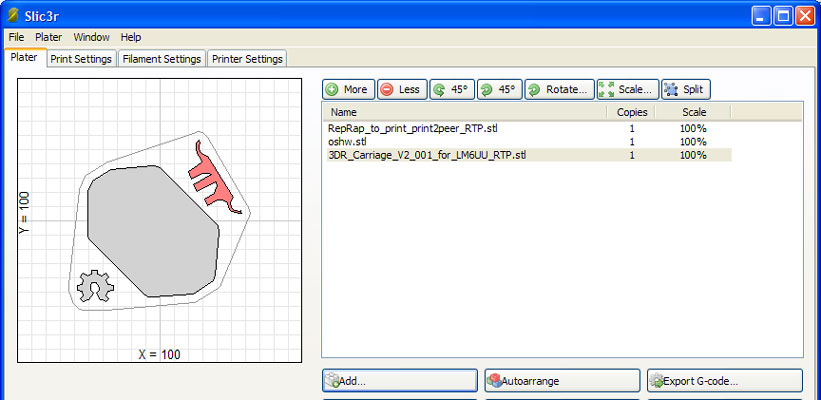
When you have a valid model correctly oriented and scaled, load it into Slic3r by dropping the file into the Plater window, which provides a scale view looking down on the outline of your model. You can load and move other objects on the virtual build plate if necessary.
On the Print Settings tab, select suitable print settings for your model.
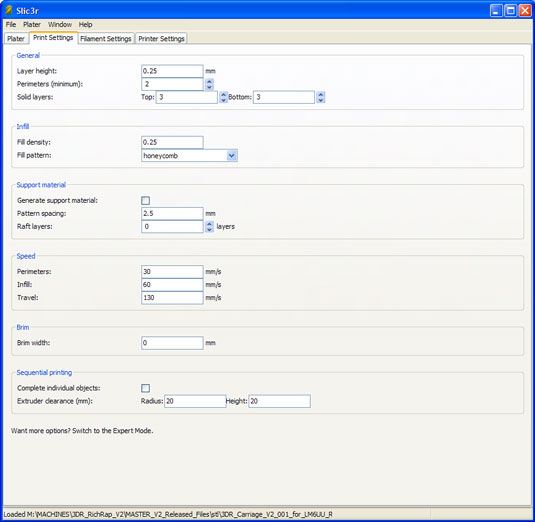
The Print Settings tab provides options that tell Slic3r how you want the model to be printed, and at what speed and quality:
- Layer Height: This setting determines how finely your model is vertically sliced. The finer the layers, the better your finished print looks, but the longer it takes to print. A typical layer height is 0.25mm for a 0.4mm or 0.5mm nozzle.
- Perimeters (Minimum): This setting is the number of times the extruder draws the outer surface of a layer before doing the infill. Normally, you use at least two perimeters to ensure a solid, good-looking object.
- Solid Layers: The Top and Bottom settings ensure that the top and bottom of an object are solid. For most models, it’s good to start with three top and bottom layers.
If you select zero top layers and no infill, your model is printed as an outer shell with as many perimeters as you selected — ideal for printing pots, vases, and other types of hollow objects.
- Fill Density: This setting is as a percentage, so a setting of 0.25 creates a 25 percent level of plastic infill for an object. A level of 0.3 (30 percent) is a good setting for most functional parts.
The objects you print almost never require an infill of 100 percent. You don’t need to use more plastic to achieve only a slight gain in strength. Normally, display models are printed with less than 15 percent infill. Functional parts such as those needed to build a 3D printer usually require infill of 25 percent to 50 percent.
- Fill Pattern: This setting allows you to specify how the interior of an object is filled. The most common fill-pattern settings are Rectilinear and Honeycomb; Concentric is often used for round parts or for vases, pots, and so on. For mechanical parts, Honeycomb is the strongest setting, but it’s slightly slower to print than Rectilinear.
- Generate Support Material: Select this setting to generate automatic support material if your object has significant overhanging features. The Raft option, which is rarely used, builds a plastic raft on the build platform before the object is printed. This setting can minimize warping in some types of plastic and can help correct for unlevel build platforms. Both rafts and support material need to be removed from the printed model; the raft or support is then discarded. You can select various patterns and spacing of rafts and support material to aid with both structural support and also removal after printing. You need to experiment to find your ideal support or raft settings as this tends to be specific to both the 3D printer and material being used. The ideal combination allows for just enough structure to hold the model, but it is easy to peel away after it’s cooled.
- Perimeters, Infill, and Travel: The settings in the Speed section govern how fast the machine builds the object. Your electronics firmware sets the maximum speed and acceleration. Experiment with this setting, but start with a slow setting to get a good sense of how fast your particular RepRap can go and what issues you face when speeding or slowing printing. Most modern RepRap 3D printers can print perimeters at 50mm per second and infill at 70mm per second or faster.
- Travel speed is the speed at which the machine moves from one point to another between extrusions of material. You want the print head to move as fast as possible to each new position between stops and starts of a layer. The goal is to minimize print time and improve overall quality. Start at 150mm per second, and move up in small steps. Top travel speed for a RepRap printer with an extruder mounted on the moving carriage is around 280mm per second. A lightweight Bowden extruder or a delta printer should be able to exceed 400mm per second. (Only a few years ago, home 3D printers were ten times slower.)
- Sequential Printing: Set this if you want to print each object on your build plate one at a time. Normally an entire plate of parts will be printed layer after layer, which is usually the fastest way to print. However, printing the entire plate at once means that if you have a fault in the print or if one of the objects becomes detached, the entire build will be ruined. With sequential printing, you print each part one at a time, and this can limit the failures, but it takes longer. Also, because your extruder must be able to print around an already-printed object, you’ll have to enter the clearance distance of your hot-end so it doesn’t crash into an already-finished part. This arrangement also limits how many parts you can place on the build platform.
On the Filament Settings tab, select print material size and temperature.
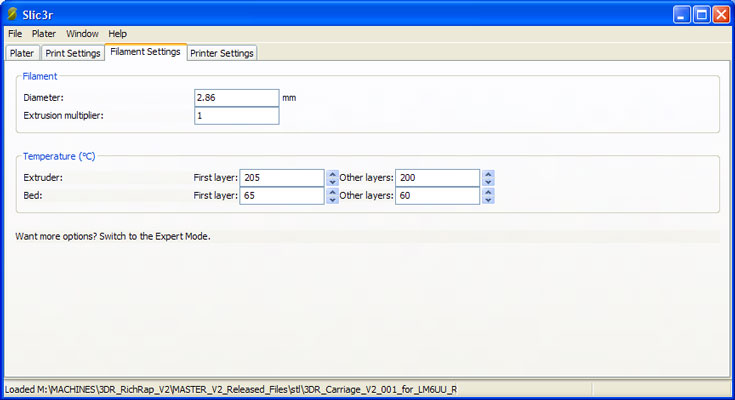
Tell Slic3r the diameter of your filament and the temperature at which to extrude it based on the material being used. You can also tell Slic3r to use a heated bed, if your printer has one. Make sure that the measured diameter of your filament is correct. If you’re printing with PLA, you should set an extruder temperature of around 200 degrees C and a heated-bed temperature of 60 degrees C. You have the option to increase the temperature a little for the first layer. This setting is useful if the plastic isn’t sticking to the build platform, but don’t go too high; excess heat may keep the material from sticking.
On the Printer Settings tab, set your 3D printer size and firmware type.
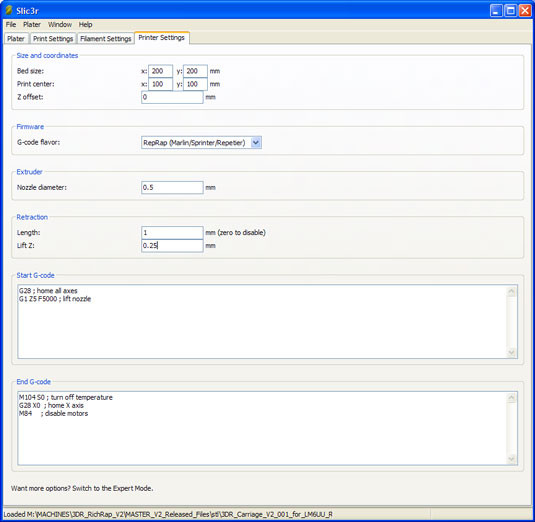
This tab should show the mechanical size of your 3D printer, as you set it when you first ran the Startup wizard. Make sure that the Bed Size and Print Center settings are what you expect for your machine. The other options on this tab include the following:
- Z Offset: This setting is useful if you’re running different extruders with hot-ends of different lengths or if the nozzle is fractionally too far from or close to your build surface. Enter a positive value to raise the hot-end from the build surface before printing starts. Depending on how your 3D printer is configured, you may not be able to enter a negative number to lower the hot-end before printing. In that case, you usually can adjust the hot-end mechanically. We discuss this technique in more detail in “Calibrating Your 3D Printer” later in this chapter.
- G-Code Flavor: This setting specifies the type of open-source firmware you have in your electronics. For a RepRap, you usually choose the option titled RepRap (Marlin/Sprinter/Repetier). Check with your supplier if your 3D printer isn’t a RepRap.
- Nozzle Diameter: Check this setting to ensure that your nozzle diameter is correct.
- Length: The length of extruder retraction is a very important aspect of the printing process. Unfortunately different thermoplastic materials that are being used for printing require a different length of extruder retraction to stop plastic ooze or missing print sections. This retraction length is a move to suck back the melted filament into the hot-end after a section of printing. Usually it happens before the hot-end travels to a new point on the build plate where another section of material will be deposited. You only need to specify a retraction length; the firmware knows to move the filament back the same distance when it reaches the next printing point before it starts extruding. You need to use this setting to prevent blobs and fine strings of melted plastic from making a mess of your print. Make sure you have retraction enabled and set at least 0.5mm. If you still have problems with blobs or fine strings across areas of your model then increase this length 0.2mm at a time. In most 3D printers you should not need more than 2mm, but do check with the manufacturer as some Bowden configurations may require up to 4.5mm, which is the maximum length you should set.
Every extruder setup is different. Experiment to find the best degree of extruder retraction, and keep in mind that you must adjust this figure to suit the material you’re using. For a geared or direct-driven extruder, start with 0.5mm of retraction; a setting of around 1.5mm may be required to stop strings and blobs. Don’t set the retraction value too high; air may be sucked into the nozzle if you do, causing many other problems. A Bowden requires significantly longer retraction due to the elastic nature of the filament being pushed inside the PTFE (Teflon) tube; approximate retraction values can range from 1.5mm to 5mm.
- Lift Z: This setting allows the extruder to lift a little above the object being printed right after the extruder retraction and just before the machine-travel move. Lift Z gives the fast-moving print head a little more clearance when it’s moving across a printed layer to get to a new point to print. Enter a positive number — usually, one extra layer height. (This is the same as your selected layer height, which you specified in the Print Settings tab — for example, 0.25mm). As with the extruder retraction, the firmware knows to go back down by the same amount when the travel move is complete and before the next extrusion starts. This setting can help if your objects are being knocked off the print bed during printing, or if layers are skewed out of alignment, because the motors are hitting corners or already-printed components of the object.
If Lift Z doesn’t keep objects from being knocked off or printed layers from shifting, the travel moves may be too fast. In such a case, try slowing the travel on the Print Settings tab. If that change doesn’t resolve the issue, the extruder is most likely overextruding plastic material that’s getting caught on the hot-end during printing.
- Start G-Code and End G-Code: These commands start and finish every print. These G-code instructions are added to the output of every part printed; they tell the firmware how to set up the specific RepRap 3D printer for printing and how to shut it down.
The standard starting G-code in Slic3r tells your printer to go to the home position and lift the nozzle a little. Your print starts after the extruder head and heated bed reach the temperature you specified on the Filament Settings tab of Slic3r (refer to Step 3). The end G-code shuts off the extruder and bed heaters and then homes the printer on the X axis; you don’t want to crash the carriage into the printed object. Finally, all the stepper motors are disabled, so the machine is in a running-but-shut-down state.
Eventually, you may want to add more custom G-code commands. Many RepRap electronics, for example, now have an onboard sounder that can play beeps and alerts. You can control it by specifying (in the starting G-code) three short beeps at the start of a print; you may want to specify a long and loud beep to signal the end of the print in the ending G-code. You can control many other operations with G-code, such as turning on fans at the end of the print to cool the printed object and build bed. Another option, available in Slic3r’s Expert mode, triggers a digital camera to take an image after every layer is printed, which can provide a stop-motion high-speed video of your object growing as it prints.
On the Plater tab, click the Export G-code button.
Depending on the complexity of the objects being printed, the performance of your computer, and the fineness of the layers you selected, exporting the G-code file can take a few seconds, a few minutes, or (in extreme cases) hours. Things take time; complex things take more time. If no warnings were displayed, your G-code should be ready for your printer. Before you print, however, make sure that the 3D printer is calibrated.
