
Shrinking a volume takes advantage of a hard drive that isn’t using all its space. For example, you can have a 200GB hard drive and use only 50GB of it. If so, the drive can be shrunk to, say, 100GB. That makes the remaining 100GB of disk storage available for use as another volume, such as another disk drive in Windows.
To shrink a volume, follow these steps:
First, clean up some of the crap.
To get the most space available, consider removing some unused files from the drive. Empty the Recycle Bin. And, perform other actions to ensure that you’re not wasting space on the drive.
Open the Disk Management console.
Open the Control Panel.
Open the Administrative Tools window.
In Windows 7, choose System and Security and then choose Administrative Tools.
In Windows Vista, choose System and Maintenance and then choose Administrative Tools.
In Windows XP, open the Administrative Tools icon.
Open the Computer Management icon.
In Vista, click Continue or type the administrator’s password.
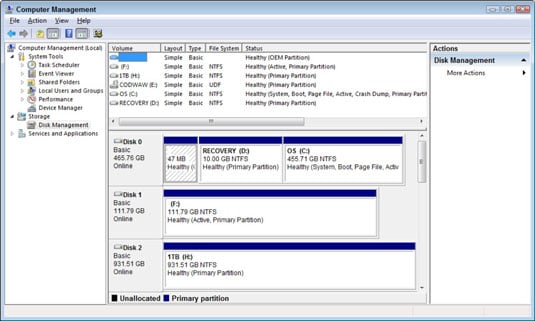
Choose Disk Management.
Right-click a volume.
It cannot be the system volume, such as drive C, or a media card, a flash drive, or an optical drive. It must be a hard drive.
Choose Shrink Volume from the shortcut menu.
Windows examines the volume to see how well it can be shrunk. Then it displays the Shrink dialog box where you can set the size of the new partition.
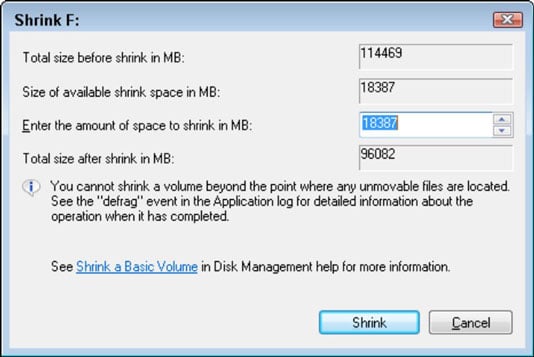
Set the amount of disk space to release.
Use the text box by the item Enter the Amount of Space to Shrink in MB to set the new volume size. The amount listed is 18,387MB, or just over 18GB of storage. That’s also the maximum amount that can be shrunk; you can set the value lower, but not higher.
Set the size to whatever amount you need. Don’t restrict the existing volume too much, or else it may fill up and cause other problems.
Click the Shrink button to reduce the drive’s size.
The computer busies itself with shrinking the volume. When the operation has been completed, you see the new unallocated volume appear in the same slot as the current drive in the Disk Management console.
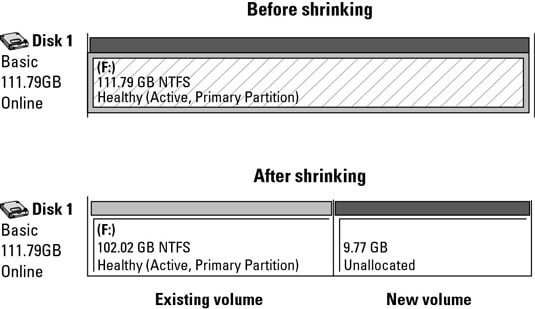
After shrinking an existing volume, a new volume has been created, as you can see in the Disk Management console. Because the volume is unallocated, it’s not available for use, at least not in a way that’s recognizable to Windows.
When a single physical hard drive sports unallocated drive space, you can take advantage of it to make the hard drive larger by extending the volume.