

Calculator in macOS Mohave
Need to do some quick math? The Calculator application gives you a simple calculator with all the basic number-crunching functions found in a pocket calculator. To use it, you can either click the keys with the mouse or type numbers and operators (math symbols such as +, –, and =) using the number keys on your keyboard (or numeric keypad, if you have one). Calculator also offers a paper tape (Window → Show Paper Tape) to track your computations — and, if you want, provide a printed record. It can even speak numbers aloud (Speech → Speak Button Pressed and Speech → Speak Result).Check out Calculator here.
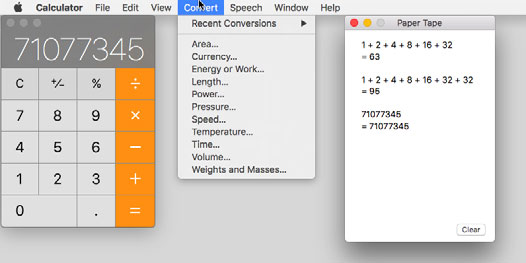 Calculator (left), Convert menu (middle), and Paper Tape (right).
In my humble opinion, the most useful feature in Calculator (after Paper Tape) is the Convert menu — more specifically, the currency-conversion feature. It checks the Internet for the current exchange rate before calculating the conversion for you. That’s very cool.
Beyond that, Calculator has three modes: Basic, Scientific, and Programmer. Basic is the default, and you access the other two modes as follows:
- Pressing Command +2 (View→Scientific) turns the formerly anemic calculator into a powerful scientific calculator.
- If you prefer Reverse Polish Notation (RPN), press Command + R.
- Choosing View → Programmer (Command +3) turns Calculator into the programmer’s friend, letting you display your data in binary, octal, hexadecimal, ASCII, and Unicode. It also performs programming operations, such as shifts and byte swaps. (If you’re a programmer, you know what all that means; if you aren’t, it really doesn’t matter.)
Moving right along, the remaining applications in this section can be found in your Utilities folder (Go → Utilities; keyboard shortcut: Command +Shift+U):
macOS Mojave Activity Monitor
In Unix, the underlying operating system that powers macOS, applications and other things going on behind the scenes are called processes. Each application and the operating system itself can run a number of processes at the same time.In this figure, you see 288 different processes running, most of them behind the scenes. Note that when this screenshot was taken, half a dozen or more programs were running, including Finder, Safari, and Activity Monitor itself.
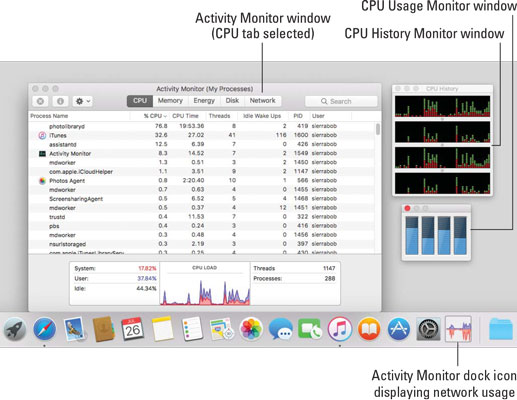 The Activity Monitor window, two little CPU monitors, and the Activity Monitor dock icon.
To display the two CPU monitor windows on the right side of the Activity Monitor window as shown, choose Window→ CPU Usage (Command +2) and CPU History (Command+3).
You also select what appears in the Activity Monitor’s dock icon — CPU Usage, CPU History, Network Usage, Disk Activity, or the Activity Monitor — by choosing View→Dock Icon. All but the Activity Monitor icon appear live, meaning that they update every few seconds to reflect the current state of affairs.
Note that you can’t display CPU Usage or CPU History in a window and in the dock icon at the same time — those two items can be displayed in the dock or a window, but not both.
To choose how often these updates occur, choose View→Update Frequency.
Setting Activity Monitor to update more frequently causes it to use more CPU cycles, which can decrease overall performance slightly.
Finally, the bottom portion of the Activity Monitor window displays information for the active tab. Select the CPU, Memory, Energy, Disk, or Network, and the middle and bottom portions of the Activity Monitor window change to reflect that selection.Because all Macs that can run Mojave have at least a dual-core processor, you’ll see at least two, and possibly four or more, CPUs displayed in Activity Monitor: one for each core.
Geeks and troubleshooters (and even you) can use Activity Monitor to identify what processes are running, which user owns the process, and how much CPU capacity and memory the process is using. You can even use this feature to quit or force-quit a process that you think might be causing problems for you.Messing around in Activity Monitor isn’t a good idea for most users. If you’re having problems with an application or with macOS, try quitting open applications, force-quitting applications (press Command+Option+Esc — the Mac three-finger salute), or logging out and then logging back in again before you start mucking around with killing processes.
Disk Utility in macOS Mojave
If you’re having problems with your hard drive or need to make changes to it, Disk Utility is a good place to start. Start by clicking a disk or volume in the column on the left and then click one of the buttons on the toolbar as described in the following sections.Volume +/–
The Volume + and Volume – buttons, new in Mojave, make it easier than ever to subdivide your hard or solid-state disk into virtual volumes, which look and act like separate disks but are volumes on a single disk.If you think this sounds a lot like what we used to call partitioning, it is.
Although APFS will allow you to create partitions instead of volumes, I can’t think of a good reason for you to do so.
One more thing: You can’t currently use an APFS volume as a Time Machine backup disk. If you try, Time Machine will complain that the disk’s file system is incompatible and ask to erase and reformat it as HFS+.Partition button
Speaking of partitions, you can use the Partition button to create disk partitions (multiple volumes on a single disk) on disks formatted as HFS+. macOS treats each partition as a separate disk. The Partition button is enabled only when an eligible item is selected in the column on the left.Partitioning a drive lets you create multiple volumes. A volume is a storage space that (from the Mac’s point of view) looks and acts just like a hard drive. A partition is simply a designated volume on a drive, separate from all other partitions (volumes). You can create any number of partitions, but it’s a good idea to limit yourself to no more than a small handful.
By the same token, it’s absolutely not necessary to use partitions unless you’re running Boot Camp. Many users never partition a hard drive and get along just fine. If you do choose to partition, you should probably limit the number of partitions you create. An iMac with a 1TB drive will do just fine as shipped (with a single partition); there’s no need to create more.
Be careful here. Although some adjustments can be made to partitions without loss of data, not all adjustments can. You’ll be warned if what you’re about to do will permanently erase your data, but I thought I’d give you fair warning first. And, of course, you should always have a backup before mucking with your disk.
Finally, if you click the Partition button with an APFS disk selected in the sidebar, you’ll see an explanation that suggests you might be happier with a volume than with a partition, as shown here.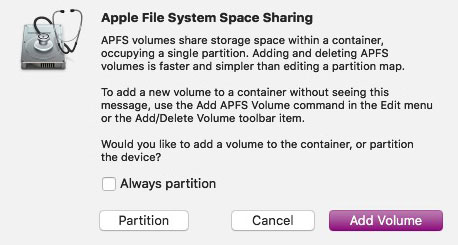 If you try to create a partition on an APFS disk, this is what you’ll see.
First Aid button
If you suspect that something’s not quite right with your startup disk (or any other disk connected to your Mac), the First Aid button in Disk Utility should be among your first stops. Use First Aid to verify and (if necessary) repair an ailing drive. To use it, select a volume icon in the list on the left and then click the First Aid button in the upper-left corner of the Disk Utility window. A sheet asks if you’d like to run First Aid on the selected disk; click Run to do it or Cancel to dismiss the sheet. When it’s finished, you’ll get information about any problems that the software finds.If the disk you’re trying to repair is your startup disk, Disk Utility will warn you that it needs to temporarily lock the boot volume and that other apps will be unresponsive until the operation has completed, as shown. Go have a cup of coffee or something — the process takes 15-30 minutes for most disks.
 If you try to run First Aid on your startup disk, you’ll see this alert before you can continue.
If First Aid doesn’t find any problems, you can go on your merry way, secure in the knowledge that that disk is A-okay. If First Aid turns up a problem that it can’t fix, it will advise you what to do next.
You can’t use Disk Utility First Aid to fix a CD or DVD, nor can you use it to fix most disk image (.DMG) files. These types of disks are read-only and can’t be altered.
Erase button
Use Erase to format (completely erase) any disk except the current startup disk.When you format a disk, you erase all information on it permanently. Formatting can’t be undone — so unless you’re absolutely sure this is what you want, don’t do it. Unless you have no use for whatever’s currently on the disk, make a complete backup of the disk before you format it. If the data is critical, you should have at least two (or even three) known-to-be-valid backup copies of that disk before you reformat.
After clicking the Erase button, a sheet drops down with a space for you to name the disk you’re about to erase and you see a drop-down Format menu so you can choose the disk format, as shown here.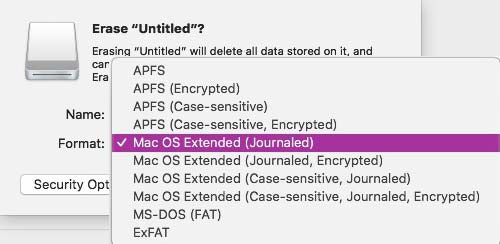 Use APFS for solid-state disks (left); use macOS Extended (Journaled) for rotational and hybrid disks (right).
Use Mac OS Extended (Journaled) for rotational and hybrid disks, use APFS for solid-state drives, and don’t try any of the other options unless you have a good reason.
Don’t try any of the other options (case-sensitive, encrypted, and other variations) unless you know what you’re doing and have a darn good reason. Formatting a disk using many of these options can cause Mac software to misbehave. Don’t do it. Only choose Mac OS Extended (Journaled) or APFS — unless you’re prepared to spend time troubleshooting when your Mac doesn’t work as expected.
Mount/Unmount button
A drive can be connected but not available to your Mac. For example, when you eject a hard drive or SSD, it’s still connected to the computer but doesn’t appear in Finder. This is called an unmounted disk.The Mount/Unmount button lets you dismount (eject) or mount a connected disk or partition on a disk. For reasons that should be obvious, you can’t eject the disk from which you booted.
Info button
Click the Info button to see myriad technical details about the selected disk, including its size, capacity, and free and used space.Grapher
Grapher is a venerable piece of eye candy that shows off your CPU’s computational power. A quick, visual math instructor, Grapher can graph equations in two or three dimensions and speaks hexadecimal, octal, base ten (decimal), and binary to boot. You can even graph curves, surfaces, inequalities, differential equations, discrete series, and vector and scalar fields … whatever that means.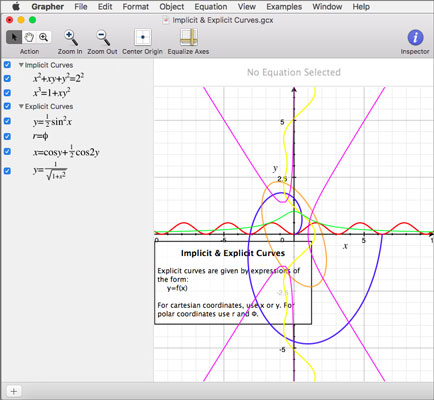 Grapher’s Implicit & Explicit Curves example.
Keychain Access
A keychain is a way to consolidate your passwords — your Mac login password, your email password, and passwords required by any websites. Keychain Access is the application you use to manage those passwords.Here’s how it works: You use a single password to unlock your keychain (which holds your various passwords), and then you don’t have to remember all your other passwords. Rest assured that your passwords are secure because only a user who has your keychain password can reach the other password-protected applications.
The Keychain Access utility is particularly cool if you have multiple email accounts and each one has a different password. Just add them all to your keychain, and you can get all your mail at the same time with one password.
A special master keychain called the Login Keychain is created automatically for every macOS Mojave user and unlocked automatically when you log into your account.Here’s how to add passwords to your login keychain:
- To add passwords for applications: If the application supports the keychain, the first time you log in with your username and password, a dialog will ask if you want to add this login to the keychain. Click Yes.
How do you know which programs support the Keychain Access utility? You don’t, until you’re prompted to save your password in a keychain in that Open dialog, connect window, or so forth. If a program supports Keychain Access, it offers a check box for it in the user ID/password dialog or window.
If that doesn’t happen the first time you provide your password, the program doesn’t support macOS keychains and you’re out of luck. You can add the account details manually (see the next bullet), but they won’t be provided automatically when the app requests them — you’ll have to open Keychain Access to look them up. The upside is that your passwords are secure as long as they’re stored in a keychain.
If you select the User Names and Passwords check box on the AutoFill tab of Safari’s Preferences window (Safari → Preferences or Command +, [comma>), you don’t have to add sites, accounts, or passwords manually. Instead, the first time you visit a site that requires an account name and a password, Safari asks whether you would like to save your password, and then it does so.
- To add a website (or other) password to a keychain manually: If your login credentials aren’t being filled in automatically for a website, you can add them manually using the Keychain Access application. Just click the little + (plus) button at the top of the main window and type (or copy and paste) the URL of the page in the Keychain Item Name text field. Then type your username in the Account Name field and your password in the Password field, as shown. (If you’re adding a password for something other than a website, type a descriptive name in the Keychain Item Name field rather than a URL.)
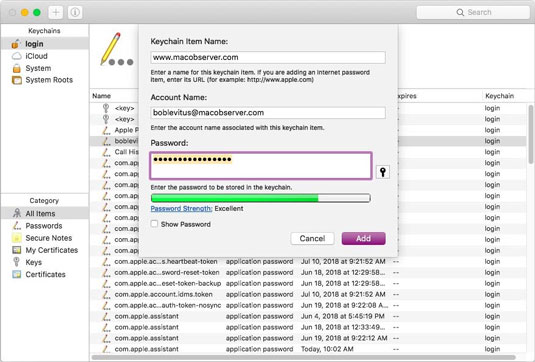 Add a URL to the keychain manually by using Keychain Access.
Click the little key to the right of the password field to use the Password Assistant window, which can help you select a memorable high-quality password, as shown here.
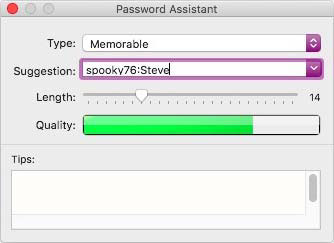 Using the Password Assistant to generate a memorable, high-quality password.
To use the new URL password, use Safari to open the URL. If the account name and password aren’t filled in for you automatically, choose Edit→ AutoFill Form Command+Shift+A) and they will be.
iCloud Keychain syncing is a great feature that makes keychains even better. Turn it on (System Preferences →iCloud), and your Safari passwords will be securely synced to (and from) all your Apple devices, including iPhones and iPads.
Just remember that this makes all your passwords available on all your devices. That’s handy, but if any of your devices aren’t secured with passwords or passcodes or are shared with others, all your passwords could be at risk. Just think about it before you enable iCloud Keychain.
Migration Assistant
Migration Assistant is pretty much a one-trick pony, but that pony is a prizewinner. You use Migration Assistant to transfer your account and other user information from another Mac, another volume on the current Mac, or a Time Machine backup. You need to authenticate as an administrator to use it, but it’s a pretty handy way to transfer an entire account without having to re-create your preferences and other settings. When you first installed Mojave (or when you booted your nice, new Mojave–based Mac for the first time), the setup utility asked you whether you wanted to transfer your information from another Mac. If you answered in the affirmative, it ran Migration Assistant.It’s not just for new Mojave installs. You can launch this one-trick-pony anytime to transfer all or some user accounts, applications, settings, and files from another Mac, PC, or Time Machine backup to this one. You can use it also after replacing a hard drive or reinstalling macOS. Last but not least, Migration Assistant can import user accounts, applications, settings, and files from Windows PCs as well as from Macs.
System Information
System Information (the App Formerly Known as System Profiler) is a little program that is launched when you click the System Report button in the About This Mac window (Apple→ About This Mac) or double-click its icon in the Utilities folder inside your Applications folder.It provides information about your Mac. (What a concept!) If you’re curious about arcane questions such as what processor your Mac has or what devices are stashed inside it or are connected to it, give this baby a try. Click various items in the Contents list on the left side of the window, and information about the item appears on the right side of the window. Feel free to poke around this little puppy as much as you like; it’s benign and can’t hurt anything.
If you ever have occasion to call for technical support for your Mac, software, or peripherals, you’re probably going to be asked to provide information from System Information, so don’t get rid of it just because you don’t care about this kind of stuff.
Terminal
macOS is based on Unix. If you need proof — or if you actually want to operate your Mac as the Unix machine that it is — Terminal is the place to start.Because Unix is a command line–based operating system, you use Terminal to type your commands. You can issue commands that show a directory listing, copy and move files, search for filenames or contents, or establish or change passwords. In short, if you know what you’re doing, you can do everything on the command line that you can do in macOS. For most folks, that’s not a desirable alternative to the windows and icons of the Finder window. But take my word for it; true geeks who are also Mac lovers get all misty-eyed about the combination of a command line and a graphical user interface.
You can wreak havoc upon your poor operating system with Terminal. You can harm your Mojave in many ways that just aren’t possible using mere windows and icons and clicks. Before you type a single command in Terminal, think seriously about what I just said. And if you’re not 100 percent certain about the command you just typed, don’t even think about pressing Return.
