
One of the benefits of scrum’s simplicity is that there is little to no cost to implement tools that provide the transparency for inspection and adaptation opportunities. The task board is an information radiator for all who participate in scrum projects. Making one is easy. Digital tools are available, and they can be effective.
But before you try those out and incur those monthly costs (common for most tools out there), put a task board up in your home, office, or other high-visibility and traffic area to significantly increase your chances of implementation success through transparency.
Materials you’ll need to create a task board are as follows:
Wall space
Whiteboard (magnetic, if possible), butcher paper, or whiteboard wall paint
Colored masking tape
Post-its or 3x5 cards
Magnets (optional for 3x5 cards)
Pens or markers
To assemble your task board, follow these steps:
Mount your display board on the wall:
If you have a whiteboard, mount it where you’ll see it often throughout the day.
If you're using whiteboard paint, paint the wall area to give you the background that you’ll need.
Whiteboard paint allows you to use dry erase markers and erasers just as if it were a whiteboard surface.
If you’re using butcher paper, cut enough from the paper roll and mount it with tape or other adhesive that’s most appropriate for the wall surface.
With the masking tape, run a strip across the top a few inches from the top.
This should give you enough space to write in column headings.
Run three masking tape strips vertically, spaced across the width of the task board area.
This gives you four columns.
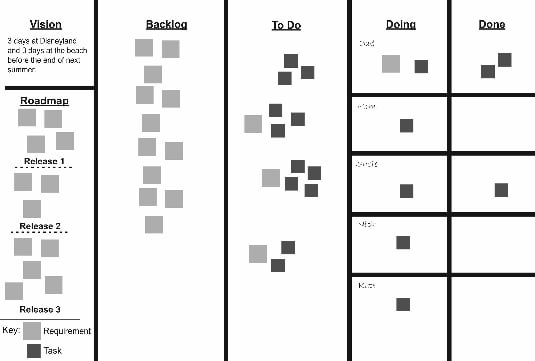
Using a pen or marker, write the following headings from left to right at the top of the four columns:
Backlog
To Do
Doing
Done
Run masking tape strips horizontally across the “Doing” and “Done” columns to create “swim lanes” for each family or team member that will be using the task board.
If it’s just for you, you can skip this step.
Optionally, if you have room, you may modify these instructions to create additional columns for the following items:
Vision and product road map
“Approve” if an approval step is required
With your vision and product road map created, you’re ready to start using the task board to plan sprints and track progress each day.
The “Backlog” column is where you’ll place requirements using the 3x5 cards or sticky notes. As you order them according to priority, arrange them so that the highest-priority requirements are at the upper right — closest to the “To Do” column.
As you plan your sprints, you will pull items to “To Do” from the “Backlog” column in a priority order, again with the highest priority on top. With requirements on sticky notes or 3x5 cards placed in “To Do,” you’re ready to start executing the sprint.
Each family or team member will pull a task from “To Do” to “Doing” to begin working on it. As soon as the task is completed, the team member will move it to “Done” or “Approve,” if an approval step is required.
You will enjoy the visibility and satisfaction of physically moving tasks from a “To Do” state to a “Done” state. This progress transparency enables high functioning and effective teams making decisions based on relevant and real-time information.