


It’s important to understand that your clients don’t see the Work page—it is available only in QBOA, so only you and your team members see the Work page. Further, the information each team member sees on the Work page is specific only to his clients—the ones to whom your team member has access.
The Work page enables you to track what needs to happen for both your clients and your own firm. And, although the terminology used on the Work page refers to projects, bear in mind that these projects are entirely different from the projects your clients can create in QBO.The Grid view in QBOA
When you click Work in the Navigation bar, QBOA displays the default Grid view of the page. The Grid view displays task cards organized into date ranges (Due Today, This Week, Next Week, and in the Next 30 days). The Grid view of the Work page in QBOA.
Each task card of a given project identifies the client for whom the work needs to be done (or, your own firm, if the project isn’t for a client) as well as the project name. Uniquely on each task card, you’ll find the task name.
You can control some of what you see on the Grid view of the Work page. For example, you can filter the page to display information for all clients, your firm, particular clients, or specific team members. The Work feature also uses data in client QBO companies to automatically display deadlines you need to meet and things you need to do, such as payroll deadlines and reconciling connected banking transactions. If you don’t want to see this automatically created information, you can click the From QuickBooks slider.
At the present time, the Work feature automatically suggests actions to take associated only with QBO; the Work feature doesn’t connect to other products like ProConnect Tax Online.
Because the Grid view organizes tasks by due date, you won’t see any type of visual connection between tasks; that is, no lines appear, connecting tasks to each other, because the Grid view isn’t a flow chart.Grid view isn’t the only view available on the Work page; you can read about List view and Calendar view later in this chapter, after I discuss creating projects and tasks.
How to create projects and tasks
You can use the Work page to create client requests. With respect to practice management, you use the Work page to create projects, which represent things that need to be done. You break each project down into tasks, which are subsets of the project that provide more detail about what needs to be done to complete the project. You create tasks as part of a project, but you can assign different team members to different tasks on the same project. Projects are typically general things you need to accomplish by a specified deadline date, and tasks describe the specific things you need to do to complete the project.As you create a project, you assign a deadline date to the project, and you assign due dates to each task in the project. You identify the client with whom the project is associated and the team member who has responsibility for the project. Or, you can specify that the project is an internal one that affects your firm but not any of your clients.
QBOA contains project templates that help you quickly create commonly needed projects, such as Monthly Bookkeeping or Client Onboarding. When you use one of these templates, QBOA creates not only the project but all the tasks associated with the project. You can then edit the project as needed.
Creating a project
To try to keep this information as easy to follow as possible, we'll create projects separately from creating tasks—even though you can, and probably will, create tasks when you create projects. To create a project, follow these steps:1. Click Work in the Navigation pane.
QBOA displays the Work page for your firm.
2. Click Create Project in the upper right corner of the page.QBOA opens a panel on the right side of the page that you use to create a project.
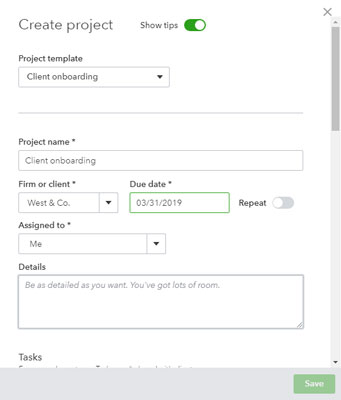 Creating a project using a template.
3. If your project falls into one of the predefined template categories of Bi-weekly Payroll, Client Onboard, Monthly Bookkeeping, or Yearly taxes, select the template from the Project Template list box.
QBOA adds the tasks associated with the project template to the project, assigning each task a due date of “tomorrow.”
4. Fill in a name for the project.If you selected a project template, QBOA fills in the project name using the project template name.
5. From the Firm or Client list box, select the QBO client with whom the project is associated.If the project applies only to your firm and no client, select My Firm.
6. Set a project due date.The due date you set for the project is a constraint; if you add tasks to the project, you won’t be able to set due dates for the tasks that occur after the end of the project.
7. Using the Assigned To list box, assign the project to one of your team members.You can add details for the project if you want.
Some projects, like reconciling a bank statement, need to repeat on a regular basis; for those projects, click the Repeat slider to set up the timeframe QBOA should use to repeat the project.
Working with tasks
Now that you’ve created a project, you can work with the project’s tasks. You can- Add and delete tasks,
- Change the due dates QBOA assigns to the tasks, and
- Reorganize the order of tasks in a project.
QBOA displays a form for task information (see the following figure).
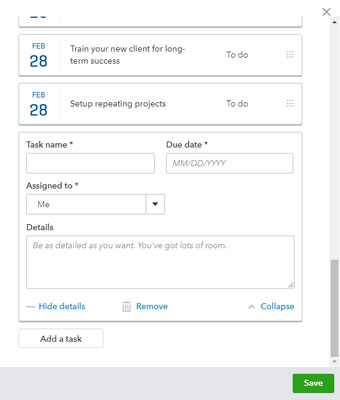 Supply a task name and due date, and assign it to a team member of the firm.
2. Supply a task name, due date, the team member to whom you want to assign the task, and any pertinent details about the task, such as the QBO commands used to accomplish the task.
There is no limit to the number of tasks you can create.
3. To work with a different task, collapse the one you’re currently working on by clicking Collapse in the lower right corner of the task card.You don’t save individual tasks; instead, you save the project, which saves the task information.
4. To delete a task or change its information, click the task.QBOA displays the details of the task.
 Click a task to edit or delete it, or drag it to reorder it.
- To change the task, simply supply the new information.
- To delete the task, click the Remove link.
You can see the symbol you drag to reorder a task.
6. Click Save to save the project and its tasks.QBOA redisplays the Work page, and your new projects and tasks appear on it.
How to update task status in QBOA
As you make progress on a task, you can update its status directly from the Grid view of the Work page. Click the down arrow on a task card to change its status.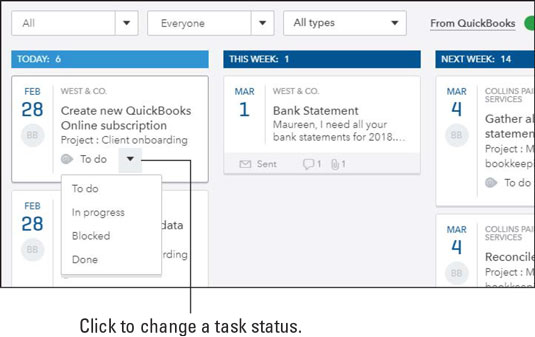 Use the down arrow on a task or project card to display the list of available statuses.
Tasks can have a status of To Do, In Progress, Blocked, or Done. You use the Blocked status when something is stopping you from completing a task.
How to edit and delete project information
You can edit any project or task except those created automatically from a QBO company—you can only hide or display those automatically created tasks using the From QuickBooks slider.Regardless of the view you’re displaying on the Work page, to edit any project or task you created, click any task in the project. QBOA then opens the Edit Project panel on the right side of the screen and displays the information of the task you clicked.
You can change the project information by editing the top portion of the Edit Project panel. You can delete any project from the Edit Project panel by clicking the trash can icon in the lower left corner of the panel (see the following figure).
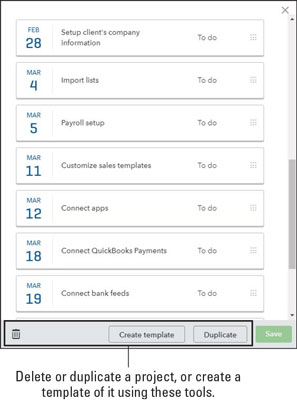 Delete or duplicate a project or create a template from it.
Many of the projects you create are similar to each other, so save yourself some work and duplicate an existing project to create a new one. You also can use an existing project to create a template for subsequent similar projects. From the Edit Project panel, duplicate the project by clicking the Duplicate button. To create a template from the project, click Create Template.
Although you can edit project and task information, you cannot change a project into a task or a task into a project.
To close the Edit Project panel, click the X in the upper right corner of the panel.
How to work in the List view
The Grid view of the Work page is limited in what it can display because the cards take up quite bit of screen real estate. You can view your projects and tasks in List view, as shown here, by clicking the List View button in the upper right corner of the Work page (just below the Create Project button). The Work page in List view.
From this view, you have additional filters available to you. In addition to filtering for a client, a team member, and a type of work (project, task, or client request), you also can filter by status and set a date range of interest to you. And, you can still edit any project or task; simply click anywhere on the project’s or task’s line to display the Edit Project panel shown earlier.
How to work in the Calendar view
The Calendar view displays the tasks due for any selected date. On the calendar, you’ll see the number of tasks due on each date. When you click a date, QBOA uses the right side of the Calendar view to show the tasks due on that date.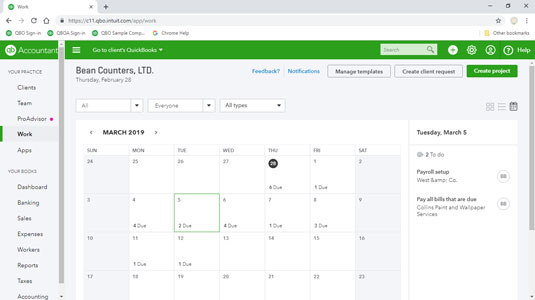 Calendar view presents project tasks by due date.
Communicate with team members about work
At the risk of stating the obvious, communication is paramount when working in a team environment. QBOA enables you to provide notifications by email for a variety of actions associated with the projects and tasks that appear on the Work page. To specify the notifications you want QBOA to send to your team, click the Notifications link at the top of Work page to display the Notifications tab of the Company Settings dialog box.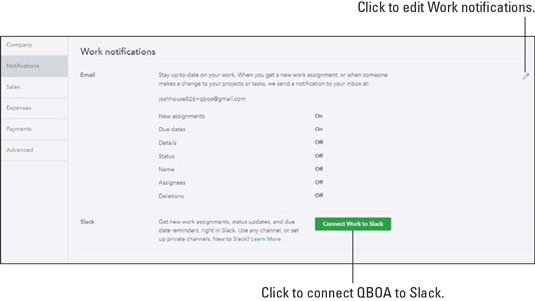 Set up email notifications for team members regarding work.
Click the pencil in the upper right corner of the Email section to turn on and off email notifications for various actions that take place on the Work page. Click Save when you finish, followed by Done to return to QBOA.
Each team member controls the notifications he receives. By default, each team member gets notifications of new assignments and due dates by default, but, to set up the rest of these notifications, each of your team members needs to log into his personal QBOA account and change these settings.
If your organization uses Slack, a collaboration tool that helps your team connect, you can integrate Slack with QBOA. Add the app to QBOA by clicking Connect Now on the Work page. If you previously hid the ad for Slack, click the Connect Work to Slack button on the Notifications tab of the Company Settings dialog box.Slack offers a free version suitable for small teams wanting to try out Slack; the free version has some limitations. Slack also offers two “pay” versions: Standard and Plus; the cost of these versions depends on the number of active Slack users per month.


