In some situations in Excel 2016, you need to move a particular worksheet or copy it from one workbook to another. To move or copy worksheets between workbooks, follow these steps:
Open both the workbook with the worksheet(s) that you want to move or copy and the workbook that is to contain the moved or copied worksheet(s).
Choose File→Open or press Ctrl+O to open both the workbooks.
Select the workbook that contains the worksheet(s) that you want to move or copy.
To select the workbook with the sheet(s) to move or copy, click its pop-up thumbnail on the Windows taskbar.
Select the worksheet(s) that you want to move or copy.
To select a single worksheet, click its sheet tab. To select a group of neighboring sheets, click the first tab and then hold down Shift while you click the last tab. To select various nonadjacent sheets, click the first tab and then hold down Ctrl while you click each of the other sheet tabs.
Right-click its sheet tab and then click Move or Copy on its shortcut menu.
Excel opens up the Move or Copy dialog box (similar to the one shown here) in which you indicate whether you want to move or copy the selected sheet(s) and where to move or copy them.
 Use the Move or Copy dialog box to move or copy from the current workbook into a different workbook.
In the To Book drop-down list box, select the name of the workbook to which you want to copy or move the worksheets.
If you want to move or copy the selected worksheet(s) to a new workbook rather than to an existing one that you have open, select the (new book) option that appears at the very top of the To Book drop-down list.
In the Before Sheet list box, select the name of the sheet that the worksheet(s) you're about to move or copy should precede. If you want the sheet(s) that you're moving or copying to appear at the end of the workbook, choose the (Move to End) option.
Select the Create a Copy check box to copy the selected worksheet(s) to the designated workbook (rather than move them).
Click OK or press Enter to complete the move or copy operation.
If you prefer a more direct approach, you can move or copy sheets between open workbooks by dragging the sheet tabs from one workbook window to another. This method works with several sheets or a single sheet; just be sure that you select all the sheet tabs before you begin the drag-and-drop procedure.
To drag a worksheet from one workbook to another, you must open both workbooks. Click the Arrange All command button on the View tab or press Alt+WA and then select an arrangement (such as Horizontal or Vertical to put the workbook windows either on top of each other or side by side). Before you close the Arrange Windows dialog box, be sure that the Windows of Active Workbook check box is not selected; that is, does not contain a check mark.
After arranging the workbook windows, drag the worksheet tab from one workbook to another. If you want to copy rather than move the worksheet, hold down the Ctrl key while you drag the sheet icon(s). To locate the worksheet in the new workbook, position the downward-pointing triangle that moves with the sheet icon in front of the worksheet tab where you want to insert it; then release the mouse button or remove your finger or stylus from the touchscreen.
This drag-and-drop operation is one of those that you can't reverse by using Excel's Undo feature. This means that if you drop the sheet in the wrong workbook, you'll have to go get the wayward sheet yourself and then drag and drop it into the place where it once belonged!
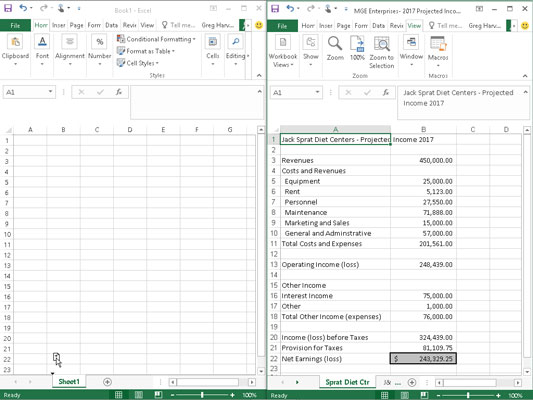
In the following figures, you can see how easy it is to move or copy a worksheet from one workbook to another using this drag-and-drop method.
Here, you see two workbook windows: Book1 new workbook (left pane) and the MGE – 2017 Projected Income workbook (right pane). These workbook windows are arranged with the View Side by Side command button on the View tab. To copy the Sprat Diet Ctr sheet from the MGE – 2017 Projected Income workbook to the new Book1 workbook, select the Sprat Diet Ctr sheet tab and drag the sheet icon to its new position before Sheet1 (no need to hold down the Ctrl key as Excel always copies between data between different files).

Now look at the next figure to see the workbooks after you release the mouse button. As you can see, Excel inserts the copy of the Sprat Diet Ctr worksheet into the Book1 workbook at the place indicated by the triangle that accompanies the sheet icon (before Sheet1 in this example).


