


- Through a browser
- As a stand-alone desktop application
- On your smartphone or tablet
2. Select the Open Discord in Your Browser option.
3. Enter a username for yourself. Create a name for yourself that people in Discord will know you by.
If you are a content creator or a gamer, or if you’re developing an online persona, it is best to think ahead of how you want to be known. For example, on PSN, Instagram, and Twitch, I use the moniker TheTeeMonster. So, when I set up my Discord, I entered TheTeeMonster as my username. Consistency is key, so aim for the same username from platform to platform.
 What do people call you on Discord? Create a username for yourself here, and begin building a brand for yourself or your organization.
4. Click the arrow button to the right, and verify that you’re not an automated program or bot.
5. Verify your account by email or by phone. Choose your preferred method of verification and follow the steps to assure Discord that yes, you are in fact a real person.
6. When you’re asked to set up your server or jump into Discord, click the Get Started option.
When you join Discord, you create what is called a server. This is your own private corner of Discord, and you decide how public your chat will be.
7. In the Create Your Server dialog box, come up with a name for your server and a serve name, and select the server region closest to your location.This is where you give your server a name people can remember it by. The content creator IAmTeeBot called his server The System. Aura’s Discord server is called The Pit, named after his love for his pitbull Layla. Then you have James Werk’s Discord, named aptly enough The Werkshop. If you don’t like what you initially name your server, don’t worry. You can always change it later in the Settings section of your server.
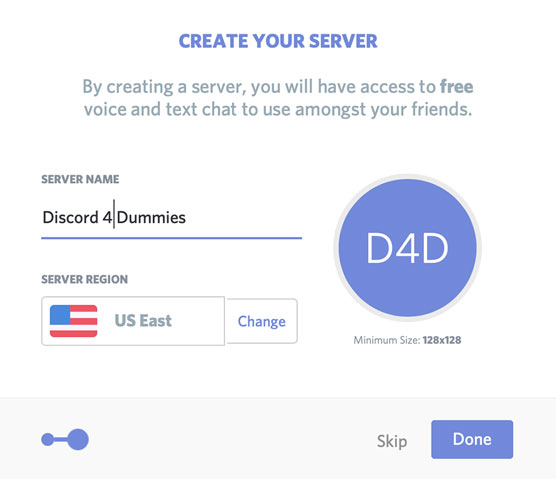 When you create a server on Discord, you christen it with a name and establish a region where your server operates.
8. Claim the server as your own with a valid email and password. You will be sent an email asking you to claim the server, making you its moderator — the one in charge of the whole operation.
You are given the option of downloading the desktop app. You will always have the option of downloading the app later.
When you claim your server via email confirmation, you are live on Discord!
9. Return to the Discord browser window, go to the top left of the app, where you see your server name, click the arrow to get the drop-down menu, and select the Server Settings option.A few options are listed here, and we will cover them all eventually. Right now, we’re focusing on just the Server Settings option.
10. In the Server Overview section, you can upload an icon for your server. To do so, click the default icon (the initials of your server name in a blue circle) or click the Upload Image button, and find on your computer an image or logo representative of you or your organization. Select it and then click the Open button to upload it.The server’s unique icon or avatar allows users to recognize your server at a glance. You will want to have an avatar for your server as well as one for yourself. Discord recommends an image at least 512 x 512 pixels for an avatar.
11. Change server regions or rename your server if you find yourself in need of a rebrand.
Scroll to the bottom of Server Settings, click the Save Changes button, and then press the Esc key to return to Discord.
On starting off your server, Discord is very much the blankest of canvases. I mean, it is quiet. Very quiet. Like when you’re wandering through the Nostromo in the opening shots of Alien — that kind of quiet!Discord gets that and doesn’t want you to feel put off, so when you first arrive, it automatically highlights things to do, such as Set a Status. You might also see an exclamation point floating around the user interface. On clicking the exclamation point, tips are revealed on neat stuff you can do straight out of the box. These tips also appear whenever Discord changes features and functions, so keep an eye out for those.
Just above your server icon, you should see the Discord icon (if it reminds you of a gaming console controller, you would be correct), your shortcut to the Home section. Single-clicking that icon immediately takes you to the Activity section, the area of Home always featured on your arrival to Discord. The Home feature offers four options:
- Activity
- Library
- Nitro
- Friends


