

Every time you explore the web, you're bound to run into tons of pictures on just about every HTML5 and CSS3 page you visit. Typically, images are used in four ways on web pages:
External link: The page has text with a link embedded in it. When the user clicks the link, the image replaces the page in the web browser. To make an externally linked image, just make an ordinary link, but point toward an image file, rather than an HTML (HyperText Markup Language) file.
Embedded images: The image is embedded into the page. The text of the page usually flows around the image. This is the most common type of image used on the web.
Background images: An image can be used as a background for the entire page or for a specific part of the page. Images usually require some special manipulation to make them suitable for background use.
Custom bullets: With CSS, you can assign a small image to be a bullet for an ordered or unordered list. This allows you to make any kind of customized list markers you can draw.
How to link to an image
The easiest way to incorporate images is to link to them. Take a look at the externalImage.html page.
The page’s code isn’t much more than a simple link:
<!DOCTYPE html>
<html lang = "en-US">
 <head>
 <meta charset = "UTF-8">
 <title>externalImage.html</title>
 </head>
 <body>
 <h1>Linking to an External Image</h1>
 <p>
  <a href = "shipStandard.jpg">
  Susan B. Constant
  </a>
 </p>
 </body>
</html>
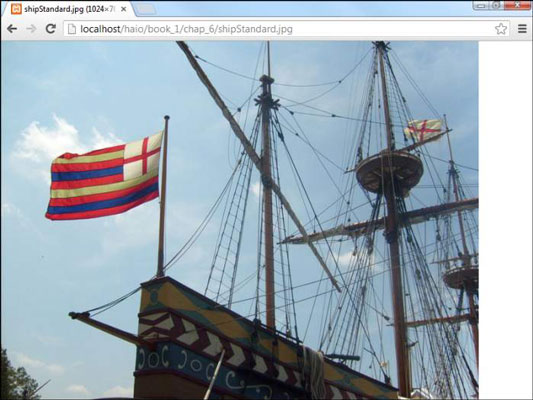
The href points to an image file, not an HTML page. You can point to any type of file you want in an anchor tag. If the browser knows the file type, the browser displays the file. If the browser doesn’t know the file format, the user’s computer tries to display the file using whatever program it normally uses to open that type of file.
This works fine for most images because the image is displayed directly in the browser.
You can use this anchor trick with any kind of file, but the results can be very unpredictable. Generally, save this trick for very common formats, like GIF and JPG.
Most browsers automatically resize the image to fit the browser size. This means a large image may appear to be smaller than it really is, but the user still has to wait for the entire image to download.
Because this is a relative reference, the indicated image must be in the same directory as the HTML file. When the user clicks the link, the page is replaced by the image.
External links are easy to create, but they have some problems:
They don't preview the image. The user has only the text description to figure out what the picture might be.
They interrupt the flow. If the page contains a series of images, the user has to keep leaving the page to view images.
The user must back up to return to the main page. The image looks like a web page, but it isn't. No link or other explanatory text in the image indicates how to get back to the web page. Most users know to click the browser's Back button, but don't assume all users know what to do.
How to add inline images using the tag
The alternative to providing links to images is to embed your images into the page.
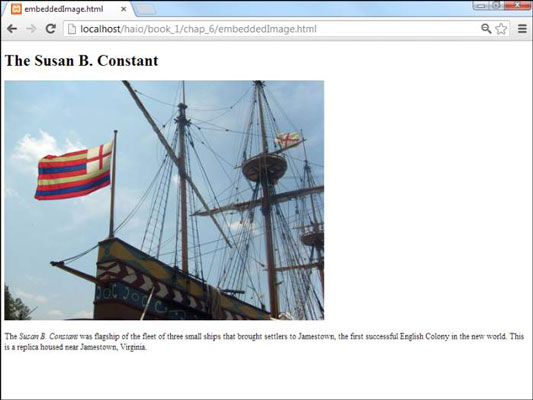
The code shows how this image was included into the page:
<!DOCTYPE html>
<html lang = "en-US">
 <head>
 <meta charset = "UTF-8">
 <title>embeddedImage.html</title>
 </head>
 <body>
 <h1>The Susan B. Constant</h1>
 <p>
  <img src = "shipStandard.jpg"
   height = "480"
   width = "640"
   alt = "Susan B. Constant" />
 </p>
 <p>
  The <em>Susan B. Constant</em> was flagship of the
  fleet of three small ships that brought settlers to Jamestown, the first
  successful English Colony in the new world. This is a replica housed
  near Jamestown, Virginia.
 </p>
</html>
The image tag is the star of this page. This tag allows you to grab an image file and incorporate it into the page directly. The image tag is a one-shot tag. It doesn't end with . Instead, use the characters at the end of the definition to indicate that this tag doesn't have content.
You might have noticed that Susan B. Constant is italicized in the page used the tag to get this effect. stands for emphasis, and means strong emphasis. By default, any text within an pair is italicized, and text is boldfaced. You can change this behavior with CSS.
src (source)
The src attribute allows you to indicate the URL of the image. This can be an absolute or relative reference. Linking to an image in your own directory structure is generally best because you can't be sure an external image will still be there when the user gets to the page.
height and width
The height and width attributes are used to indicate the size of the image. The browser uses this information to indicate how much space to reserve on the page.
The height and width attributes should describe the size of an image. You can use these attributes to actually change the size of an image, but it's a bad idea. Change the image size with your image editor. If you use these attributes, the user has to wait for the full image, even if she'll see a smaller version. Don't make the user wait for information she won't see.
alt (alternate text)
The alt attribute gives you an opportunity to specify alternate text describing the image. Alternate text information is used when the user has images turned off and by screen-readers. Information in alt tags is also used in image-searching software like Google Images.
The alt attribute is required on all images.
Additionally, the tag is an inline tag, so it needs to be embedded inside a block-level tag.


