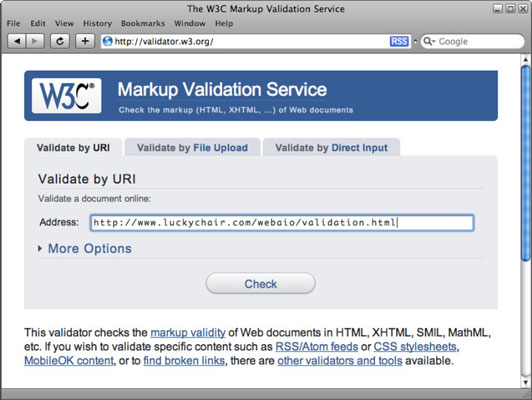
Several fantastic free online website code validation tools are at your disposal. The W3C provides multiple tools that conform to and validate against the W3C’s latest recommended standards for CSS, HTML, XHTML, HTML5, and 508 accessibility.
What these tools test
Most of the free validators allow you to test in up to three different ways, depending on the location of the files being tested and the particular validator being used:
Validate by URL: To test by URL, you must upload the page you’re testing to a live, working server before you can use that URL in the validator. This means you could upload the files to a testing server or a hidden directory on the actual server that will be hosting the site, such as http://www.mywebsite.com/test, and validate by URL from there.
Validate by upload: This method allows you to browse for (on a local computer or at some remote destination), select, and upload a single HTML file for validation.
Validate by direct input: To test the code on a single web page before that file has been uploaded to a host server, copy the entire document — from DTD to closing
tag — and paste it into the Direct Input or other appropriate testing text area on the desired online validation page.
Although most of these tools are free, performing the validation on all the pages might take a while because you can validate only a single page at a time.
How to use the W3C markup validator
All the free online validators are quite easy to use. To illustrate, follow these steps to validate a webpage using the W3C Markup validator:
Point your browser to Validator page.
This is the W3C’s main Markup Validation page.
In the Validate by URL Address field, type the complete path of the following test page:

http://www.luckychair.com/webaio/validation.html
The remaining steps use this sample file to illustrate specific code validation issues. When you’ve completed this exercise, feel free to repeat the process using one of your own web pages.
Click the Check button to validate the page.
The W3C server processes the validation and returns results in the same browser window.
The results display a big red bar across the top that reads Errors found while checking this document as XHTML 1.0 Transitional! Below the red bar, you see details of two found errors on lines 44 and 46 regarding the omission of alt text attributes on two of the page’s graphics:
Line 44, Column 84: required attribute "alt" not specified.
... " width="100" height="30" id="dell" /></td>
Line 46, Column 84: required attribute "alt" not specified.
... " width="100" height="30" id="sony" /></td>
The W3C validator returns line numbers in the error descriptions. To see which actual line numbers the validator is testing against relative to your code, you need to resubmit the test page. At the top of the validation failed page, you should see an area labeled Options. Inside this area, enable the Show Source option and click the Revalidate button.
When the results are returned, you see a new Source Listing area below the results that contains the line numbers in the code.
In a new browser window, point your browser to luckychair.com and save a copy of this page to your local computer by using the browser’s File menu.
The Save option in your browser is typically something like File→Save Page As or File→Save Page.
You’re now going to correct the errors and retest the page.
Open the downloaded validation.html page in your favorite HTML editor and add the alt text attribute to each of the images as indicated in the W3C failed validation results.
Insert descriptive alt text attributes to the code as follows:
<tr>
 <td><img src="images/b_dell.gif" name="dell" width="100" height="30" id="dell" <b>alt=</b><b>"</b><b>dell</b><b>"</b> /></td>
 <td><img src="images/b_mac.gif" alt="Mac" name="mac" width="100" height="30" id="mac" onclick="MM_goToURL('parent','http://www.apple.com');return document.MM_returnValue" onmouseover="MM_swapImage('superstore', '','images/new.gif','mac','','images/b_mac_over.gif','main','','images/mac.jpg',1)" onmouseout=”MM_swapImgRestore()" /></td>
 <td><img src="images/b_sony.gif" name="sony" width="100" height="30" id="sony" <b>alt=</b><b>"</b><b>sony</b><b>"</b> /></td>
</tr>
Return to the main Validator page and click the Validate by Direct Input tab at the top of the page.
In this area, you can validate the code by direct input without needing to upload a test file to a working host server.
Save the changes to your updated validation.html file. Then select and copy all the code on the page (from DTD to closing tag), paste it into the Validate by Direct Input field, and click the Check button.
Pasting in the HTML code from a local copy of a file can sometimes be faster than the Validate by URL and Validate by File Upload methods.
When the results appear, you see a green bar across the top of the results page that reads This document was successfully checked as XHTML 1.0 Transitional!.
This tool, like most the others, can verify only one page at a time. Fortunately, single-page validators can often identify sitewide coding issues, which can be quickly fixed on all the pages of a site.
For instance, if the validator finds a missing tag, you could use an automated process like Dreamweaver’s Find and Replace tool to find the problematic code and replace it with the corrected code in all the pages of a managed sited.
What a validator won’t catch are instances of code usage that, though valid, aren’t standards compliant. Take the code in the preceding steps, for example, which has rollover graphics embedded inside table cells. In all likelihood, the table, graphics, and JavaScript rollovers could all be replaced with tags and a few CSS styles.


