

Before you make your first attempt at printing, make sure that the machine is set up correctly — not damaged or out of alignment. Check that the electronics, motors, and sensing stops are operating correctly. Then gather the basic information you need to complete your first 3D print.
Following are some tips for making sure that your 3D printer is correctly set up and calibrated:
- Level the build platform and set the first layer distance correctly. A level platform and the correct distance are two of the most important aspects of successful 3D printing. Just because you have a bed-sensing probe or automatic level system, though, don't expect it to work correctly right out of the box or after you assemble the kit. It's almost always essential that you manually check and set the offset distance from the probe sensor and the nozzle of the hot-end.
The sensor triggers at a set distance from the build platform, but the tip of the hot-end nozzle usually is slightly farther away than this trigger point. Therefore, you need to set a Z-axis offset. Usually you have a setting on the machine that controls the offset of the nozzle from the build platform. Often you place a sheet of paper onto the build platform and adjust the nozzle up and down, by rotating the control knob on the 3D printer. When this distance is correctly set, a high-quality bed sensor probe (capacitive, inductive, or infrared) should give you highly repeatable results time and time again.
At the start of a 3D print, the sensor checks the platform distance and then moves the extra offset (usually, –0.5mm to –3mm) before starting to print the first layer. Tuning this offset distance and making sure that the build platform is level and flat gives you perfect first-layer results and a greater chance of print success.
- Make sure that the correct level of power is being fed into your position system. Verifying the power level ensures that the stepper motors don't lose steps at higher speeds and don't overheat. Too much power is as bad as not enough. If the power level is set incorrectly, your 3D printer may never operate properly, or it will fail often during printing.
You usually adjust motor power on the stepper-motor drivers by rotating a small dial called a potentiometer. Many kits come already set to the correct setting, but just as many require you to perform this step.
The exact level of power depends on the motor you're using and the type of driver installed in the electronics system. Check with the manufacturer to find out what settings you require for the stepper motor's current (power) limit.
The extruder stepper motor requires a current limit to be set, and this limit may be higher than the limits for the motors used for X, Y, and Z motion. Some electronics control systems can set the motor power via firmware settings you can change on the control panel menu of your 3D printer. Check to see whether your machine can be adjusted through the menu, which is usually much more convenient than having to adjust settings in the firmware code that you then need to recompile and upload to the 3D printer.
- Check the extruder calibration. Set the important extruder steps per unit (unit being 1 millimeter) (eSteps) to ensure that the correct amount of plastic material is pushed into the hot-end. The Slicing program uses the eSteps number to calculate the exact flow of material being extruded for the required print move to ensure plastic is not over or under extruded into the model being printed.
- Check that the temperatures you set for the hot-end nozzle and the build platform are correct. Making sure that the temperature you set for a plastic material is the same as the temperature you set for the hot-end is really important, because you really don't want to be melting plastic at the wrong temperature. When the temperature is too low, you risk jamming the nozzle or the extruder system. When the temperature is too high, the material can begin to break down — or, in a worst-case scenario, release gases or burn, causing significant damage.
You can check the temperature in several ways, but using a hand-held temperature sensor is the easiest way. The best sensor for the job is a physical probe that can make direct contact with the nozzle and the heated build platform. (Infrared and laser sensors don't work as well.)
The most important piece of advice we can offer you is this: Never leave a 3D printer unattended. Make sure that you have operational smoke alarms near your work area. Also ensure that you have adequate ventilation or fume extraction. If you have any doubts about the printer setup, check with the manufacturer. A 3D printer is often hot moving machinery, and you must treat it with respect.
After you've checked and double-checked your printer, you can get ready to print a model. Many manufacturers supply machine profiles and material settings for the slicing program being used for model print preparation. Make sure that you have the correct profile installed, and see whether you require any firmware updates that the manufacturer has issued since you bought the 3D printer.It's very tempting to print off something impressive, but to be on the safe side it's best to start with a basic 20mm cube or some other small part, like the ones shown, that can assist you with initial calibration of the printer.
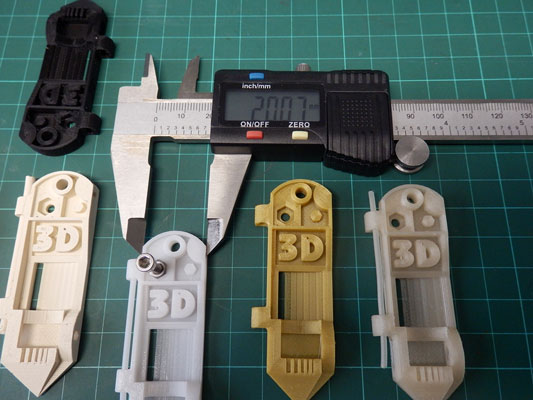 Printing a number of calibration models helps you refine settings for different materials and nozzle sizes.
A 20mm cube should take around 20 minutes to print, and producing it can really give you the confidence to know the machine is set up accurately, the X, Y, and Z axes are aligned, and material flow is correct. You will get tired of printing cubes, but remember that if you spend some time calibrating now, anything else you print is much more likely to be successful and also dimensionally accurate.
You can download a simple set of 20mm calibration cubes from YouMagine.


