

Objects designed for home 3D printing are ready-made models. Usually, the designers of these objects have home 3D printing in mind, expecting that their models will be 3D-printed before any modeling process starts. After all, if you get a taste of the results, you have a clearer goal when you start making your own models.
The promise of home 3D printing doesn't mean that you can print anything and everything. This practical limitation can frustrate users who expect to jump right in and start printing high-quality parts for product development or model-making, or as substitutes for products crafted by hand or manufactured traditionally.
In fact, 3D printers are good at producing objects that can't be made by other manufacturing techniques. This figure shows two such examples. Most users, however, don't need to create such complex models — at least, not for first projects. Most home users of 3D printing face the more standard problem of simply getting what they need out of a 3D printer.
 Two 3D-printed objects that would be almost impossible to produce on injection-molding machines.
As an example, if you wanted to print a model of a person for a scale-model railroad, you might want that person to be in a seated position with arms stretched out (see the following figure). Software packages such as Smith Micro's Poser and Trimble's SketchUp make this sort of modeling easy to do. A 3D-printing bureau that uses a professional selective laser sintering (SLS) 3D printer, such a professional operation would have no problem printing this model. Trying to print it yourself on a home 3D printer, however — especially as an ambitious early project — can be a real challenge.
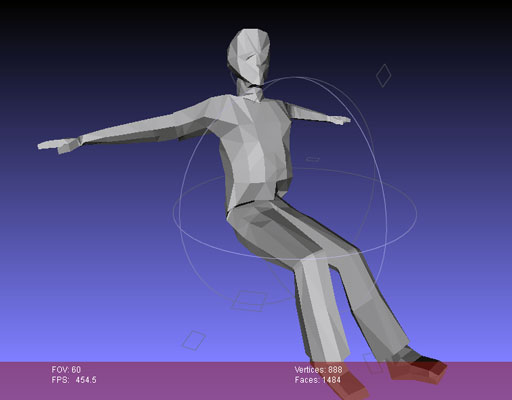 A posed person is a challenge to print on a home 3D printer; the model has overhangs where the printed material would lack support.
The main difficulty for fused filament fabrication (FFF) printers such as RepRap is that they can't extrude into free air; the object must be supported while the printing is going on. Each new layer needs a supporting layer to build on. In printing a model of a seated person, then, the feet and lower legs print just fine, but the 90-degree overhang of the upper legs and the outstretched arms present a problem: The extruded filament has nothing to attach to. With nowhere to go, the filament collapses into a mess of extruded spaghetti.
A professional SLS 3D printer works differently: It builds objects by using fine nylon powder. A laser melts the nylon layer and fuses the shape of the object; then another complete layer of fine powder is spread over the build surface, and the process repeats. The main difference is that all that spare unfused powder provides support for the fused parts as they build; the parts that eventually extend from the model into free air can be built with support from the unfused powder and stay in place while being printed. When the model cools and the excess powder is brushed off, the model is complete. Models printed this way can be almost any shape and complexity. That process isn't possible with home 3D printers — at least, not yet.
To help with this problem, you can use a support structure that builds a fine column of material from the base of the bed (or from the printed part itself) to support any overhanging features. The Slic3r software can detect where to add support. You can even use a second extruder to put a different support material in the build.
Normally, home 3D printers use the same material for the model as for the support material. All the extra material has to be snapped off, and the model cleaned up a little, when the print is complete (see the following figure). Slic3r model processing software can add support material automatically wherever it's required. This approach works well.
 The unprintable model (left) and the same model with breakaway support material (right).
Remember, though, that the support material is temporary and must be cut away when the print is finished. This cutting can leave marks and scarring. If the printed parts are intricate, removing the support by hand can be difficult.
 Take care when removing the support material; small, fragile parts can be damaged or snapped off.
 This support structure is mostly hollow and easily removable with needle-nose pliers. Further cleanup may require a sharp blade or small file.
Using a second extruder to provide a more workable support material — say, a thermoplastic such as polyvinyl alcohol (PVA) — allows you to trim the object by submerging it in warm water. The PVA dissolves, revealing the finished model. Dissolvable support material will probably be a commonplace feature of future home 3D printers.
3D printers like the BCN3D Sigma (see Figure 15-6) use a dual X-carriage system that allows two different materials to be printed with independent extrusion and movement systems. A primary material can be loaded and used on the left extrusion system while the right system is parked. When a support structure is required, the left head can park, and the right head takes over. This system allows much more freedom in model creation. Desktop 3D printers are not quite at the point of being able to print "anything" — for example, very fine details in jewelry where even support material can't "support" the fine structures using the thermoplastic materials we have available — but the technology is moving in the right direction.
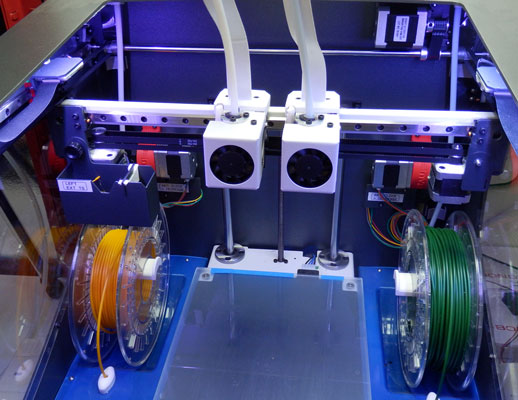 The dual independent carriages of the BCN3D Sigma allow you to use two different materials without one oozing on the other or getting in the way of printing.
You can get around (or minimize) the use of support material by rotating the model in Netfabb before printing. If you rotate a model of a seated person so that the back and arms are on the base of the print surface, for example, you may not have to use support material at all.
 Rotating a model in Netfabb to make printing easier.
No wonder 3D-printing sites often provide models designed for home 3D printing. A model of a person would most likely be posed standing straight up, with hands by the sides or in contact with the upper legs. In either case, no extra support material is needed, so the model can be printed easily on a home 3D printer. Most home users would struggle to print models in more complicated poses, due to the way that 3D printers build up models layer by layer. For this reason, if you require a model of a seated person, you may have to use support material.
Another way to avoid adding support material is to divide a complex model into two or more parts, each of which requires little or no support material. After printing these parts, you can join them with glue.
You may be better off dividing complicated objects into subassemblies. All parts are printed flat on the build plate and later assembled into complex, functioning objects. The planetary gearbox shown here is a real challenge — even for a professional-grade 3D printer — to build as one complete, functioning object with no manual assembly required. Stay tuned, though; this goal is getting closer all the time. A multistage planetary gearbox. Home 3D printers can make all the parts, but some assembly is still required.

