


Windows Server 2008 includes a useful new management console called Share and Storage Management, as shown in the following illustration. From this console, you can easily create new shares, set up the permissions for a share, remove a share, and so on. To summon the File Server Manager, choose Start→Administrative Tools→Share and Storage Management.
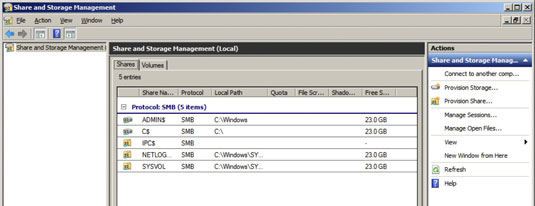
To be useful, a file server should offer one or more shares — folders that have been designated as publicly accessible via the network. You can see a list of the current shares available from a file server by firing up the File Server Manager and clicking Shares in the console tree. The Share and Storage Management console displays the share name, description, and network path for each share that you’ve already created.
To create additional shares, use the Provision a Shared Folder Wizard, as described in the following procedure.
In the Share and Storage Management console, choose Provision Share.
The opening screen of the Provision a Shared Folder Wizard appears. Here, the wizard asks you what folder you want to share.

Type the path of the folder that you want to share over the network and then click Next.
If you aren’t sure of the path, you can click Browse. This action calls up a dialog box that lets you search the server’s hard drive for a folder to share. You can also create a new folder from this dialog box if the folder that you want to share doesn’t yet exist. After you’ve selected or created the folder to share, click OK to return to the wizard.

Change the NTFS Permissions if you want and then click Next.
The NTFS permissions are the permissions that are applied to the folder that you are sharing, not to the share itself. If you want to change the underlying NTFS permissions for the folder you are sharing, click Edit Permissions and set the permissions the way you want.
Otherwise, click Next to proceed to the next step. The wizard displays the dialog box which lets you set the name this share will be known by.

Type the name that you want to use for the share in the Share Name box.
The default name is the name of the folder being shared. If the folder name is long, you can use a more succinct name here.
Windows Server 2008 includes the ability to share files using the Unix NFS file protocol. If you’ve enabled NFS sharing on this computer, this dialog box also lets you set the sharing information for NFS.
Click Next.
This dialog box appears.

Enter a description for the share and then click Next.
The dialog box shown below appears.

Select the sharing permissions you want to impose.
You have four choices:
All users have read-only access. Use this option to share information that you want everyone to have access to, but you don’t want to allow anyone to change the information.
Administrators have full control, and everyone else has read-only access.
Administrators have full control, and everyone else has read/write access.
Custom permissions: When you select this option, you can then click the Permissions button to set custom permissions.
Click Next.
The following dialog box appears.

If you’ve set up a Distributed File System (DFS) namespace and want to connect this share to it, select the Publish the SMB Share to a DFS Namespace check box.
DFS is a system that lets you combine two or more separate file shares under a single name. Its purpose is to simplify the management of large file server networks, so it is typically used only on networks that have a large number of file servers.
If you’ve never heard of DFS until now, skip this step.
Click Next.
This dialog box appears.

Verify that all the settings are correct and then click Create.
The share is created, and a final confirmation dialog box is displayed.


